Install and Conduct Exam Using Desktop Application for Windows
Steps to Download Application
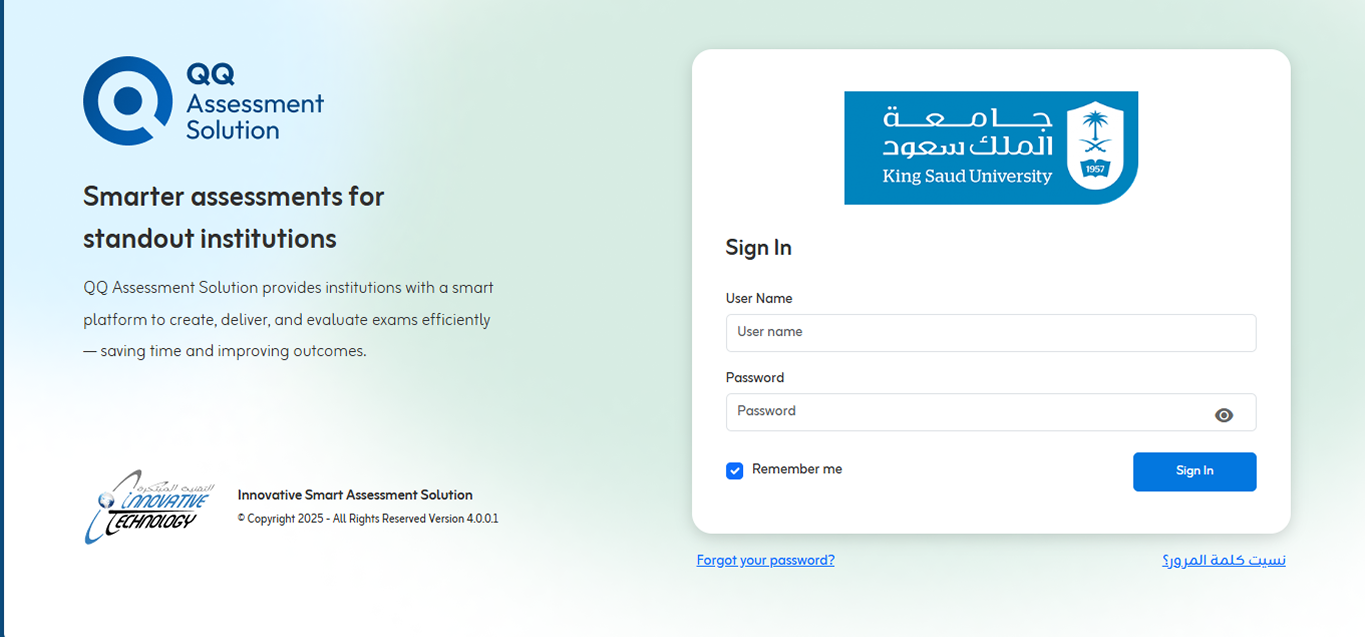
To download QQ application for exam conduction, go to the QQ web portal.
Provide your credentials to log in to the web portal.
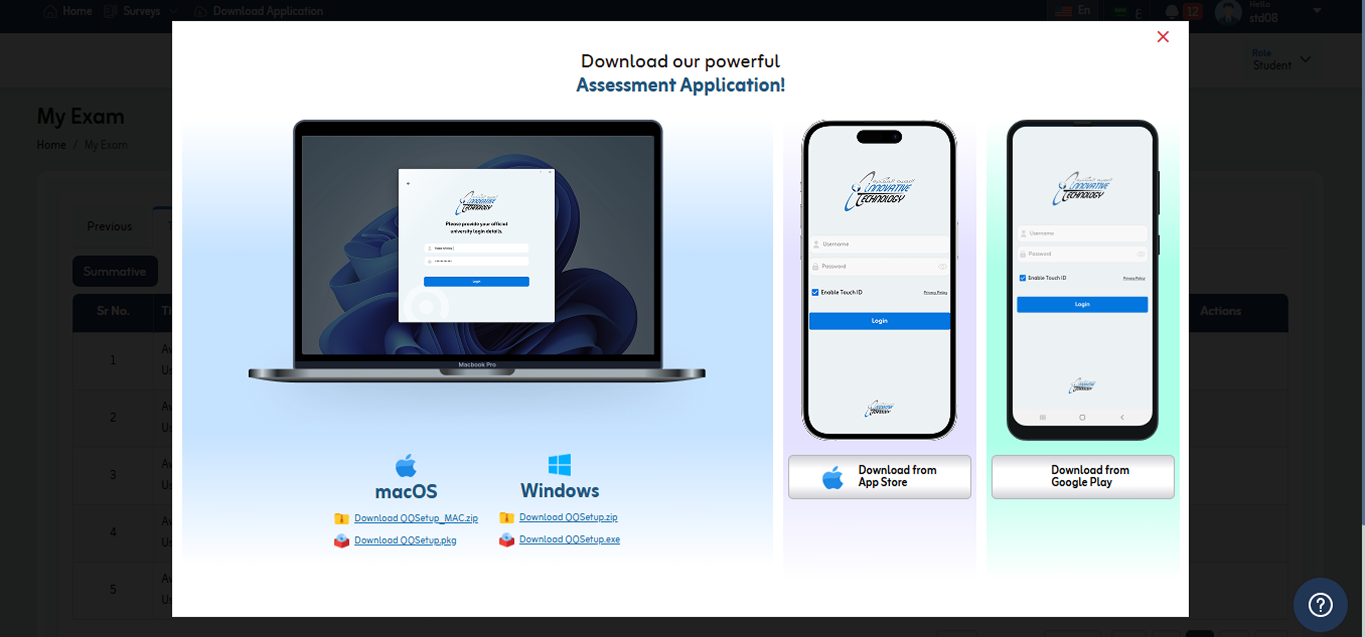
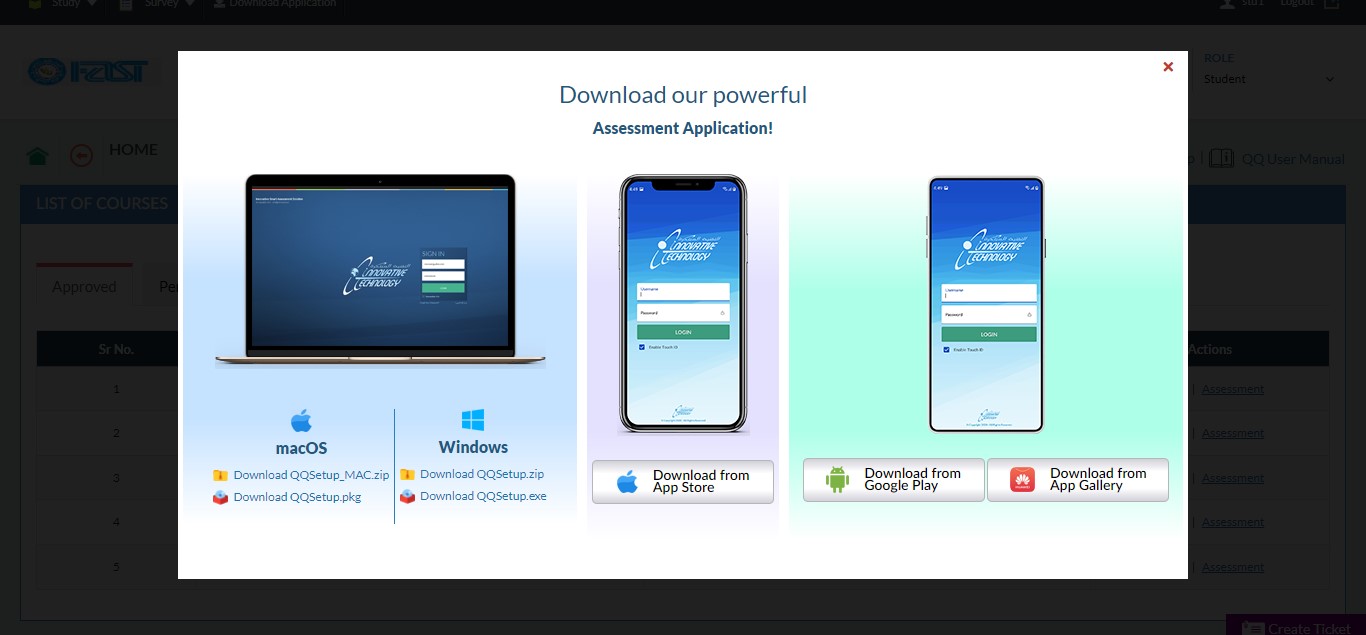
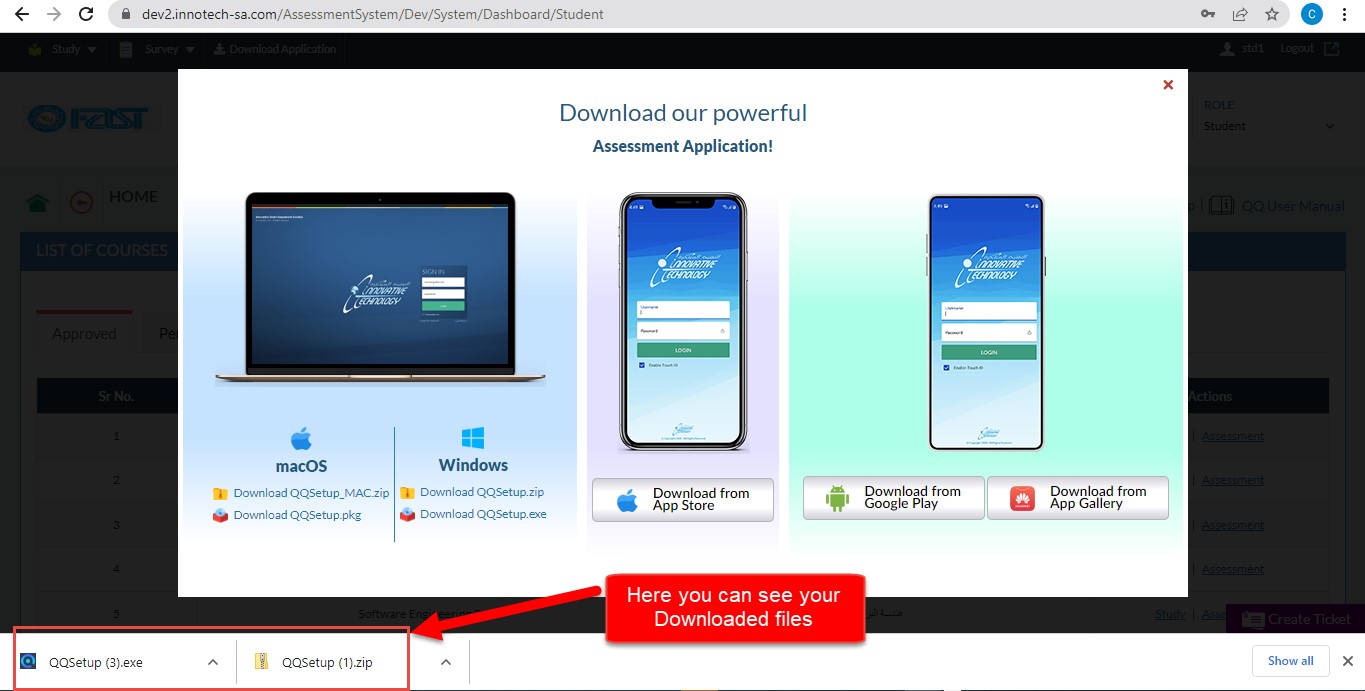
After successful login a popup will appear that provides links to download QQ assessment app on all available handheld devices.
There are two options to download the QQ Application for desktop.
- Desktop Application for windows
- Desktop Application for Mac
Download and install QQ Application for windows
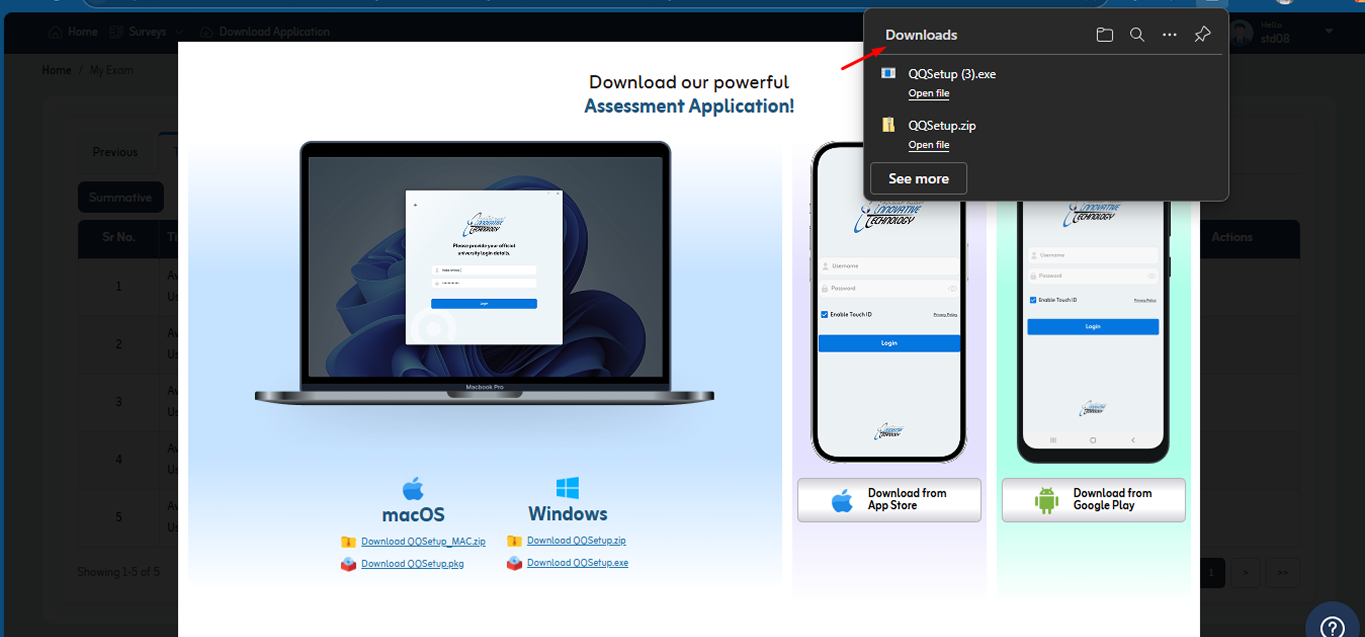
- You can download (QQ) application as an Archive.
Simply click on the Downloaded QQ Setup.zip link to download zip file.
- You can also download the direct .exe file of application setup through QQSetup.exe link.
Now select the file you want to download. When you click on the desired link, the file will start to download.
Please wait till the QQ Assessment Application is downloaded.
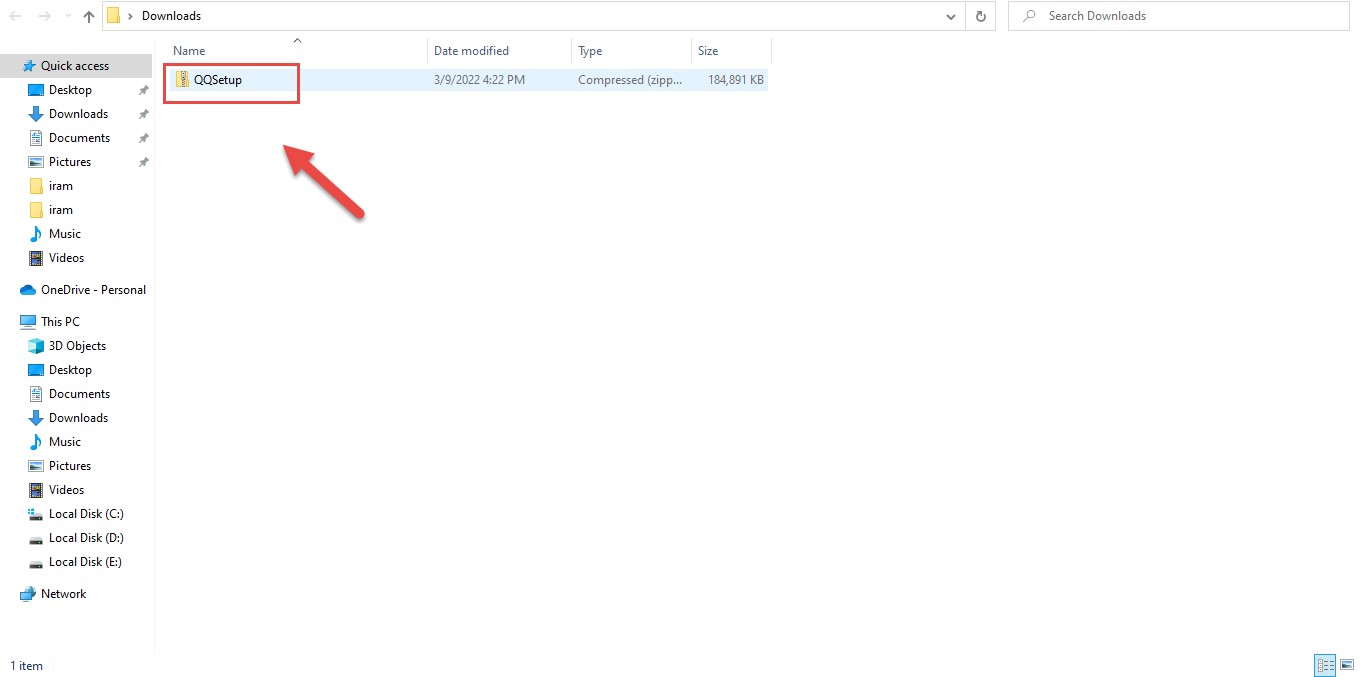
You’ll find the QQ Assessment Application Setup archive file or .exe file setup in your “Download” folder once you’ve downloaded it.
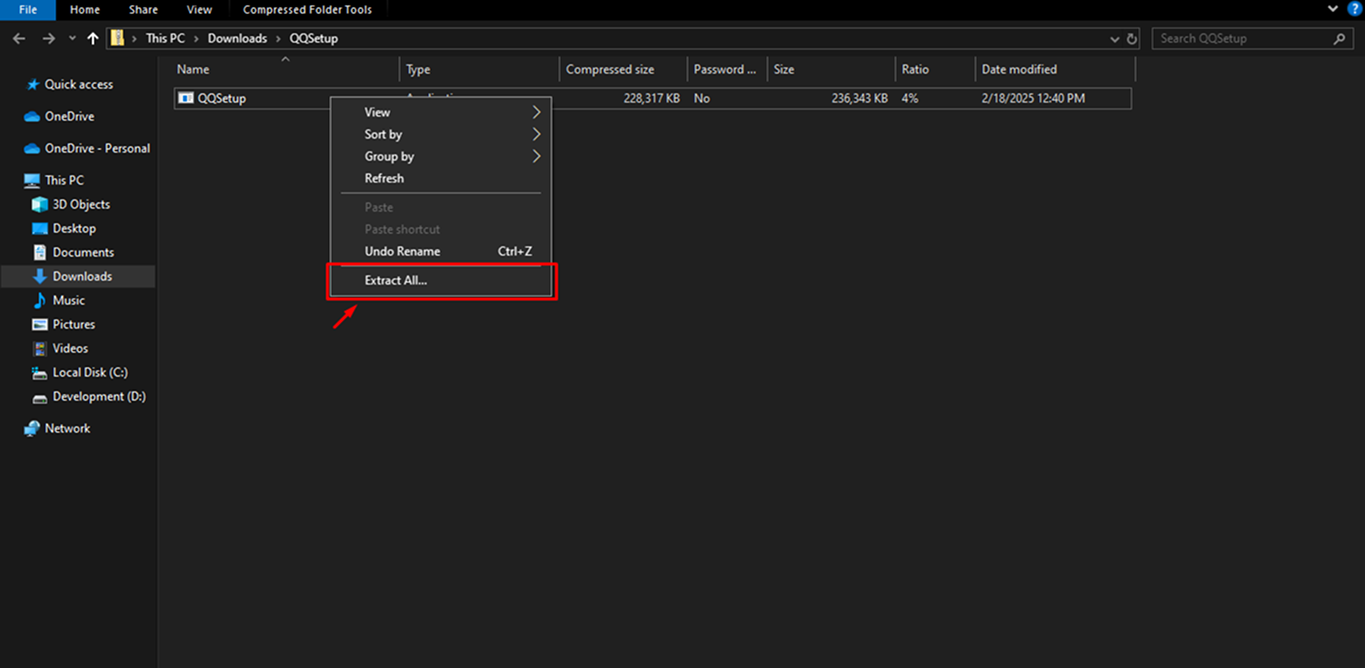
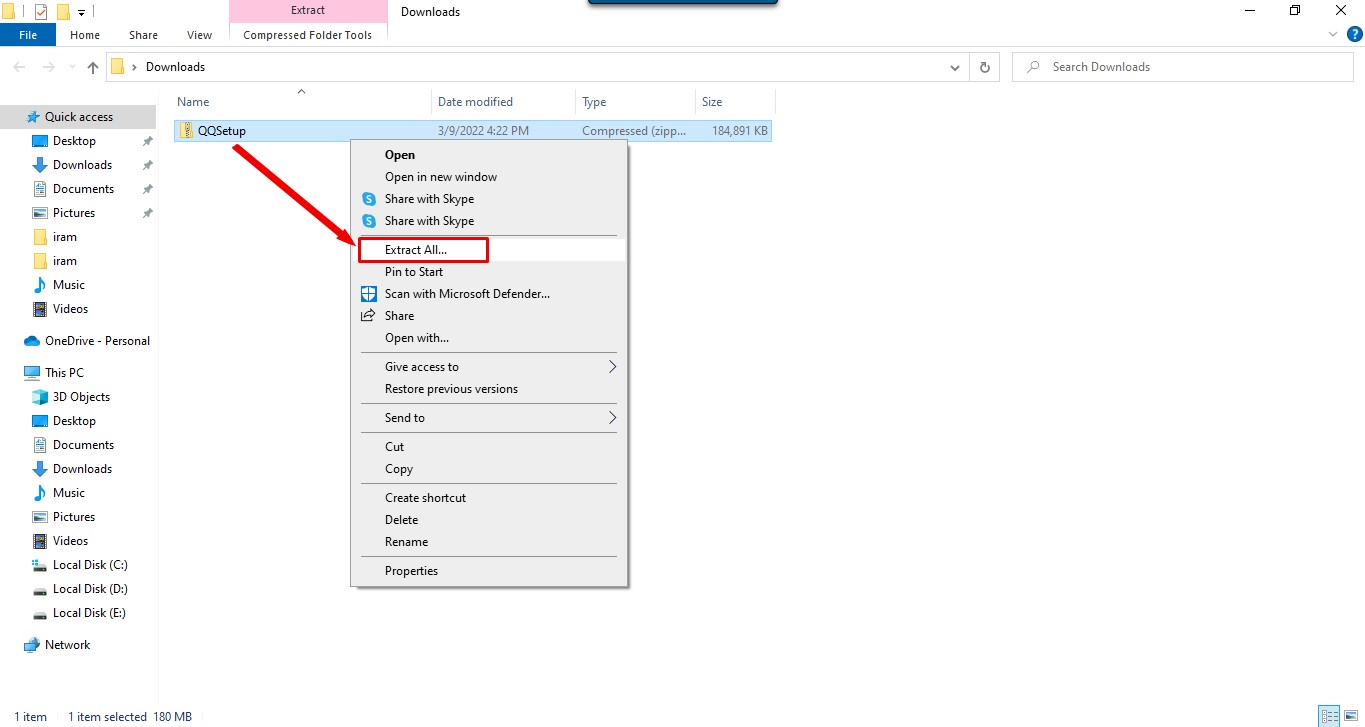
Right click on the downloaded file, and then click on “Extract All” from the list.
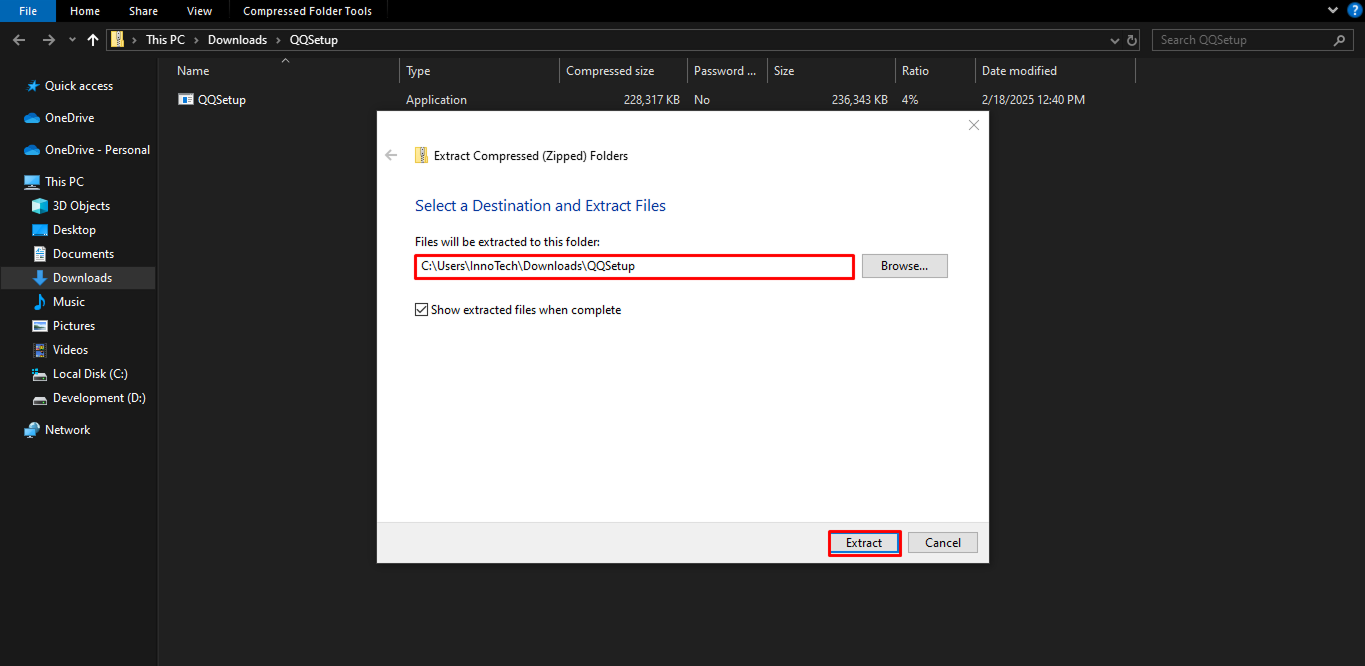
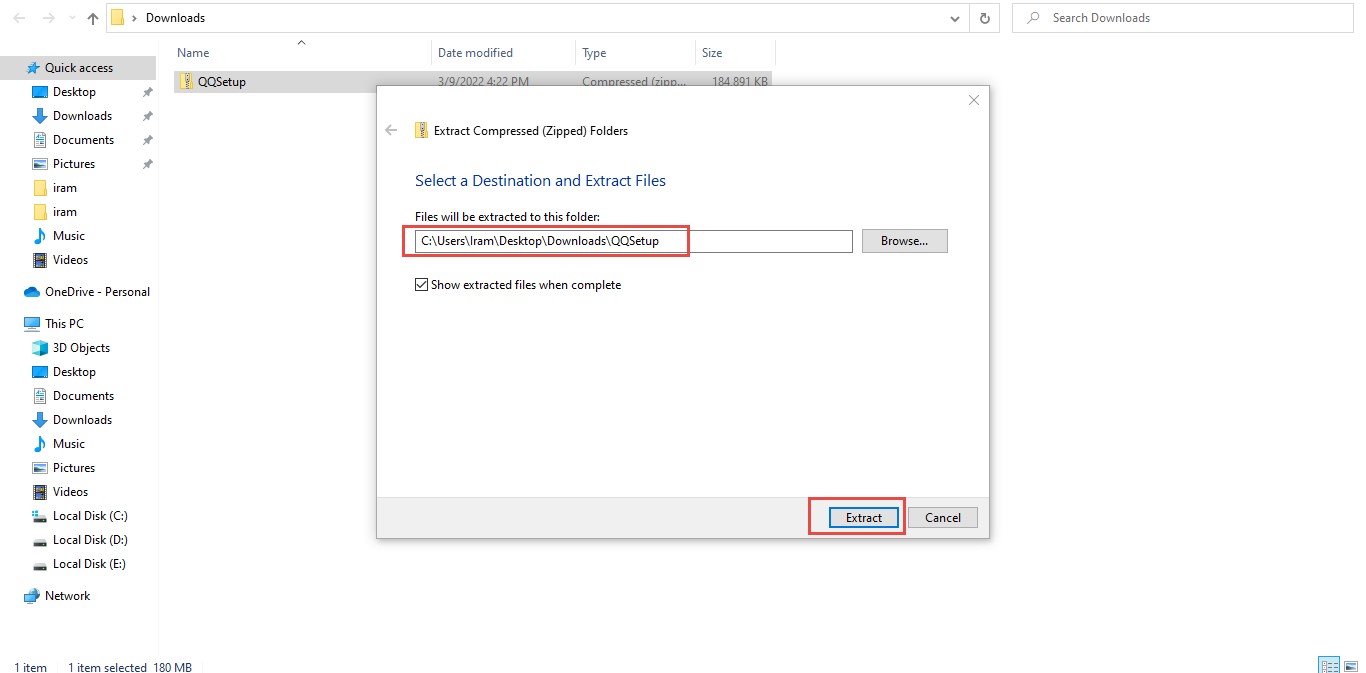
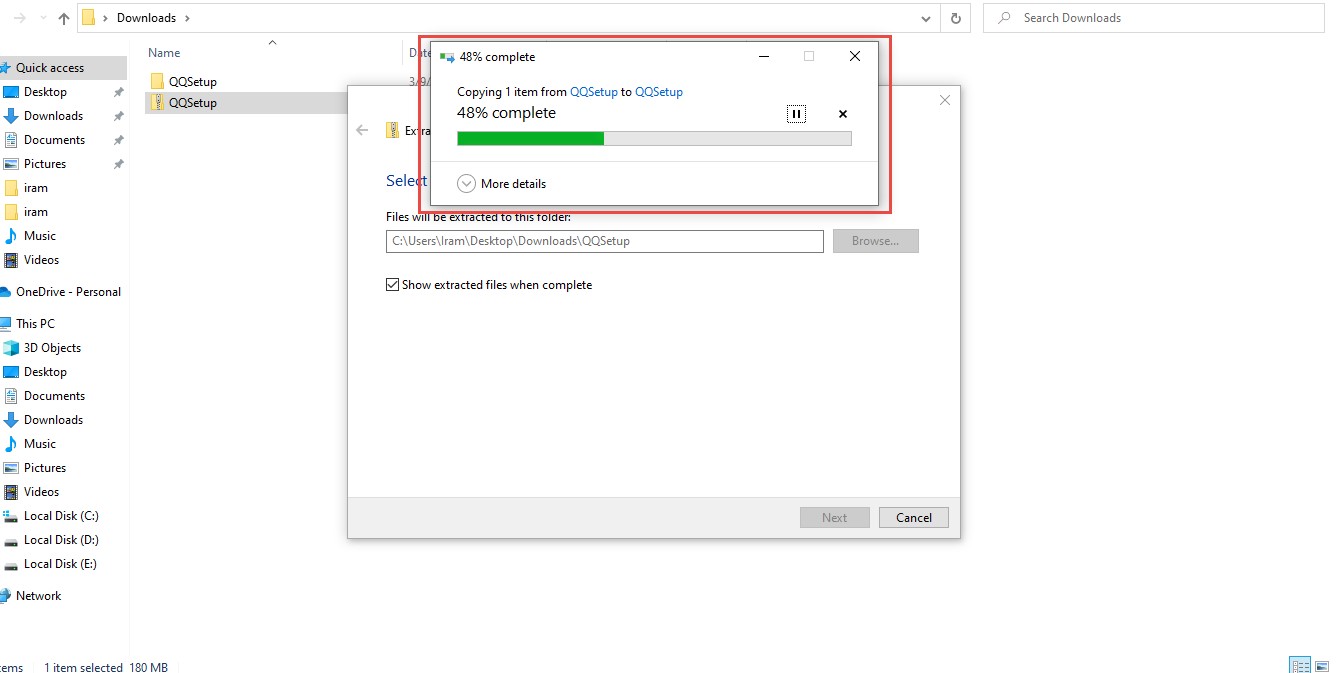
Now you are on the below screen after clicking Extract All.
Please keep in mind that your file is extracted to the location specified in the extracted folder textbox; if necessary, you can change the current location to your preferred location.
Press the Extract button.
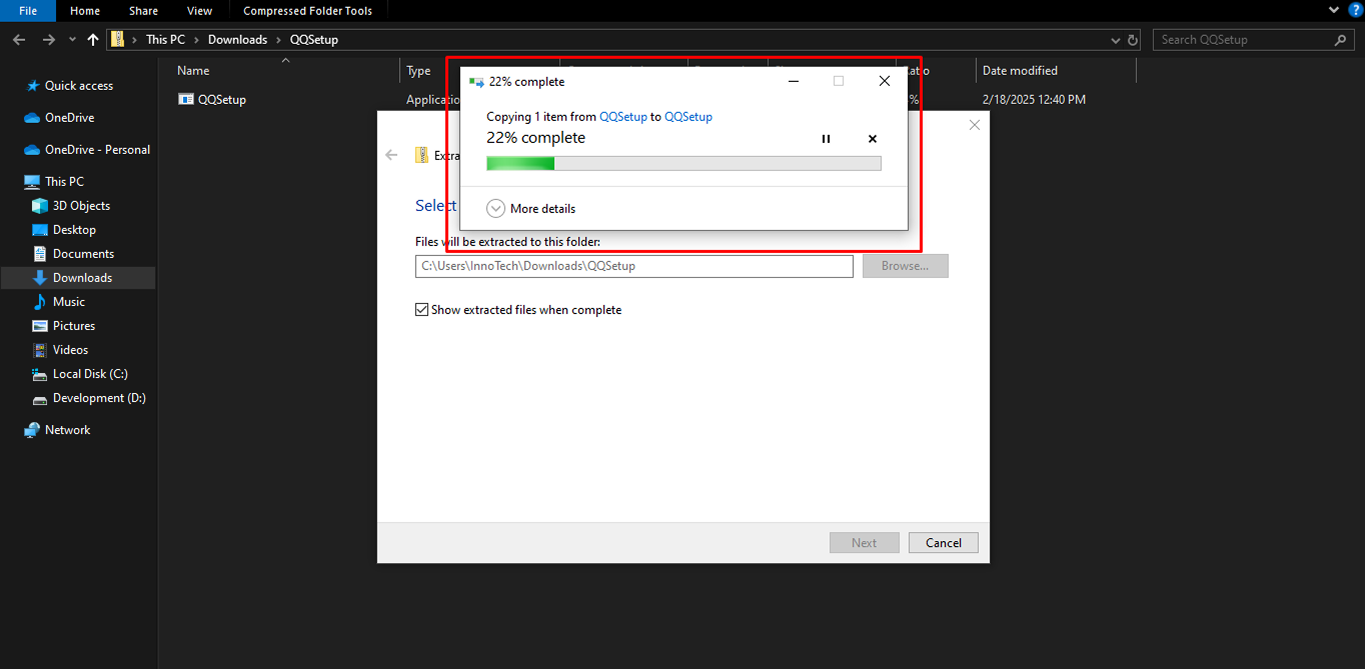
Please wait until the extraction is complete before proceeding.
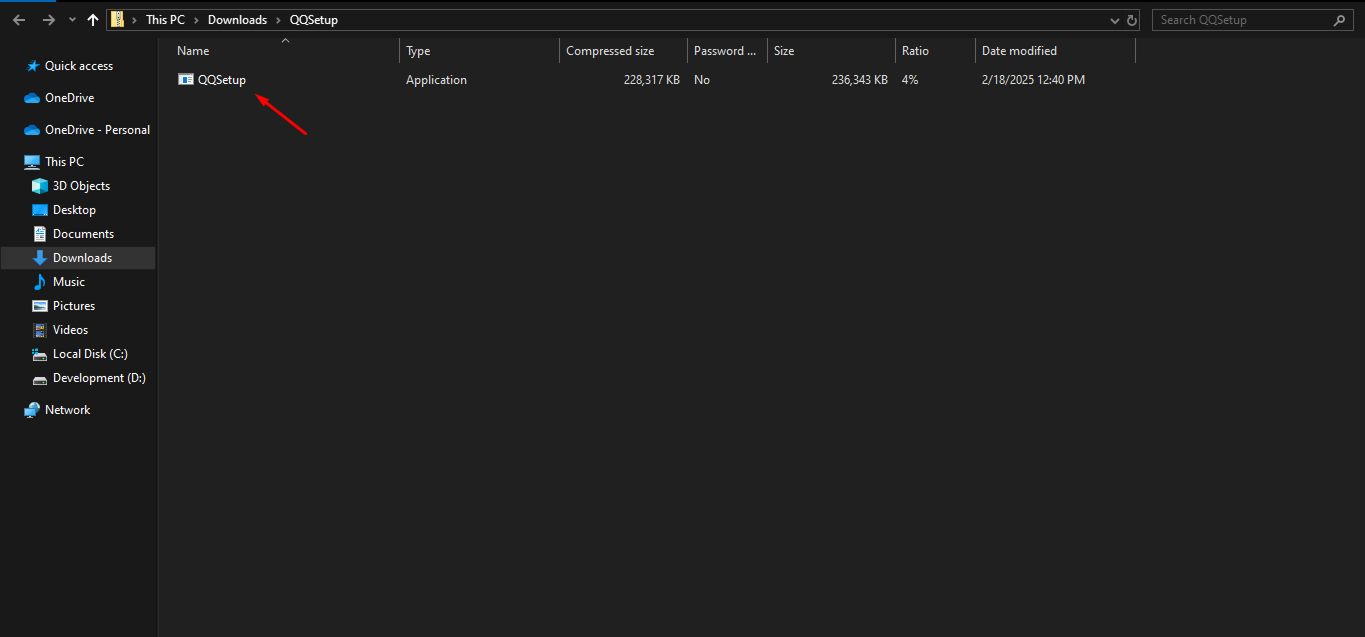
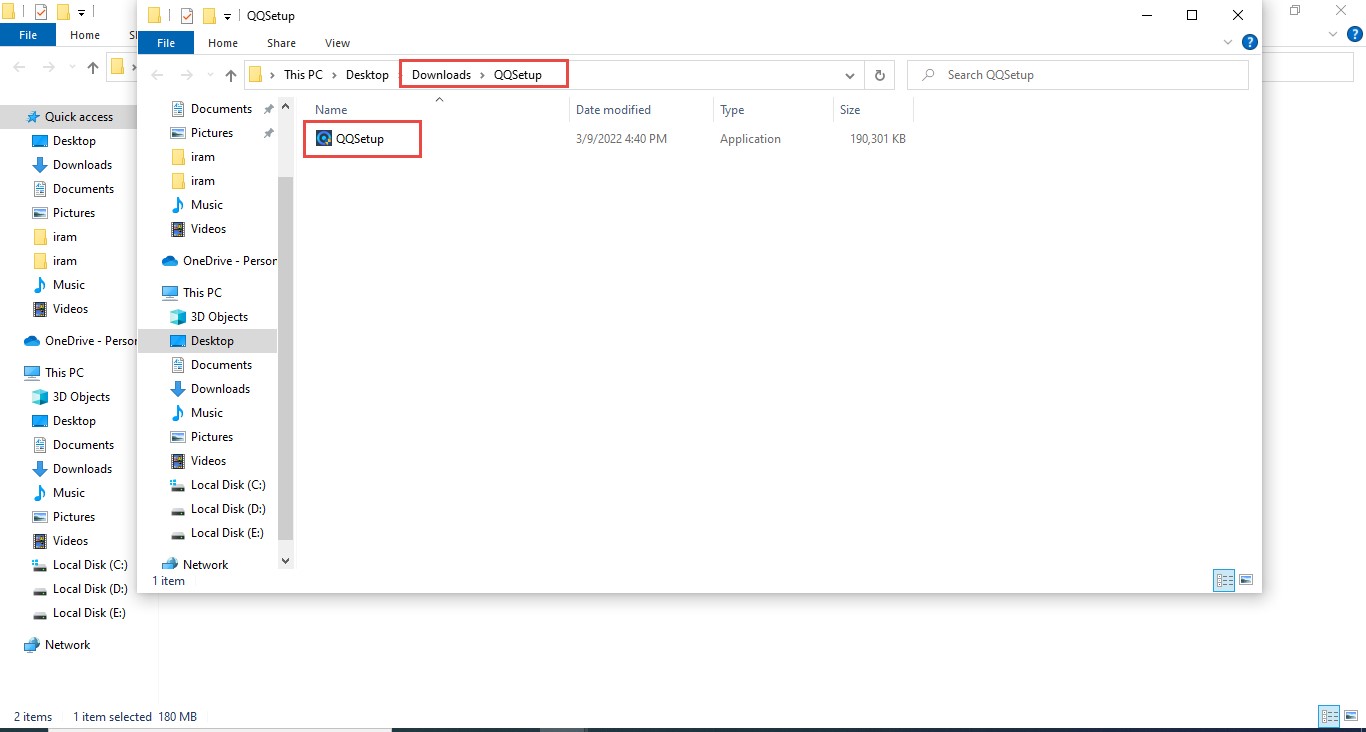
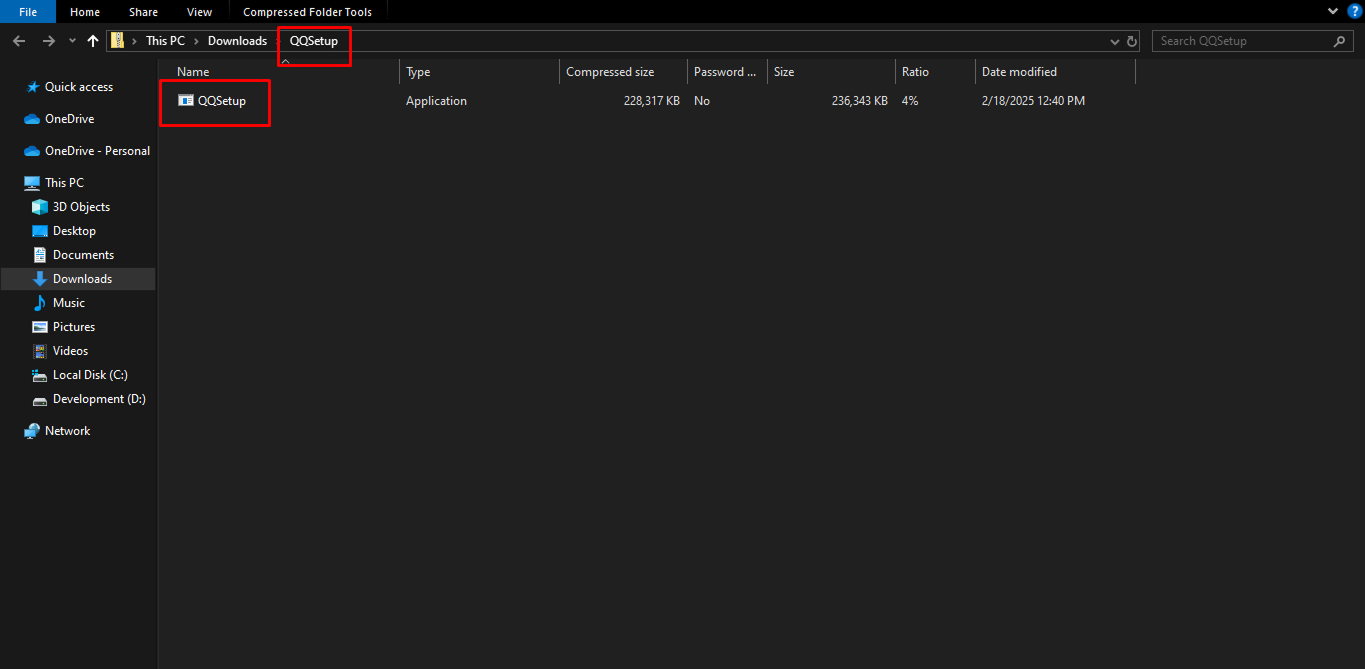
After successful extraction, A new folder will be created automatically as QQSetup.
In the QQSetup folder, you can find “QQSetup” file.
 Steps to Install QQ Application:
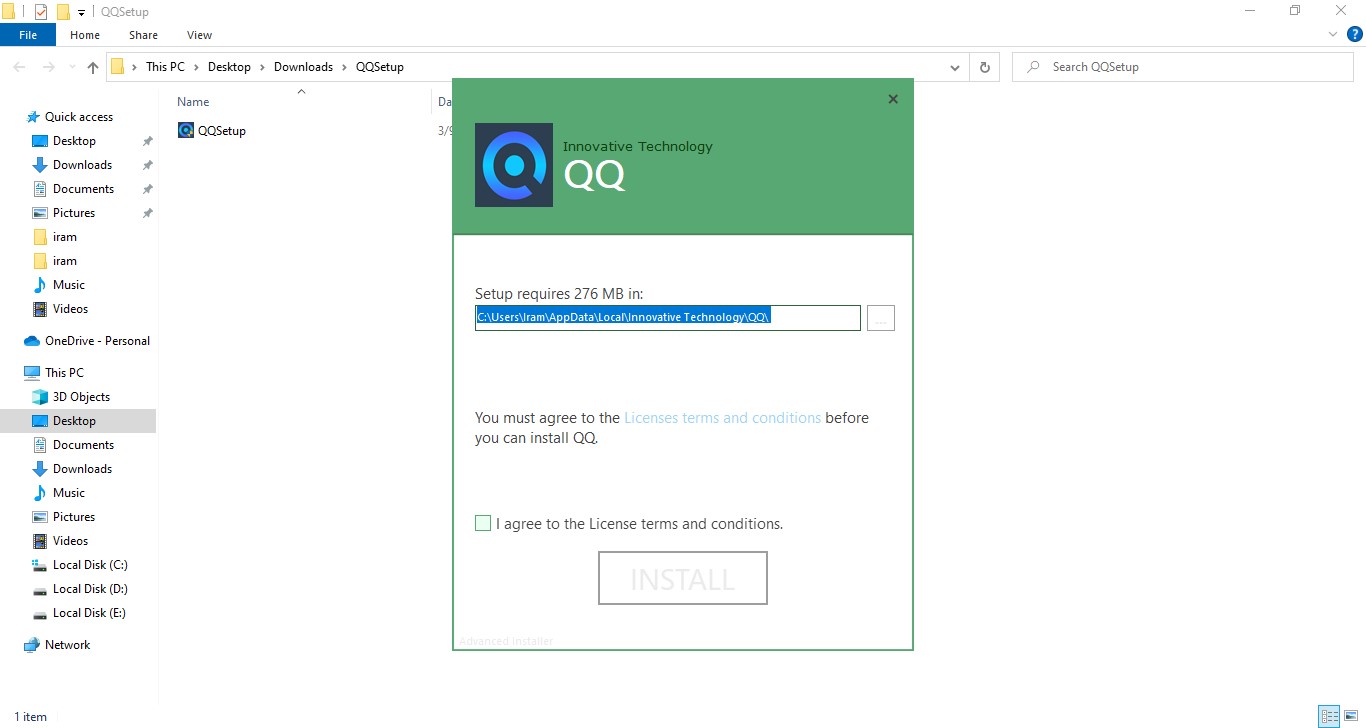
Double-click on “QQSetup.exe” to install.
A popup will appear. You must accept the application’s terms and conditions.
If you do not accept it, you will not be able to install the application.
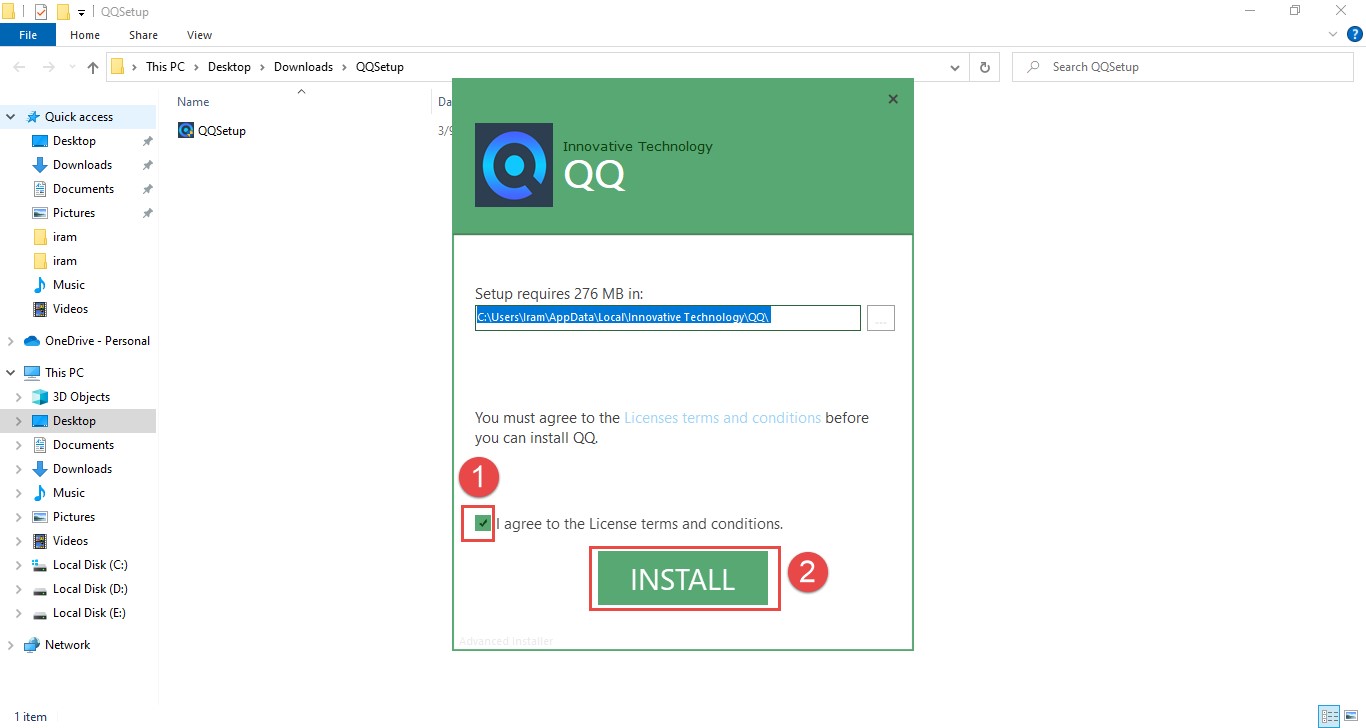
- Click the check box to accept the terms and condition
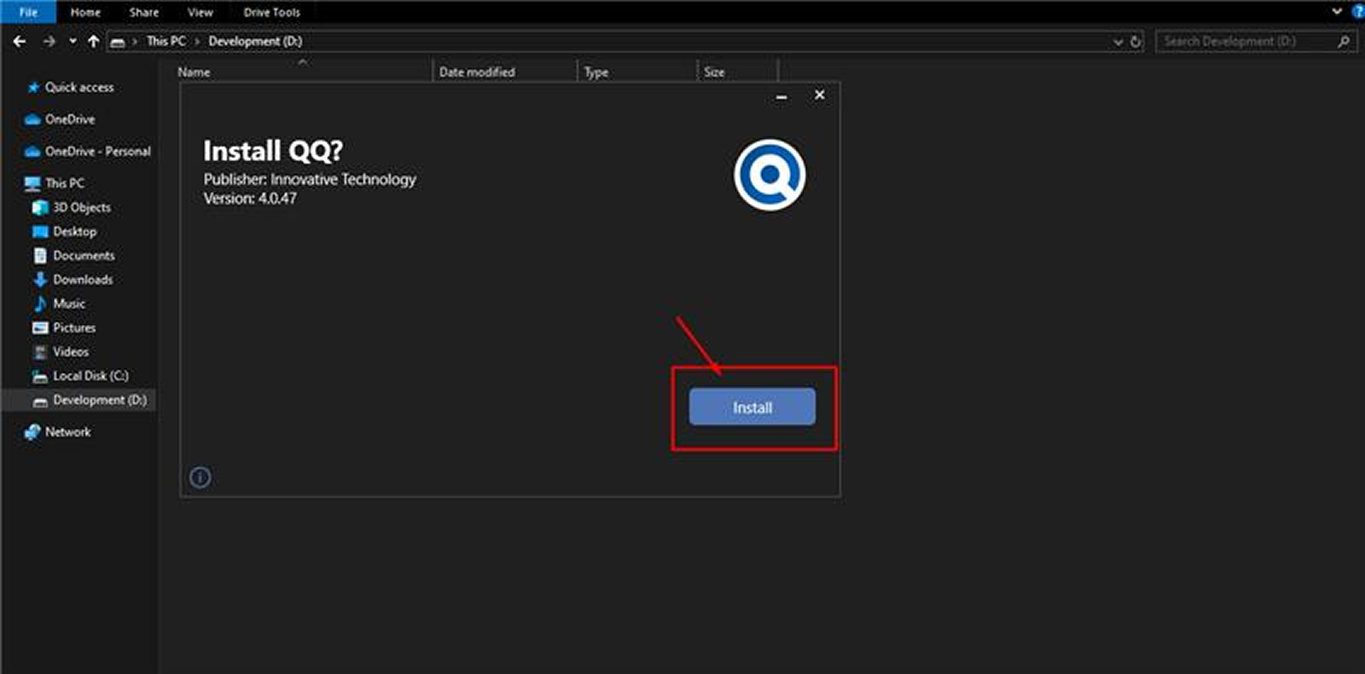
- click the “Install” button to proceed.
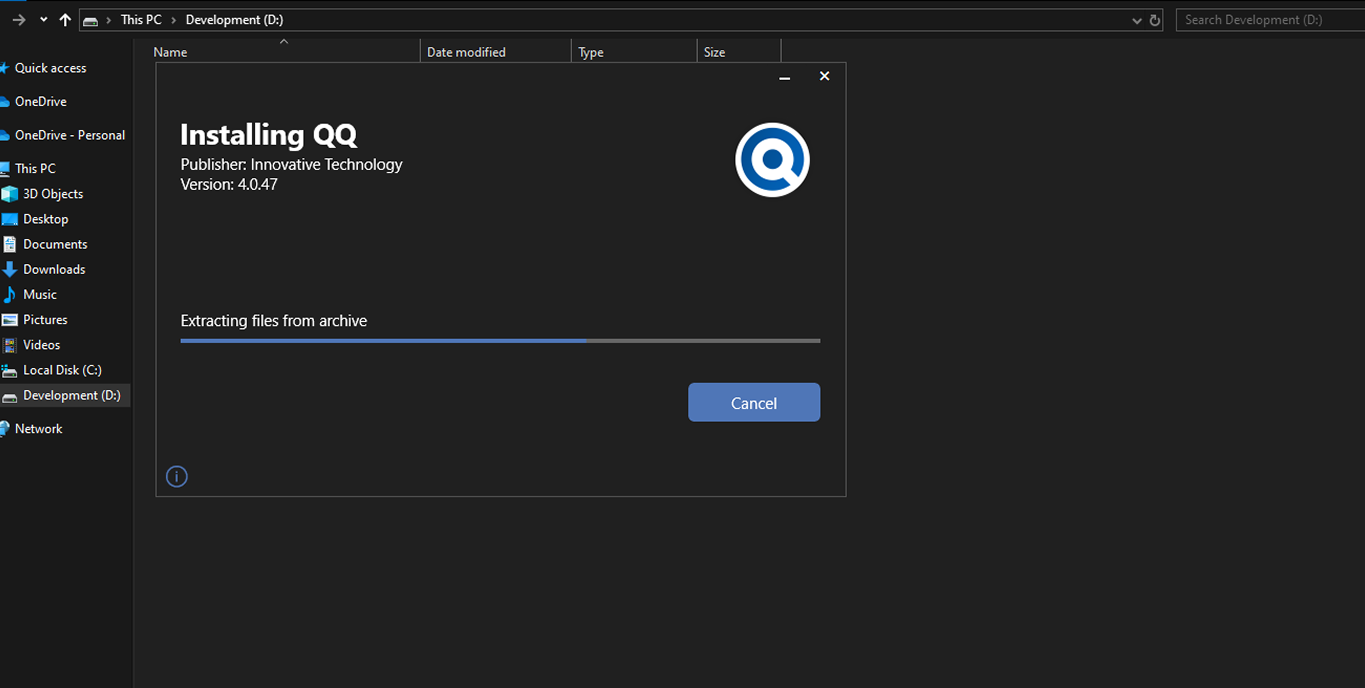
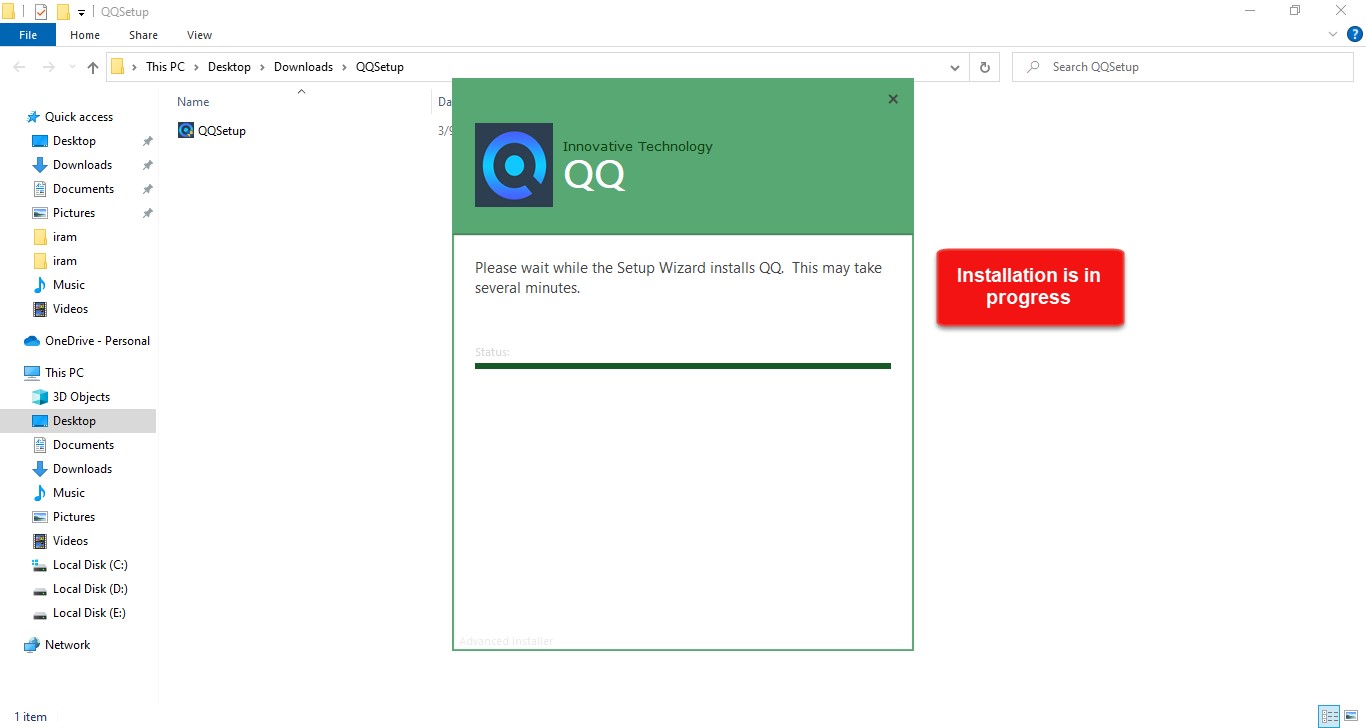
Please wait until the installation is complete before proceeding. The installation takes several minutes.
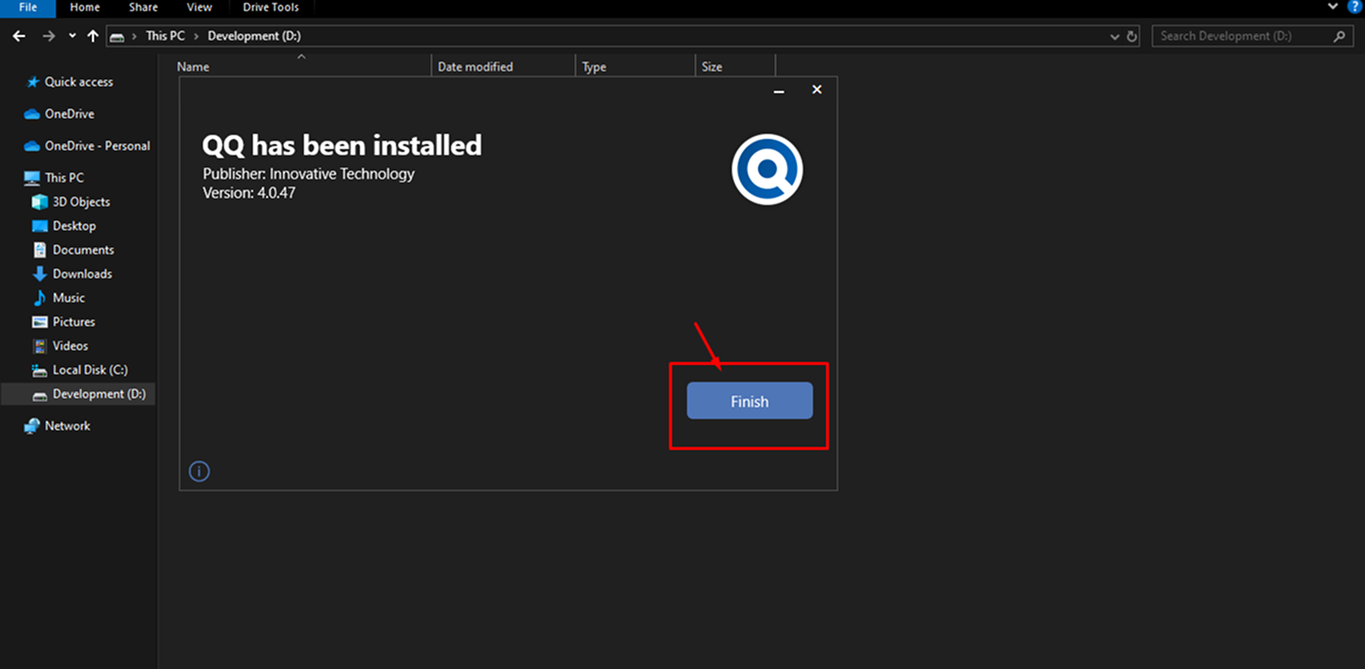
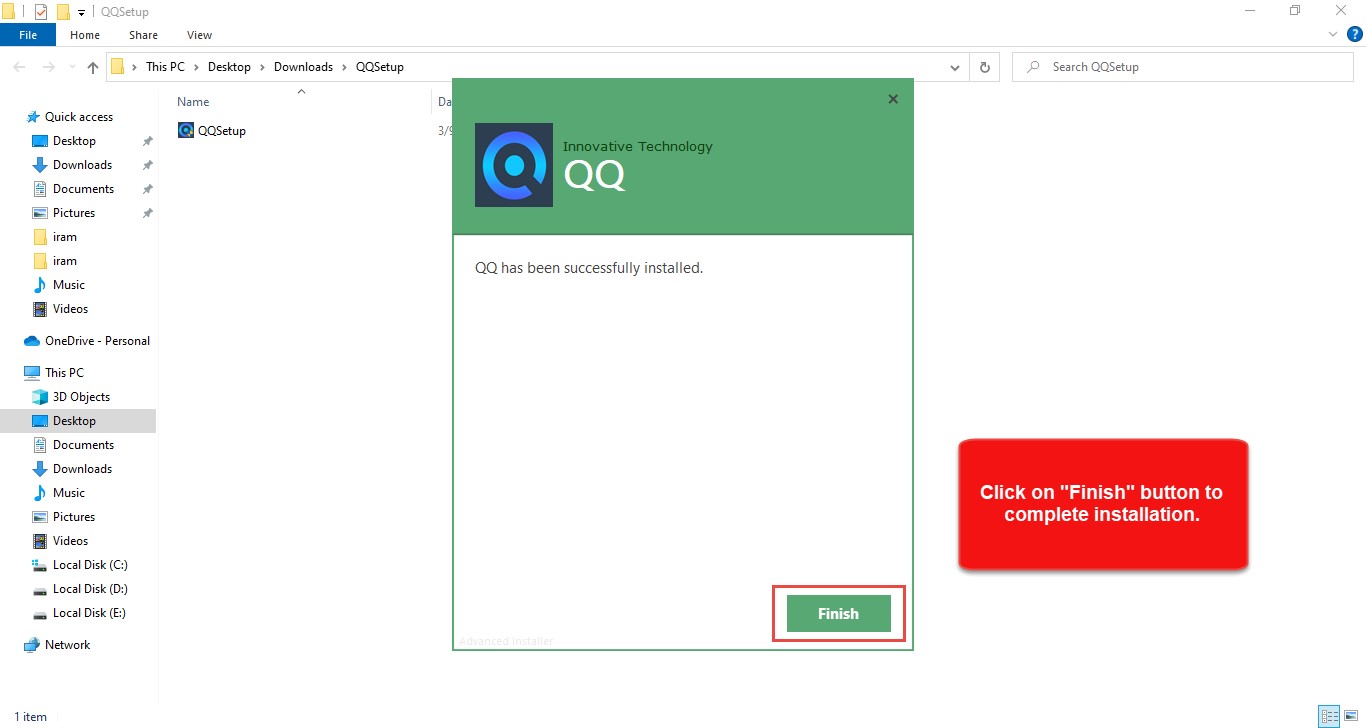
Please click “Finish” button once the installation is complete
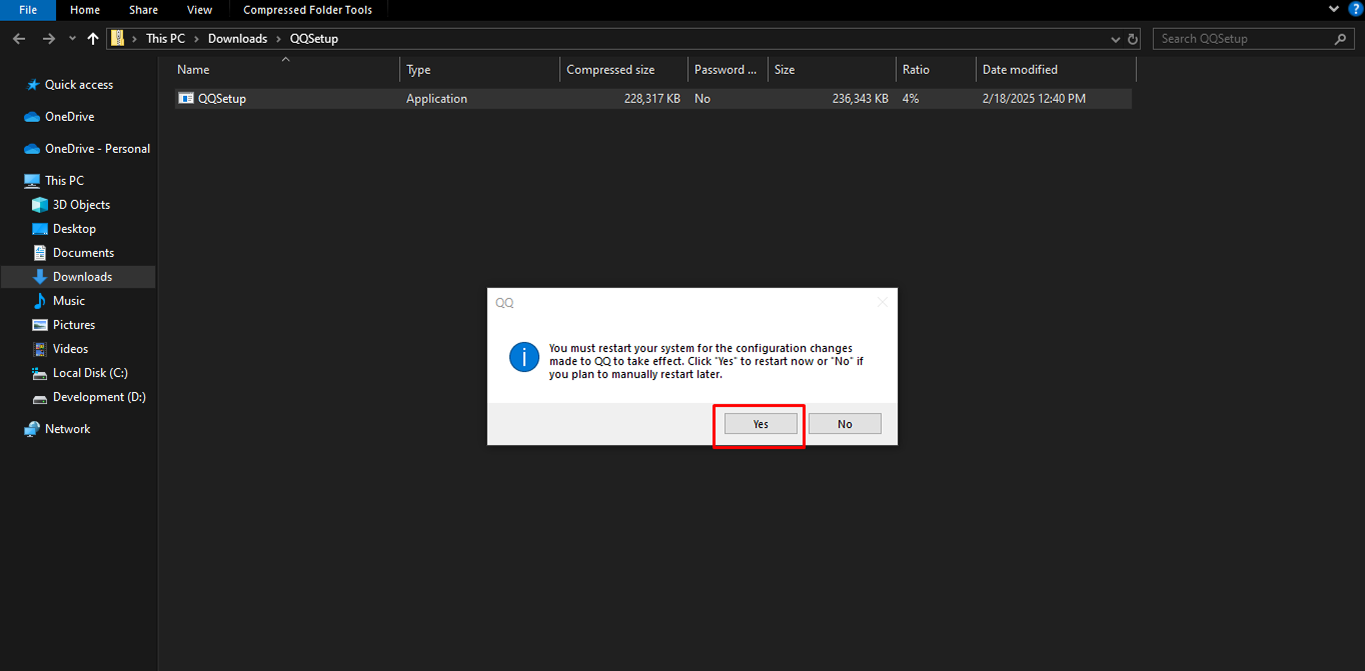
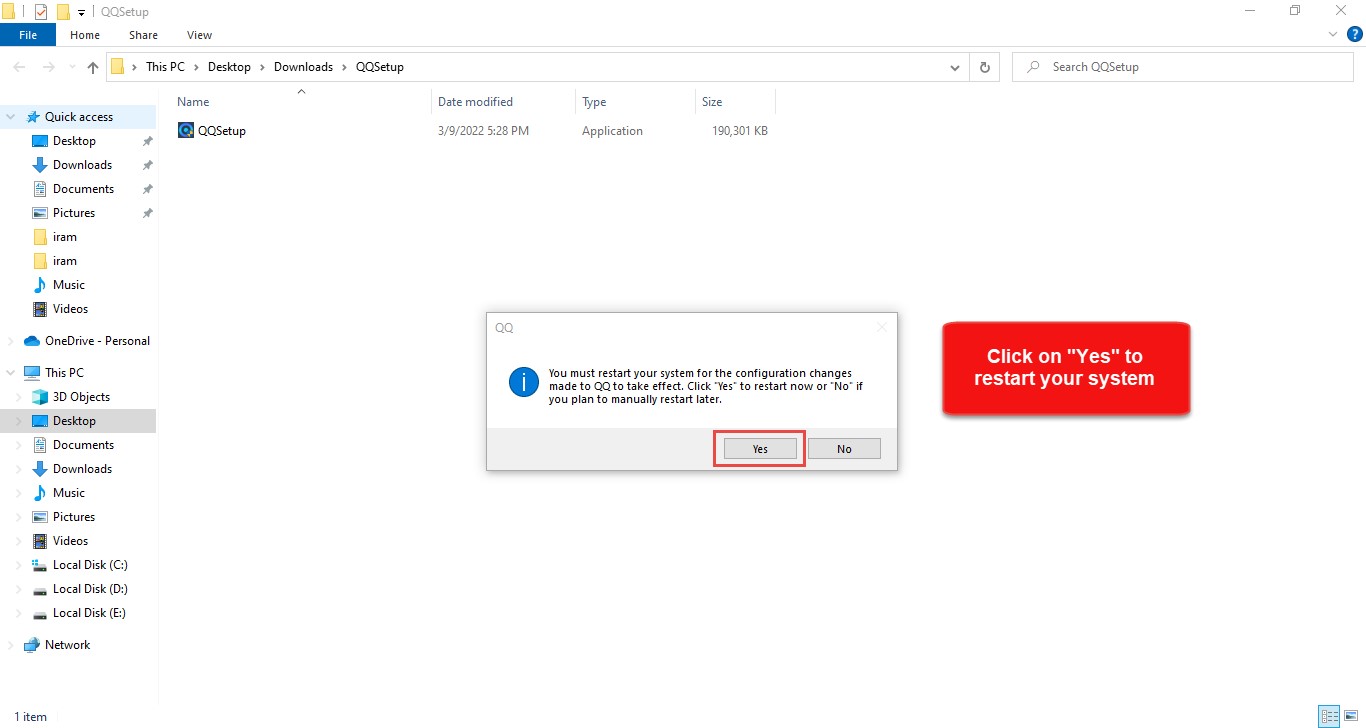
Before using QQ Application, you must restart your system. Select “Yes” to restart your system.
If you want to restart it later, select “No.”
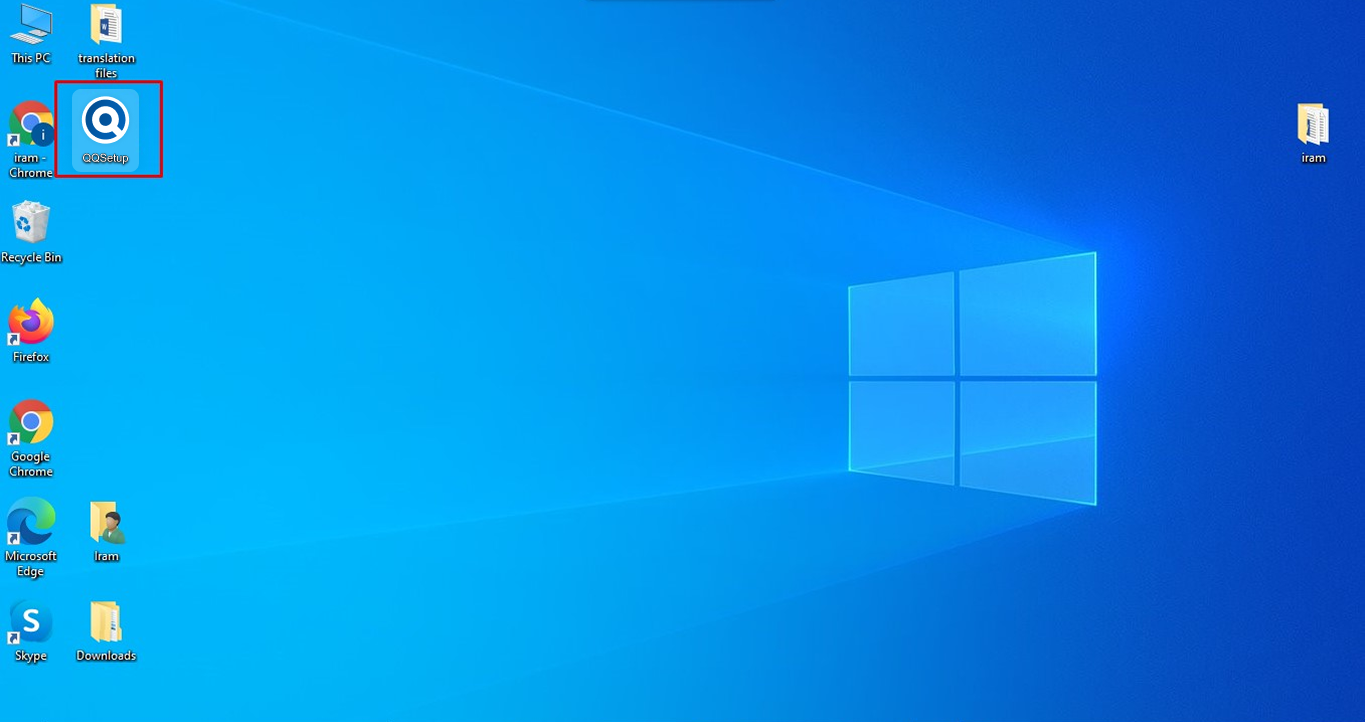
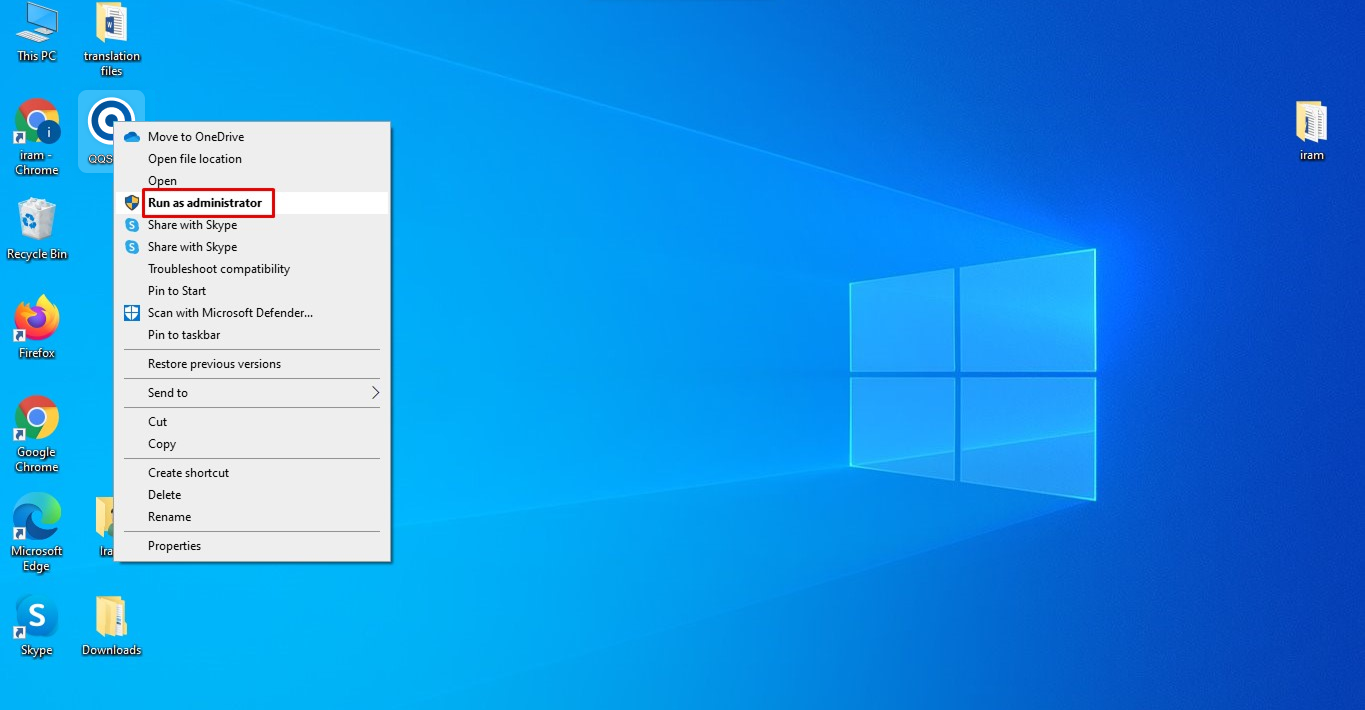
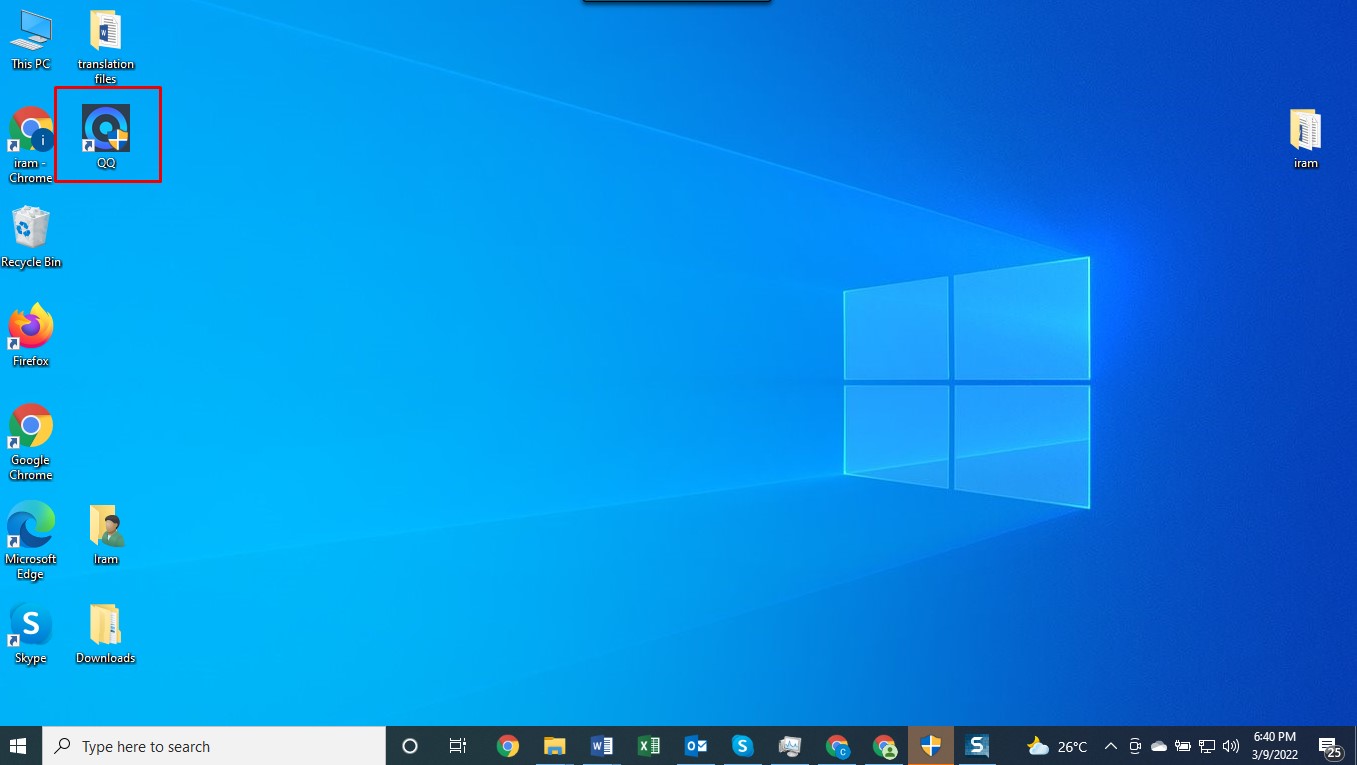
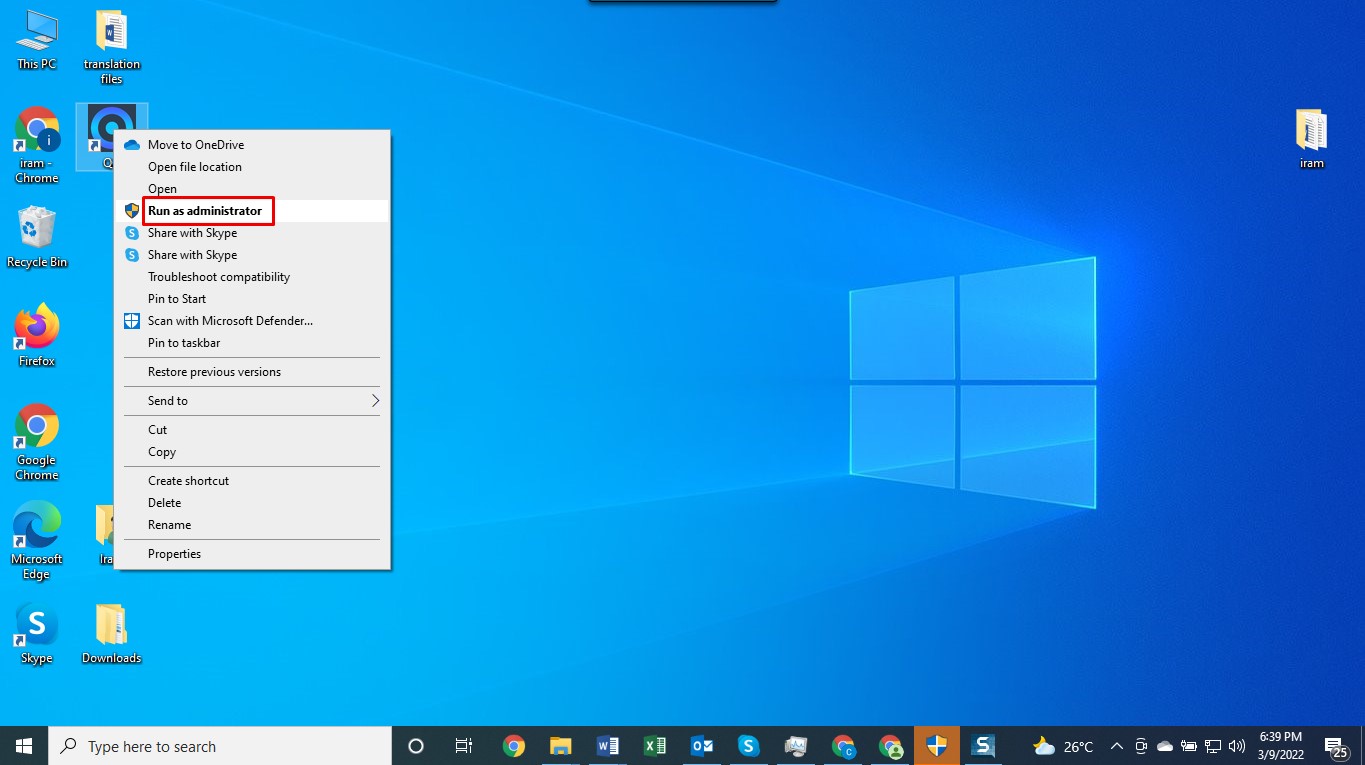
On your desktop window, you can see your “QQ Application.”
To run QQ application right-click on it and select Run as Administrator.
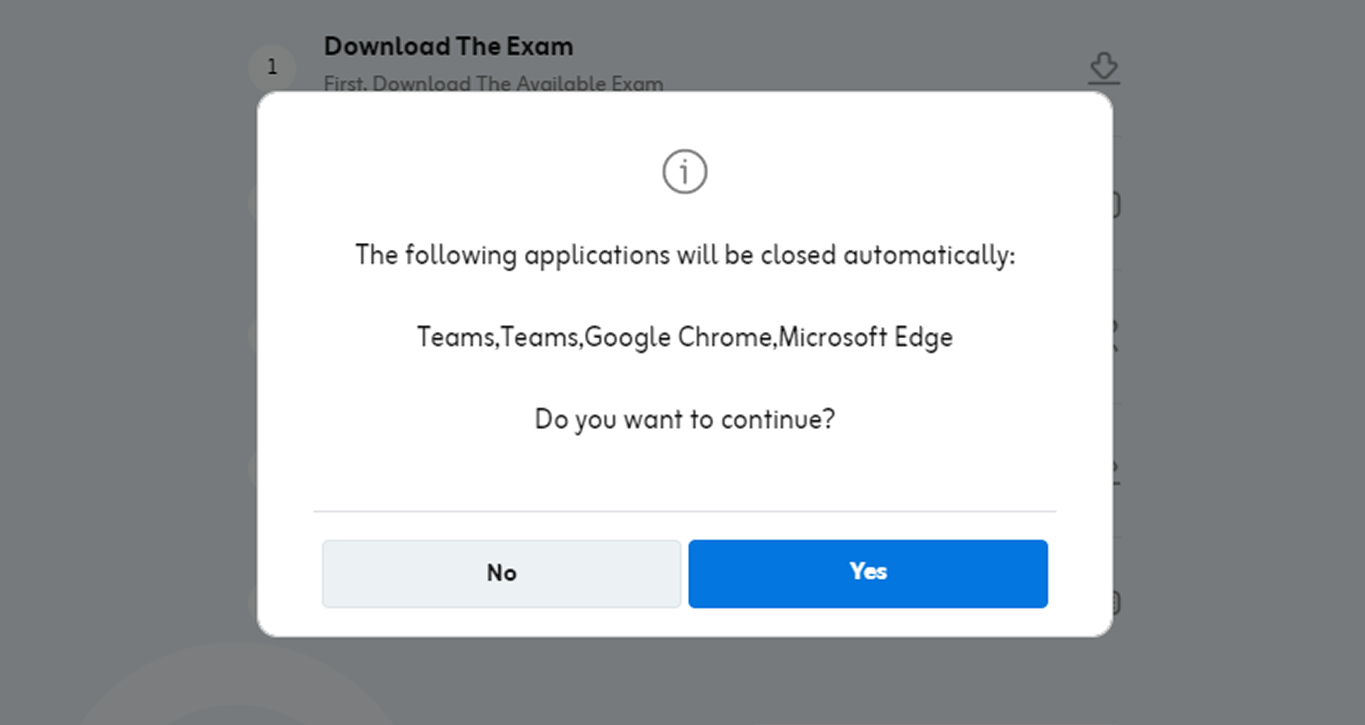
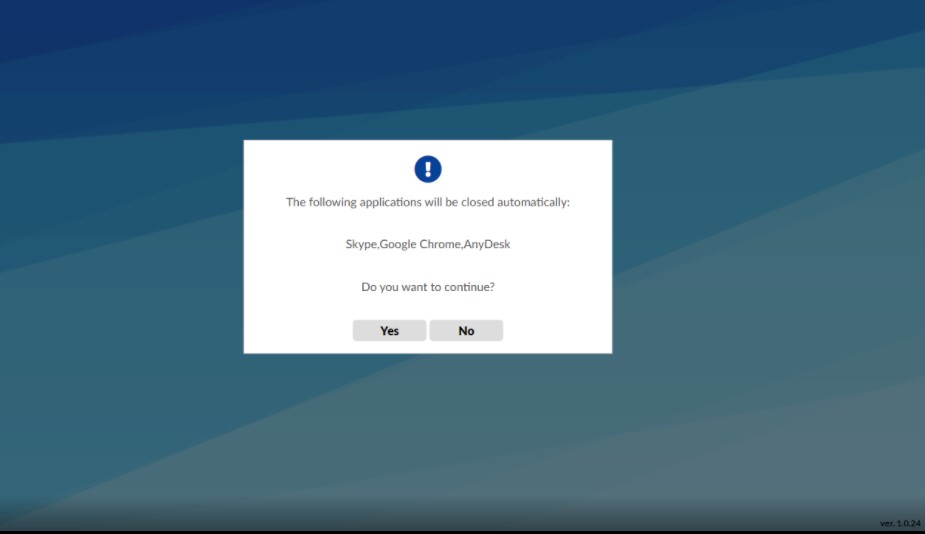
You are now redirected to a popup that notifies you that you will be unable to access any other application while using the QQ Application.
Click “Yes” to continue with the QQ Application.
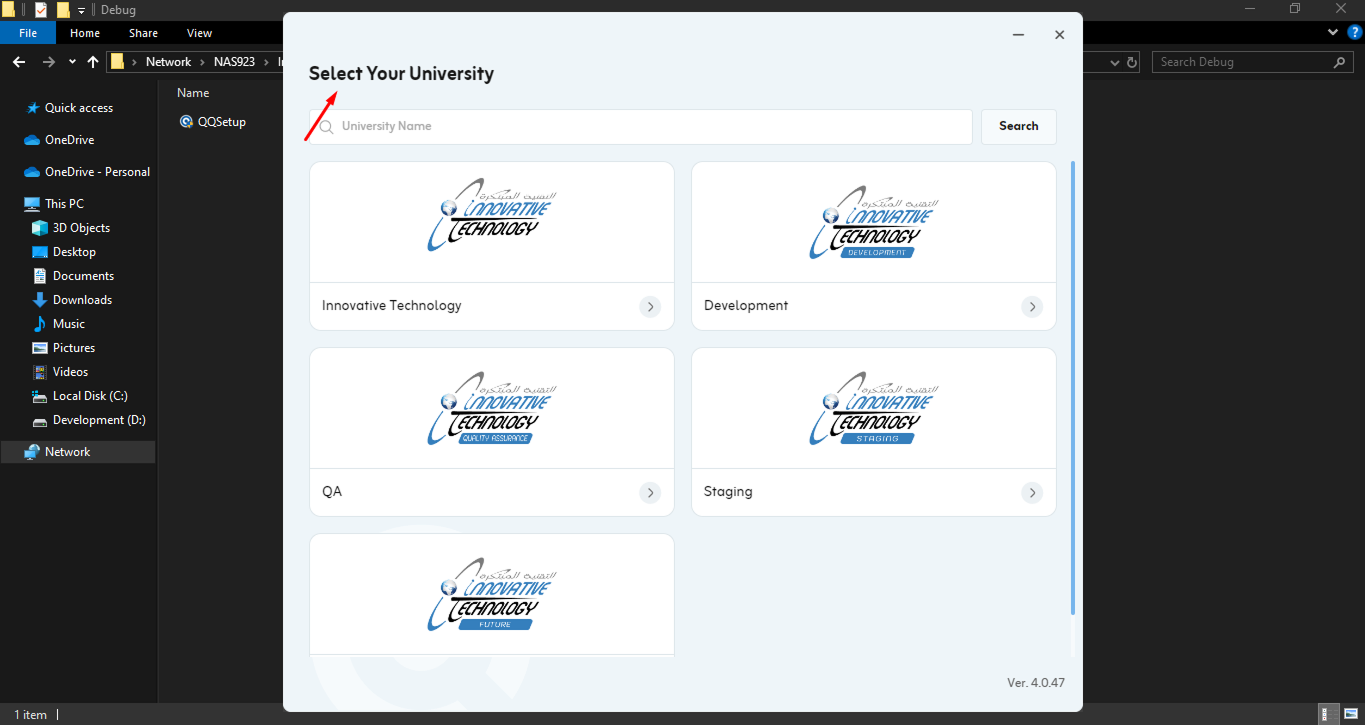
Please choose your university.
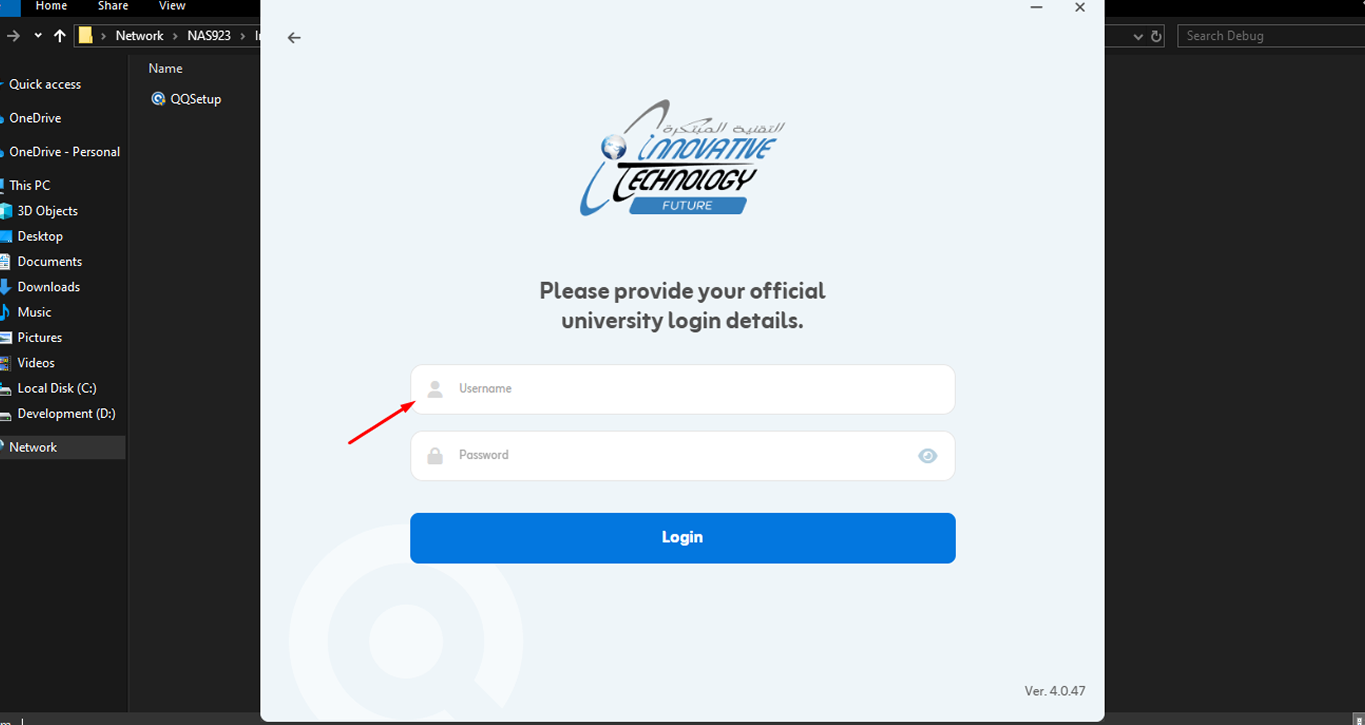
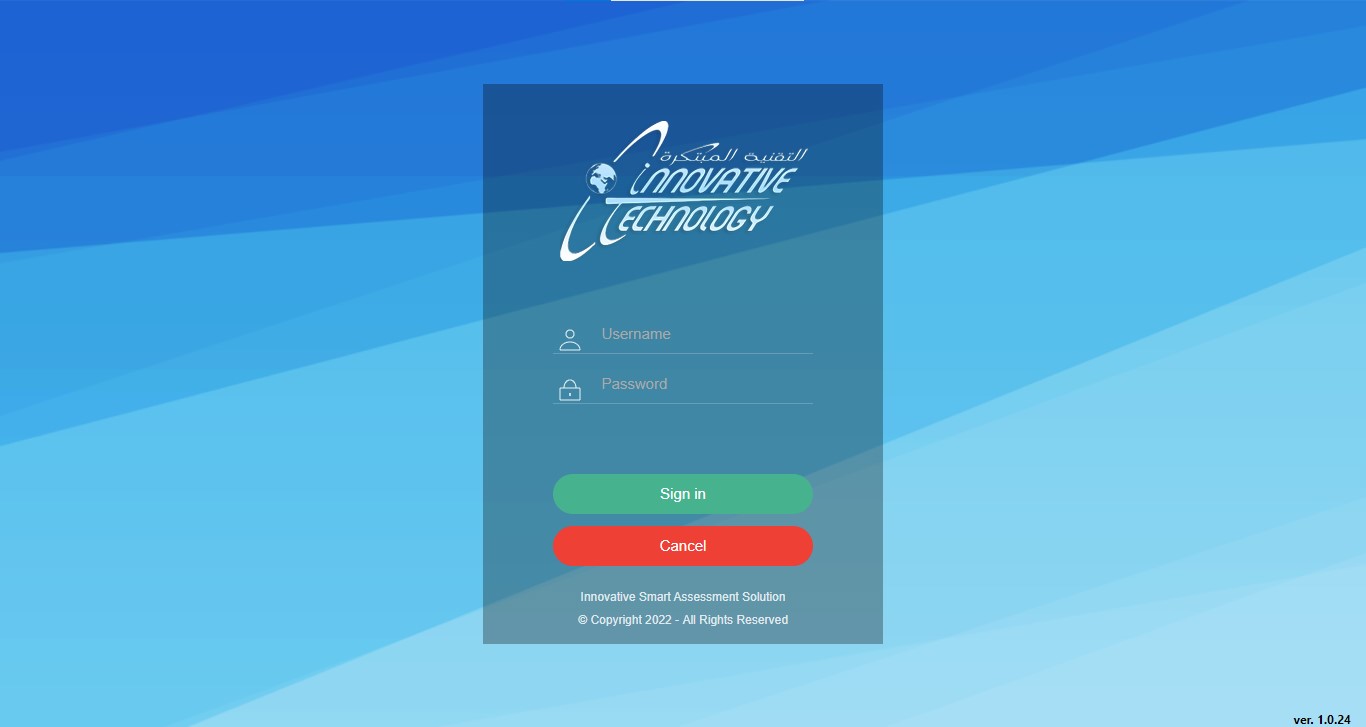
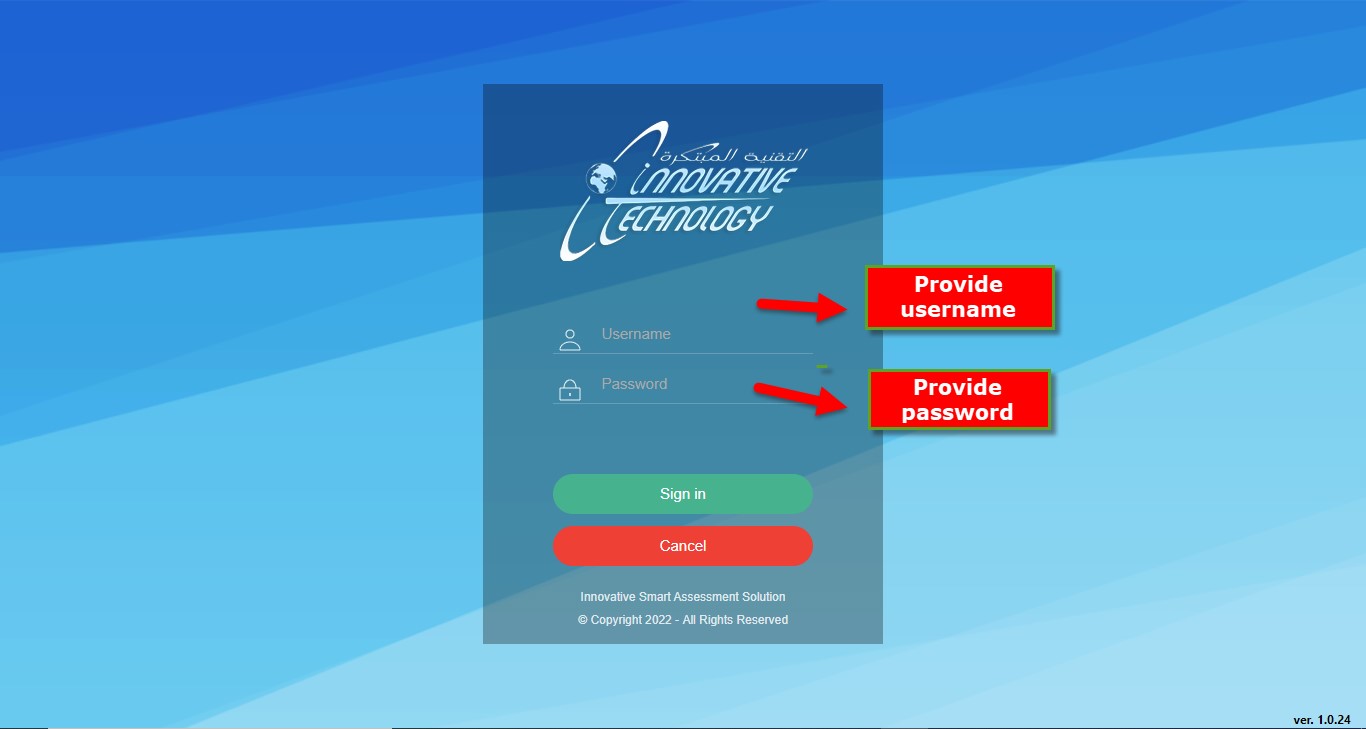
After choosing the university, you are now redirected to the Sign In screen.
Please enter your valid Username and Password in the given input fields and click on the “Sign in” button.
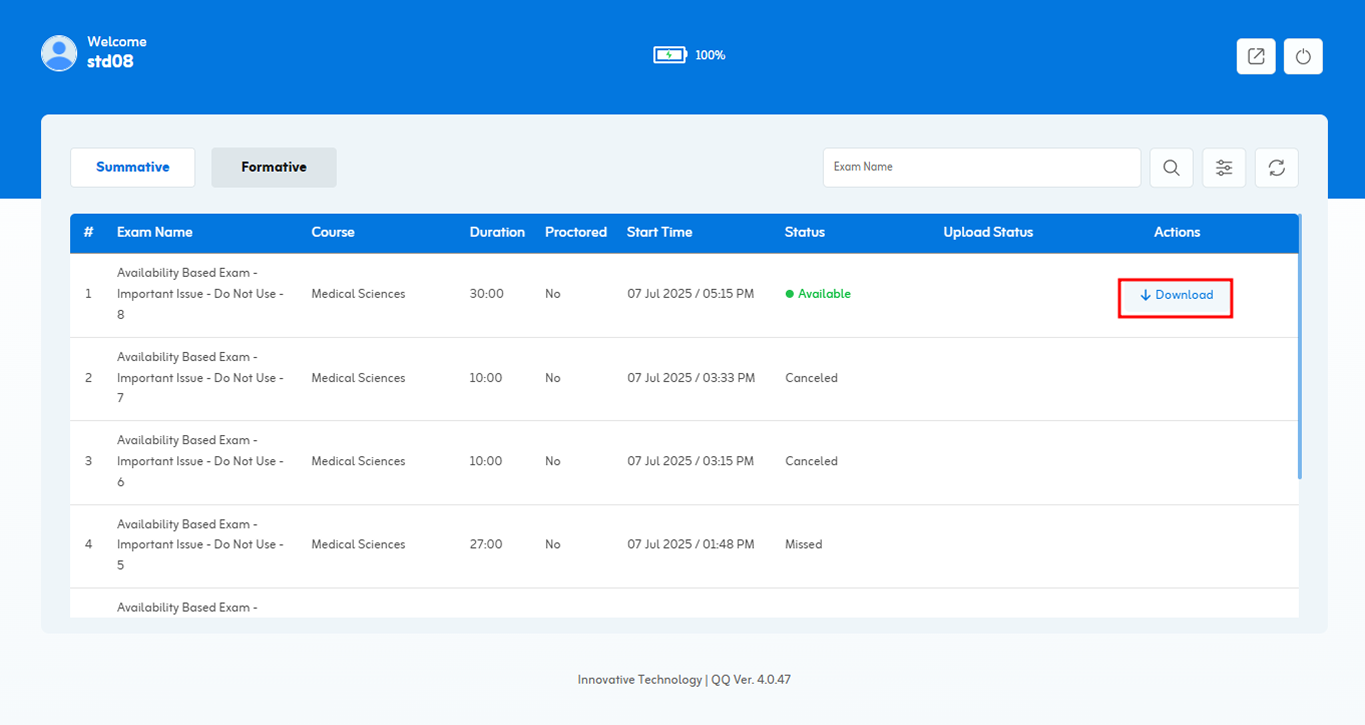
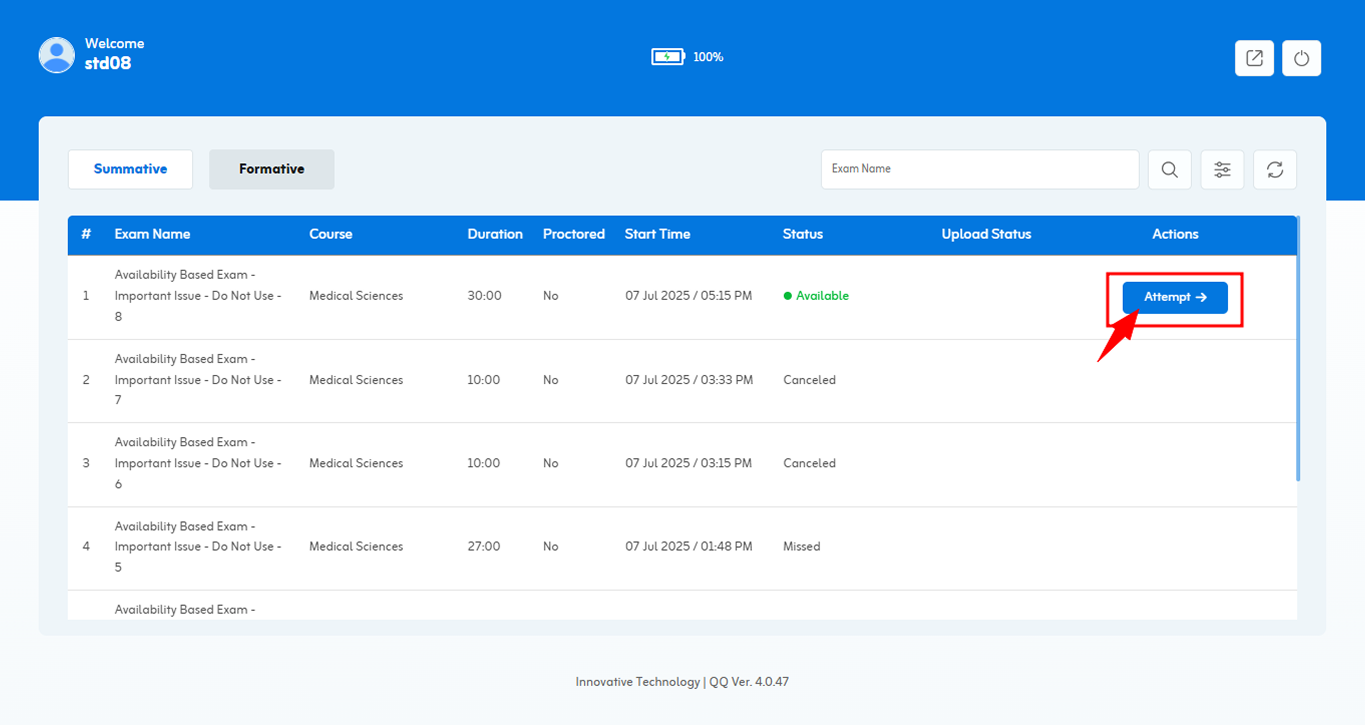
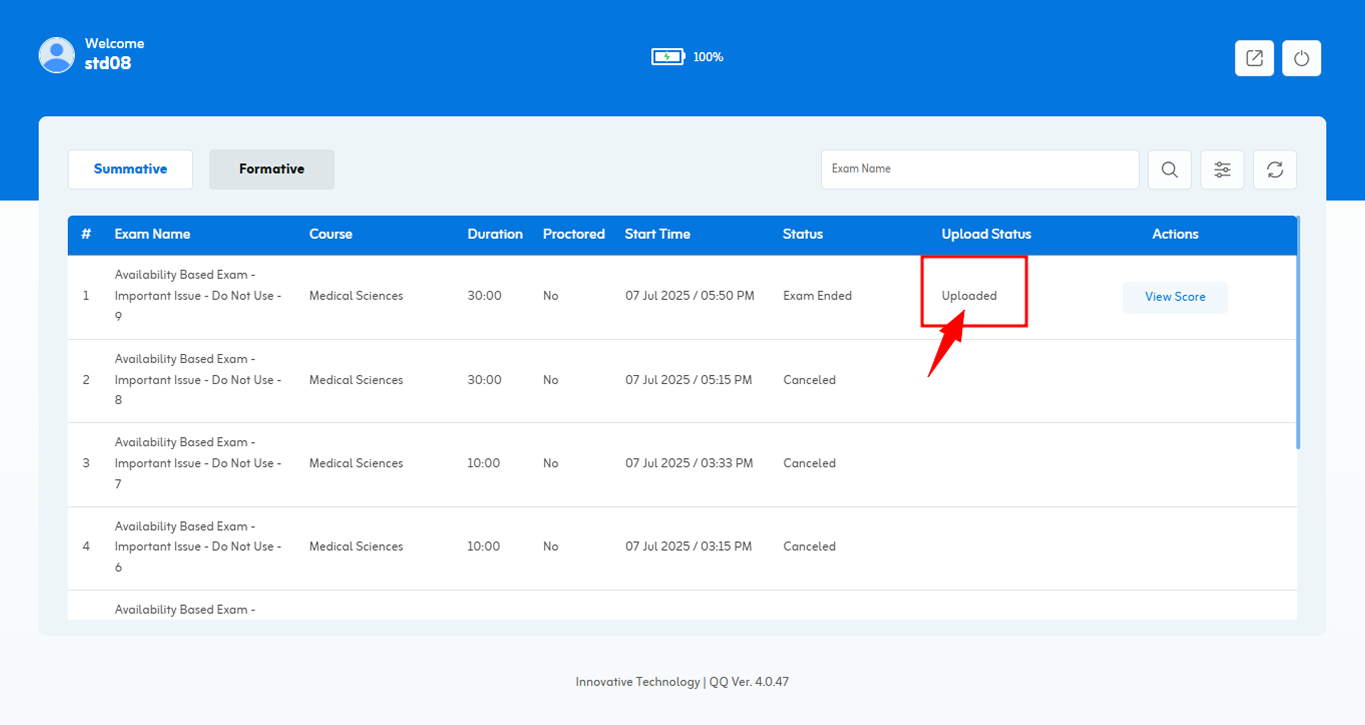
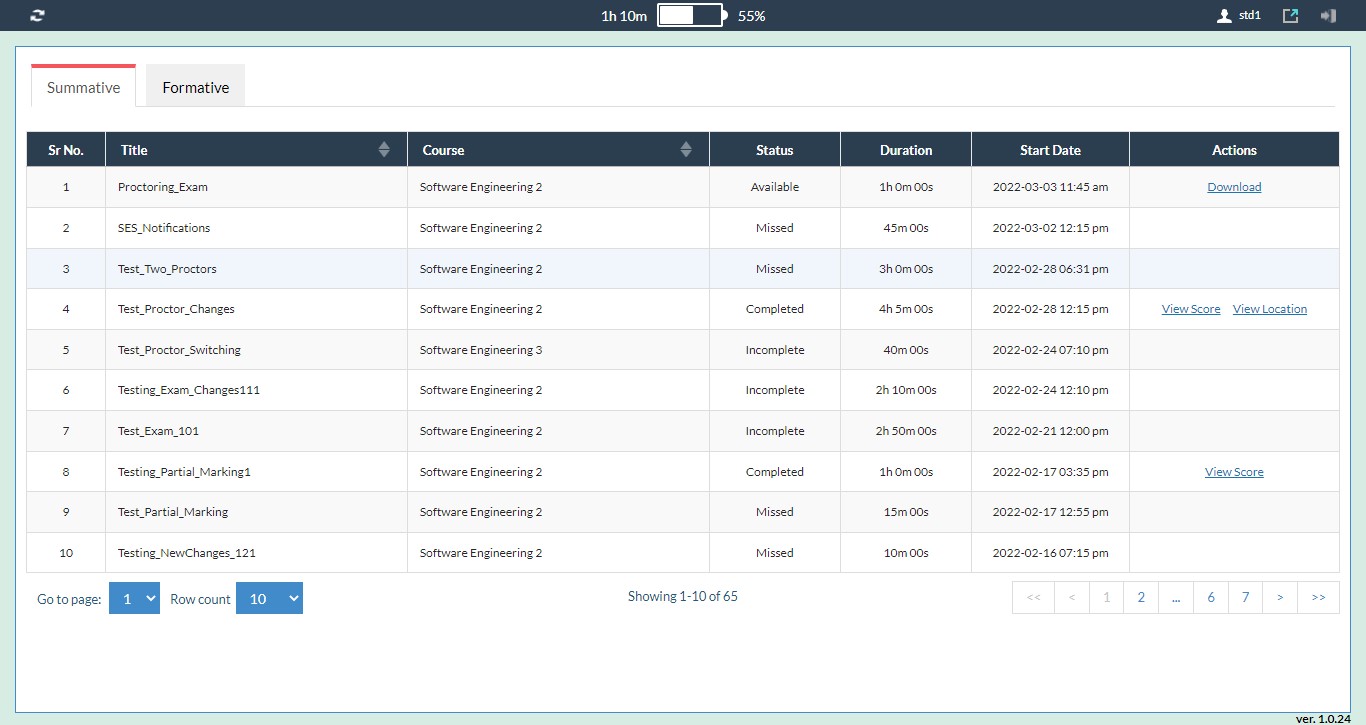
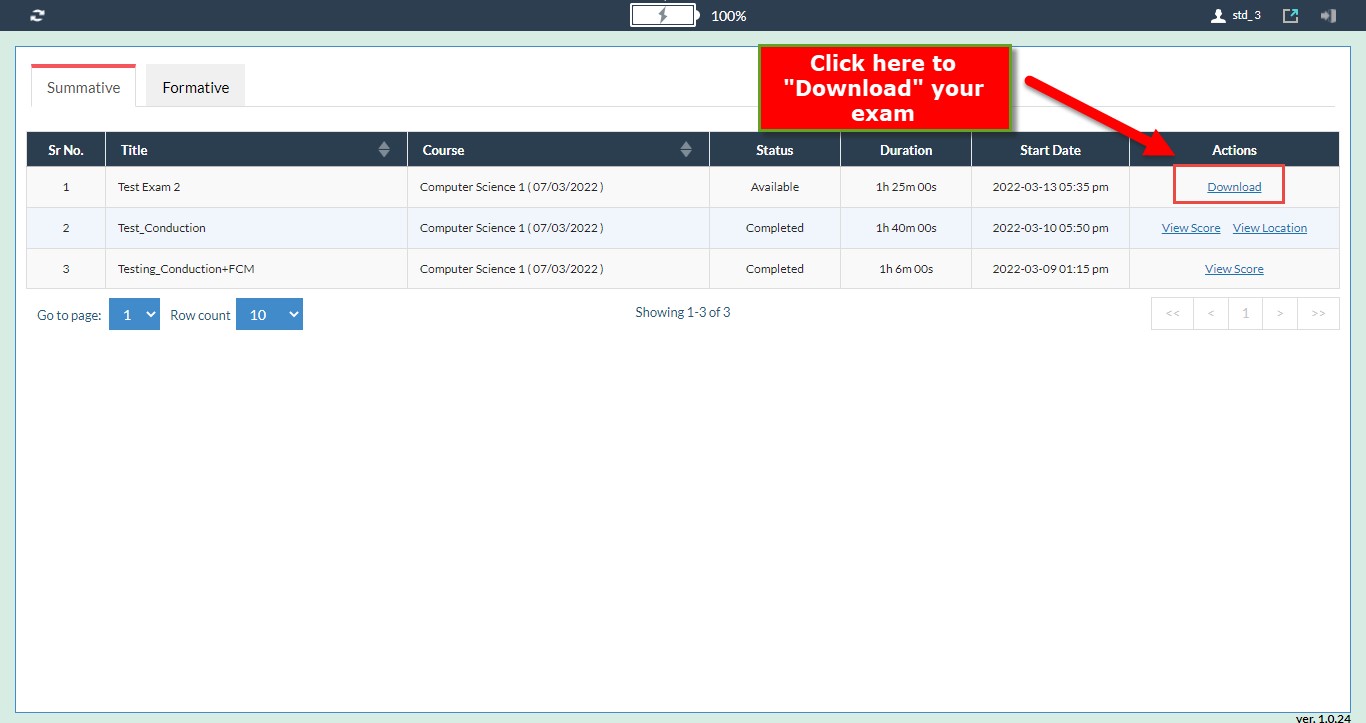
After successful authentication, you are now redirected to the Exam listing page.
On the above screen, students are able to access tabs based on two types of exams.
- Summative
- Formative
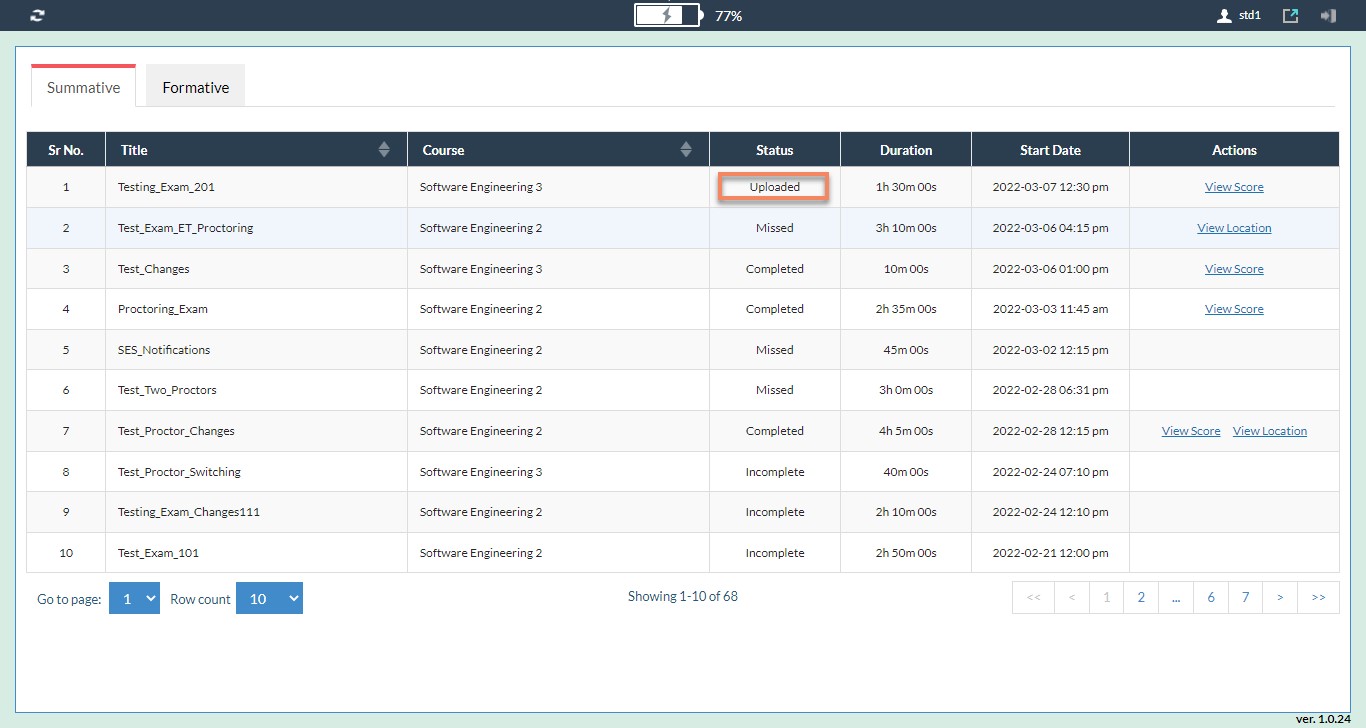
The list of exams shows the following information related to each exam:
Title
Students can see the title of their exam in this column.
Course name
Students can see their course against that specific exam.
Status
Students can see the status of their exams. Status can be;
- Available: When your exam is available against any course, you can click the “Downloaded” option to download your exam.
- Uploaded: This status will appear when a student has conducted his/her Exam successfully and uploaded from same system.
- Completed: When you successfully attempt the exam, finish the exam, and upload the exam, you will see this status.
- Incomplete: If you download the exam and begin to attempt it, but unable to complete it due to any technical difficulties, you will encounter this status.
- Missed: When a student does not take any action against the exam.
Duration:
You can see your exam duration in hours, minutes, and seconds.
Date and time
You can see your exam start date and duration in this column.
Actions can be:
- Download: By clicking this link you can download your exam
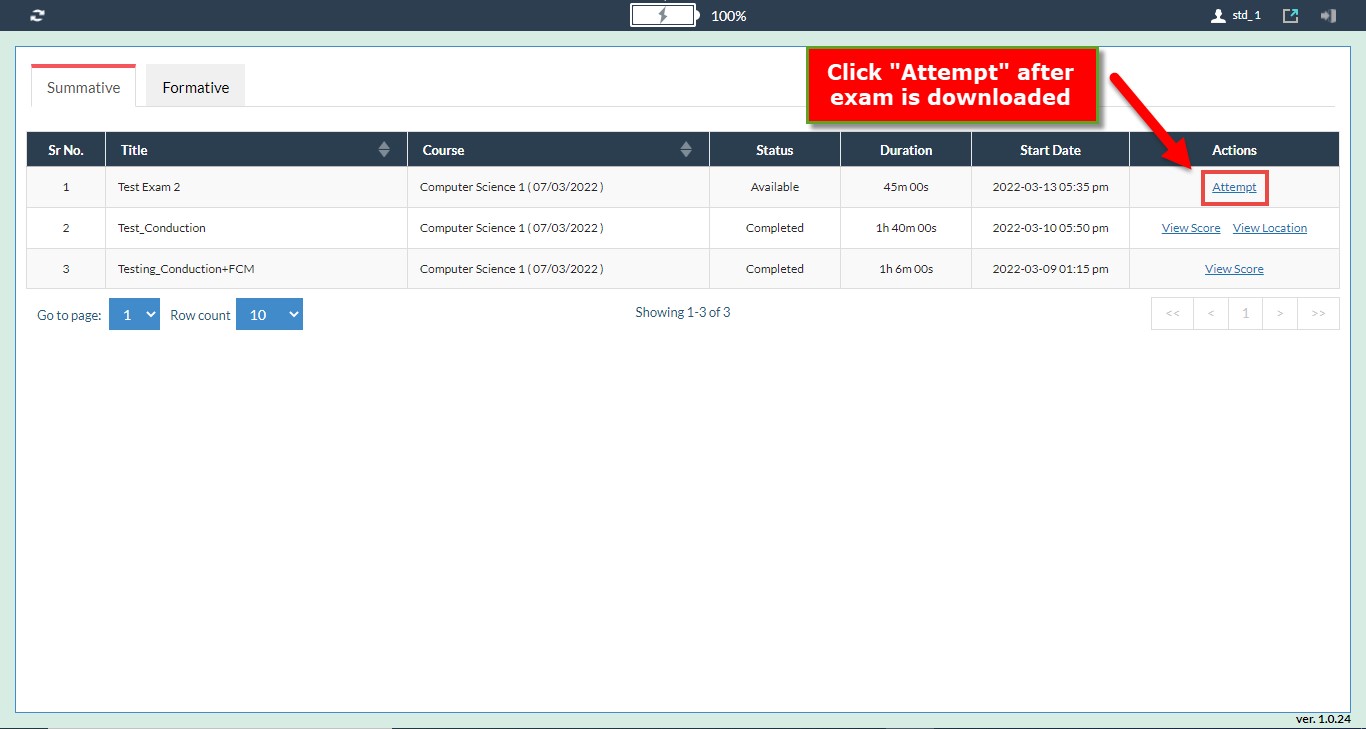
- Attempt: You can attempt your exam by clicking on this link after downloading exam.
- View score: You can see your score by clicking on this link, once you finish your exam and exam has been uploaded successfully.
- View Location: By clicking on this link, students can see their exam location, which may include the city, university, building, and hall.
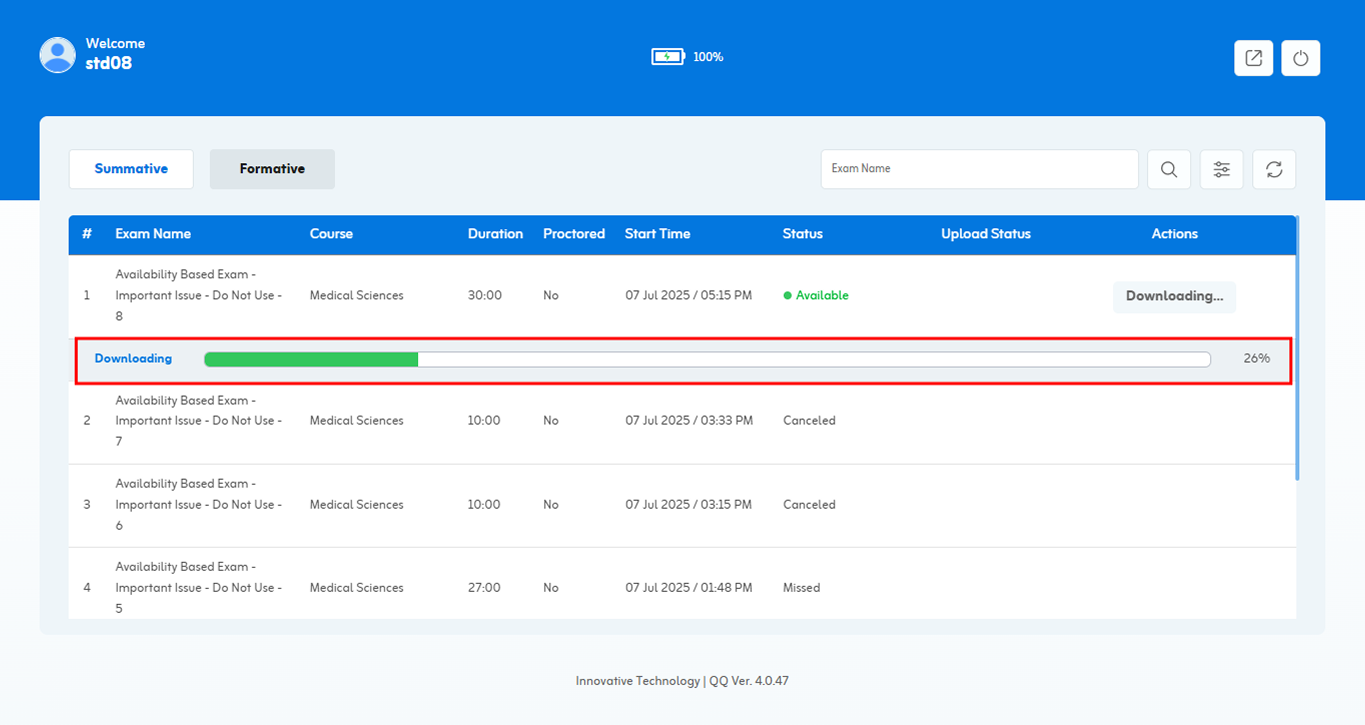
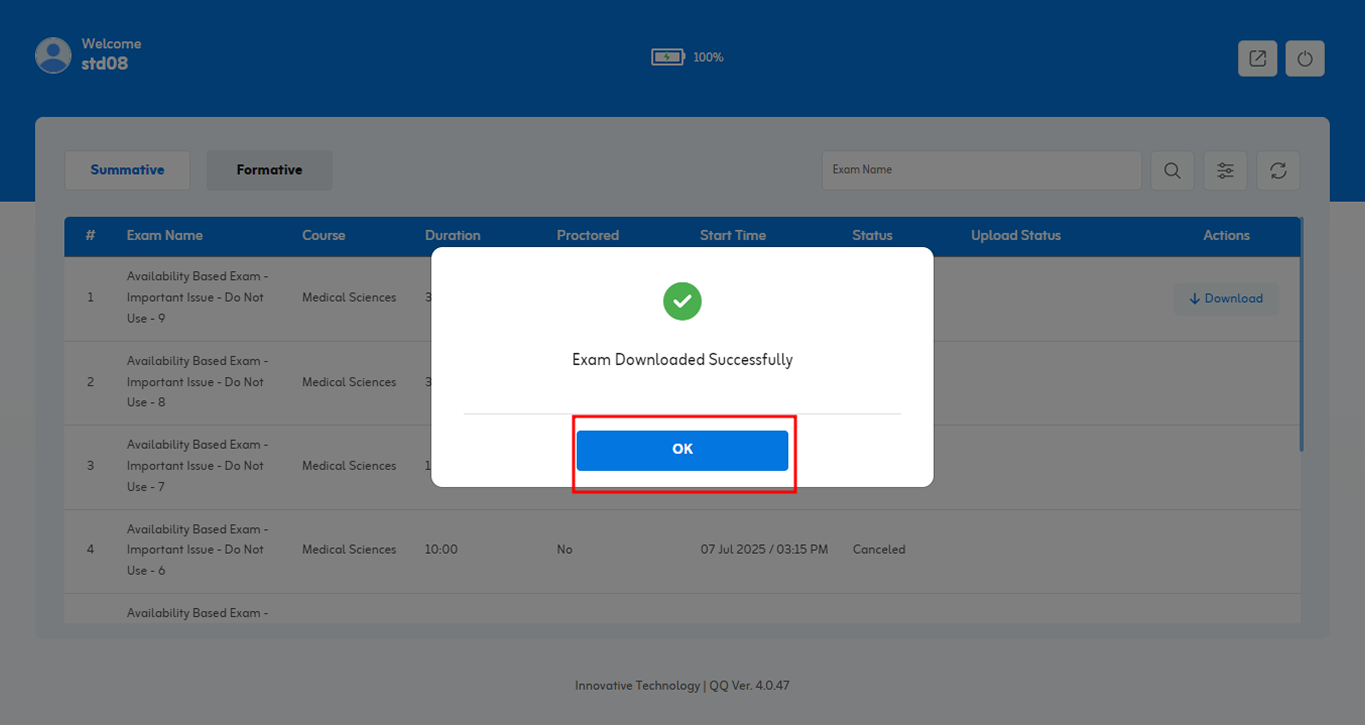
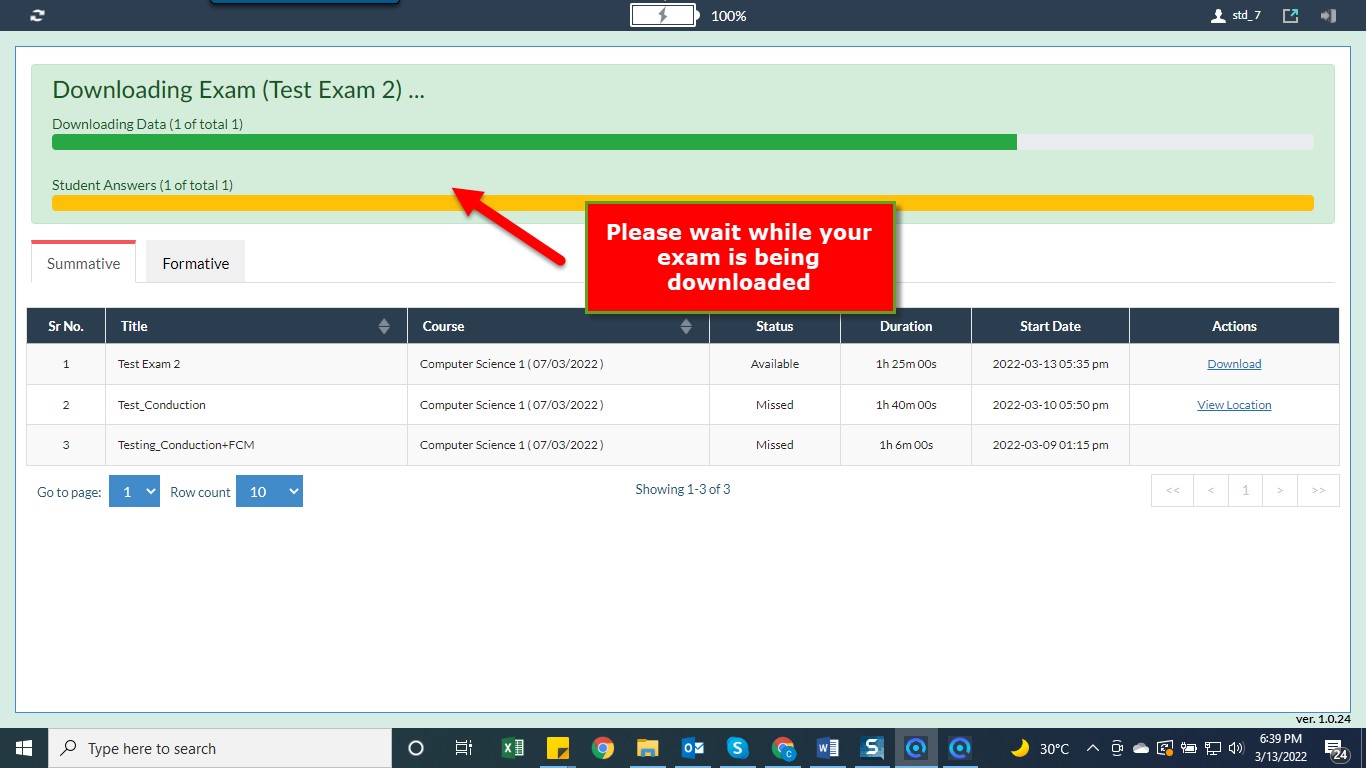
The following screen appears at the time of Exam Downloading.
Please wait while your exam is being downloaded.
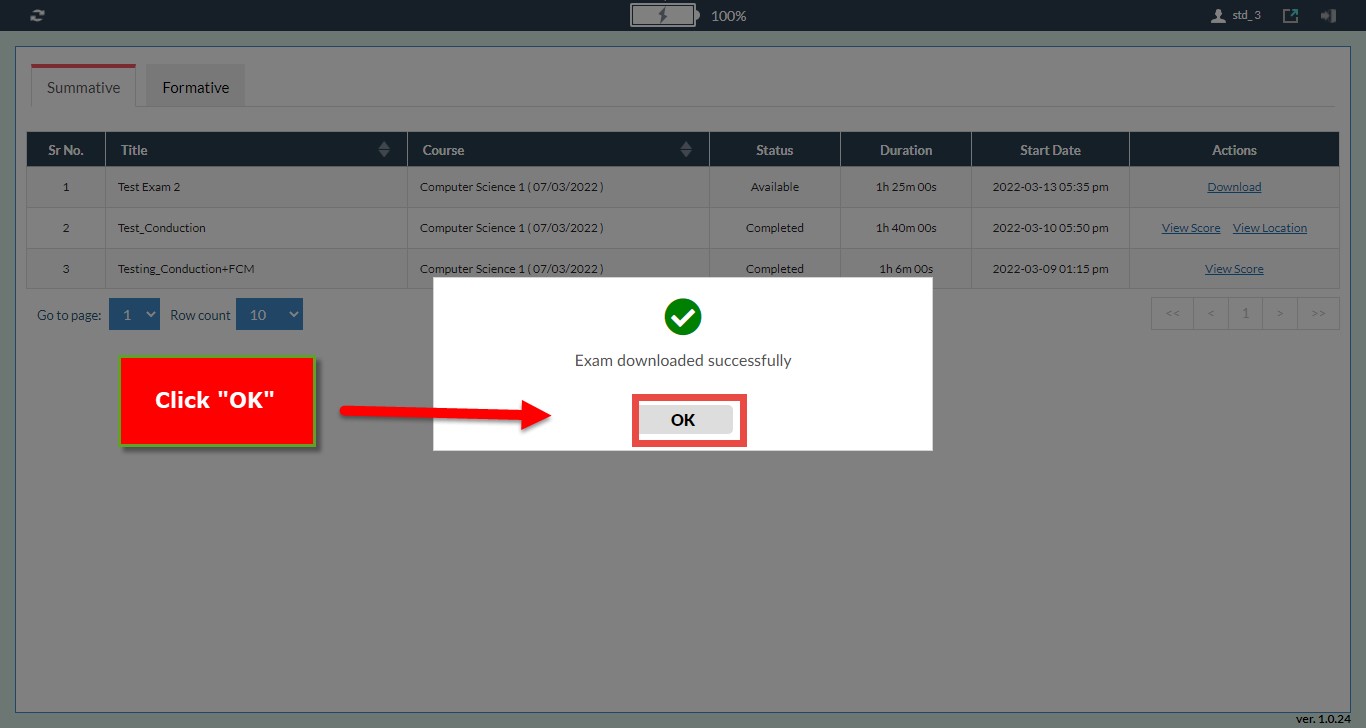
Click “OK” when your exam is downloaded successfully.
Once your exam is downloaded, the Attempt link will appear against that downloaded exam.
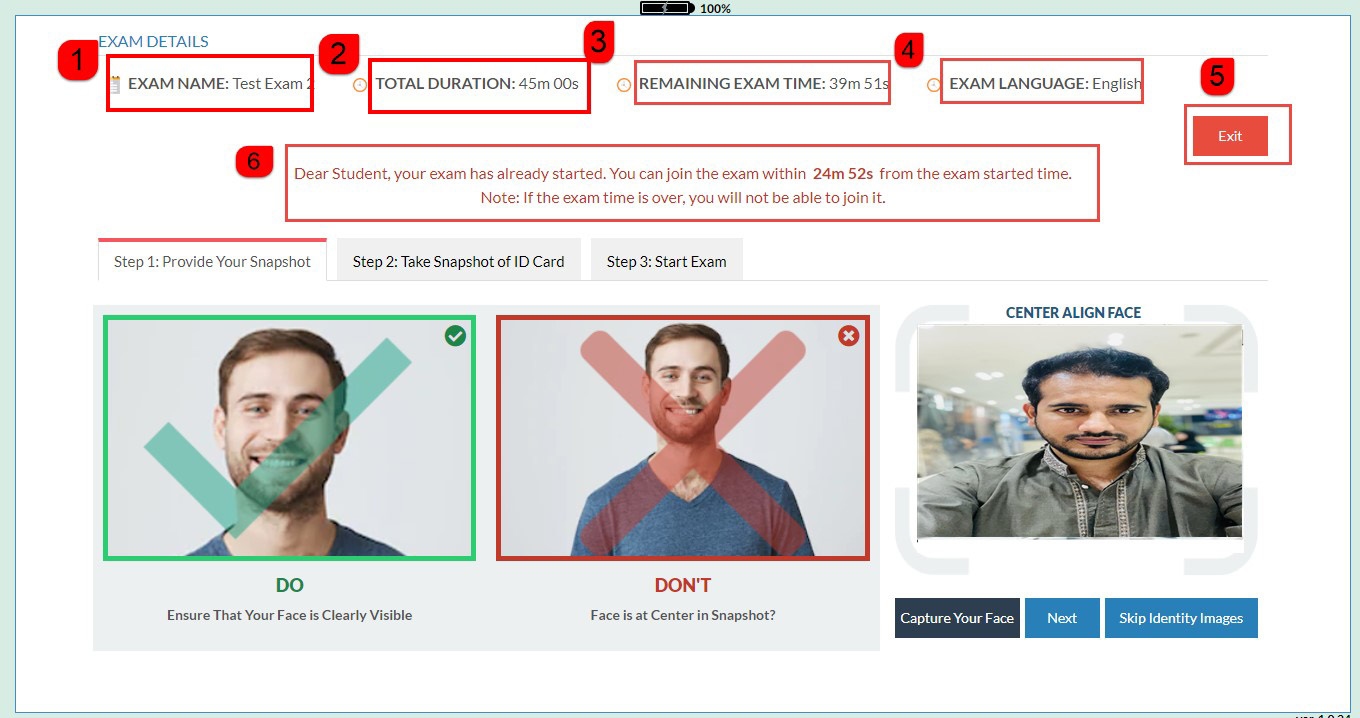
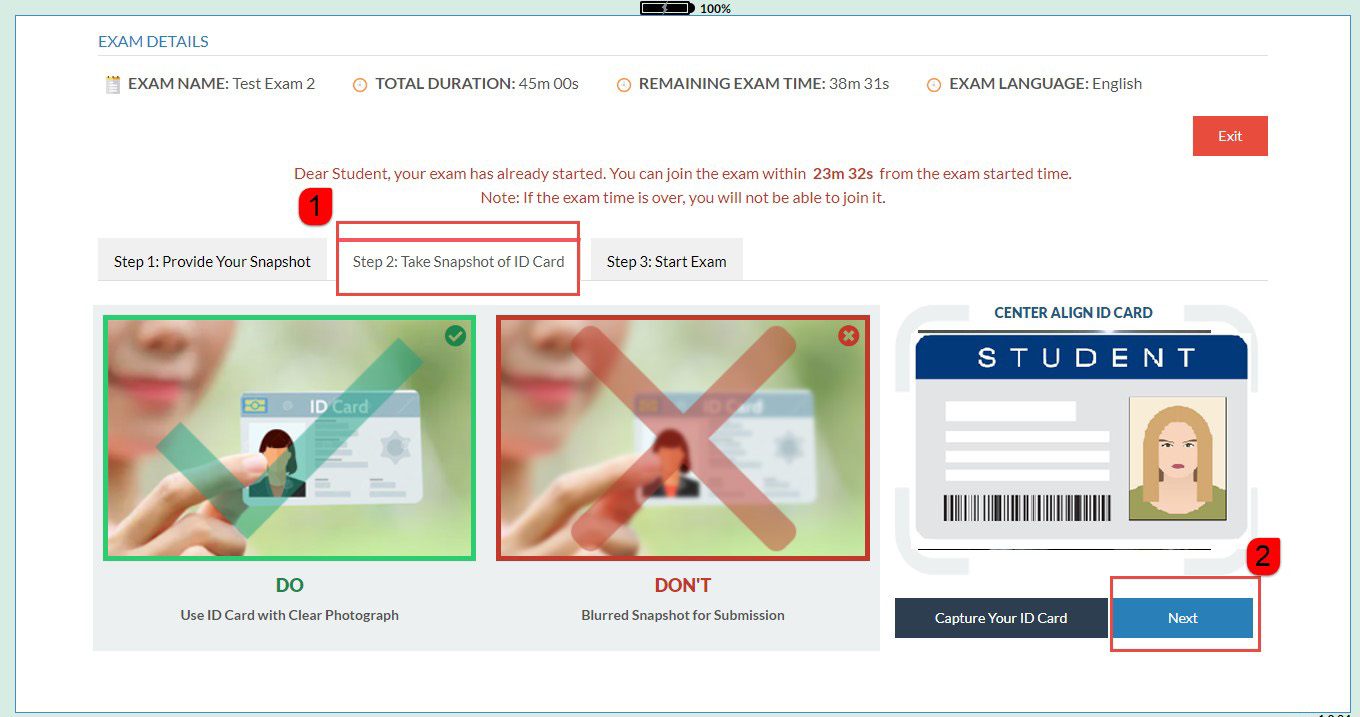
After clicking on the Attempt link, the student will be redirected to the Identity Images screen.
On this screen, you will get the following details:
- You’re Exam Name
- Exam Duration
- Remaining Exam Time
- Exam Language
- “Exit” Button (If you click on it you will be redirected to exam listing screen.)
- Exam remaining join time information
Three tabs as:
- Step1: Provide your face snapshot
- Step2: Take a snapshot of ID card
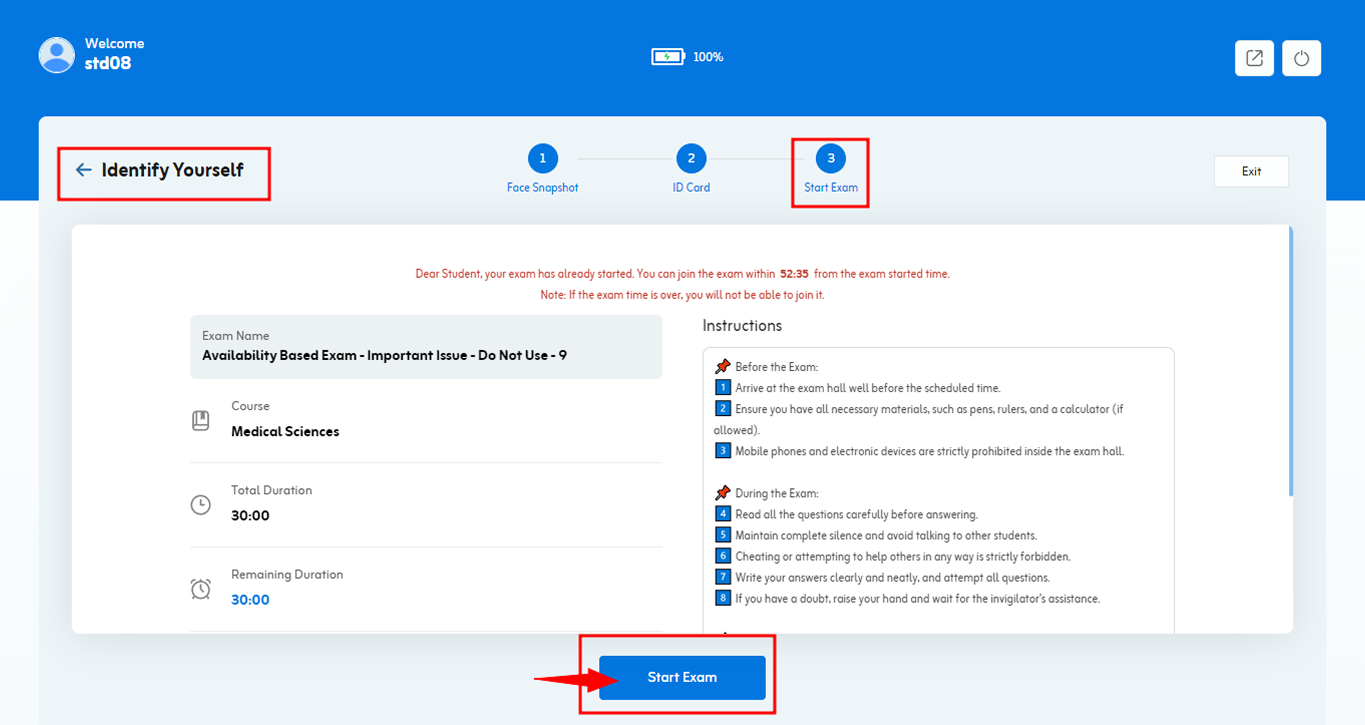
- Step3: Start exam
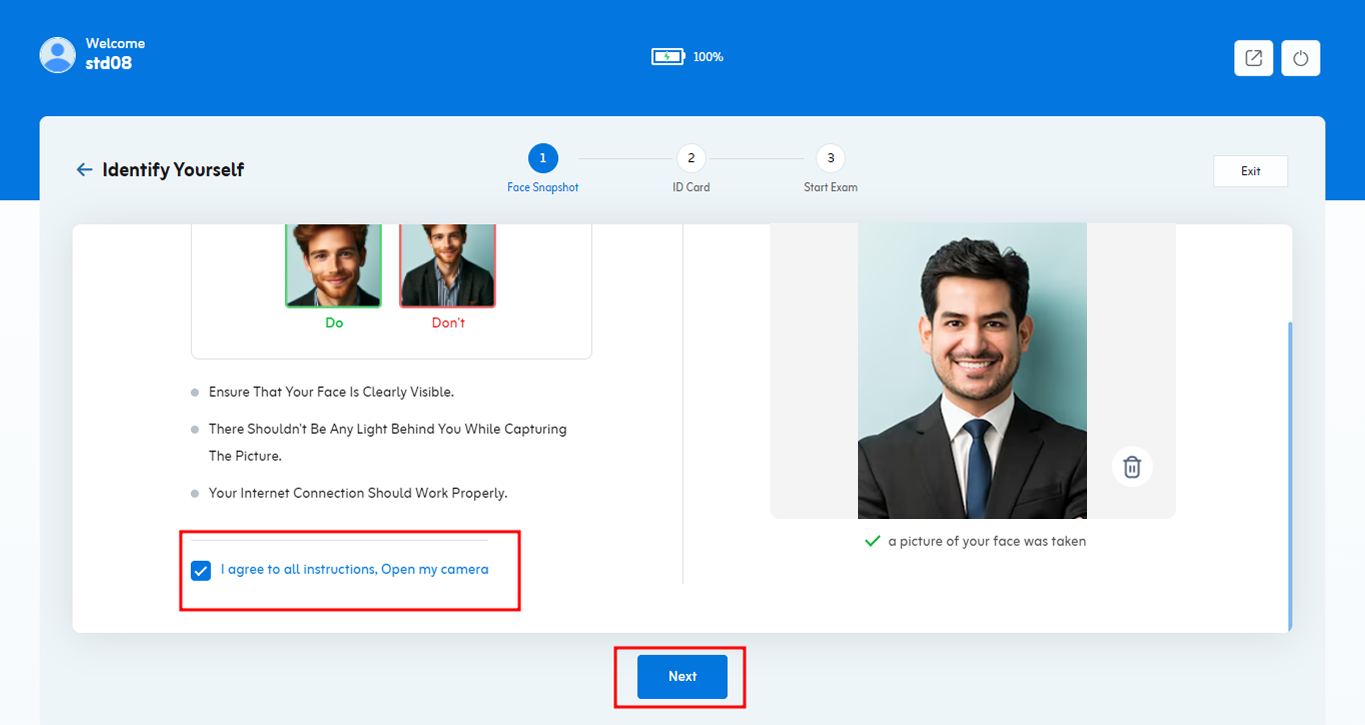
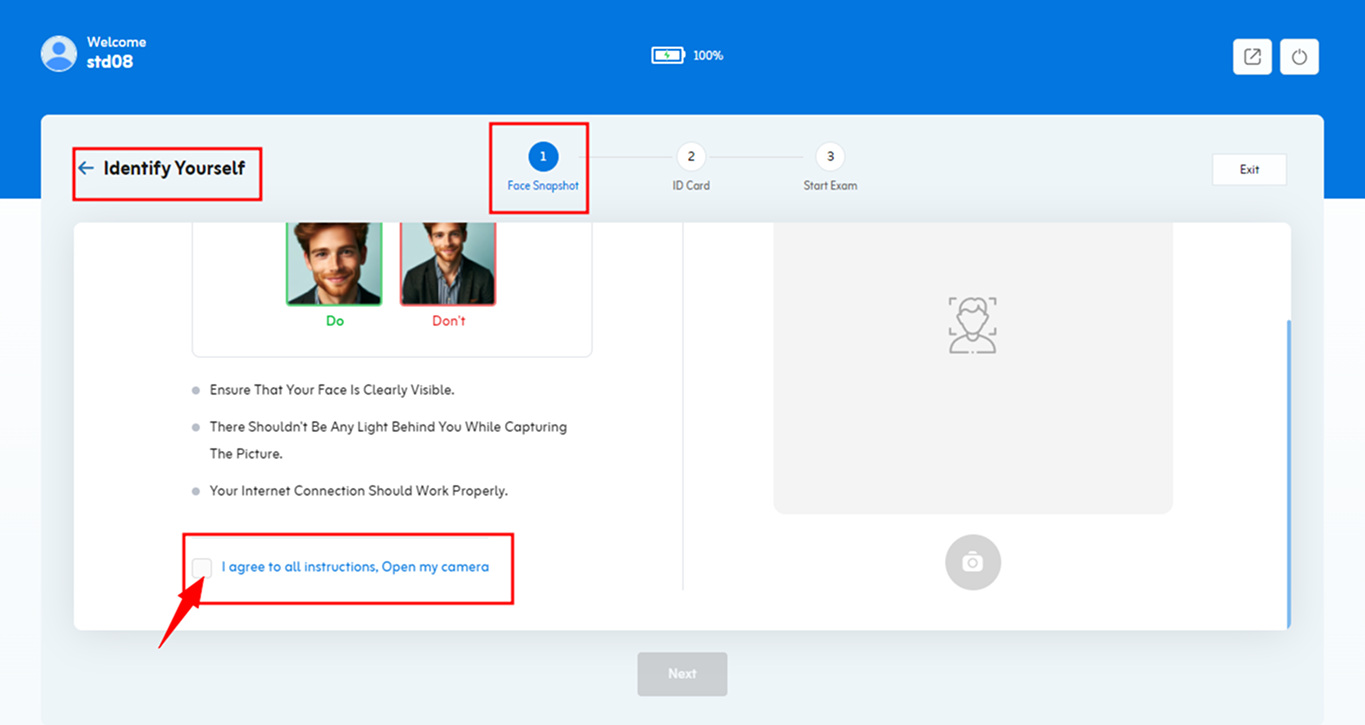 Step1: Provide your face snapshot.
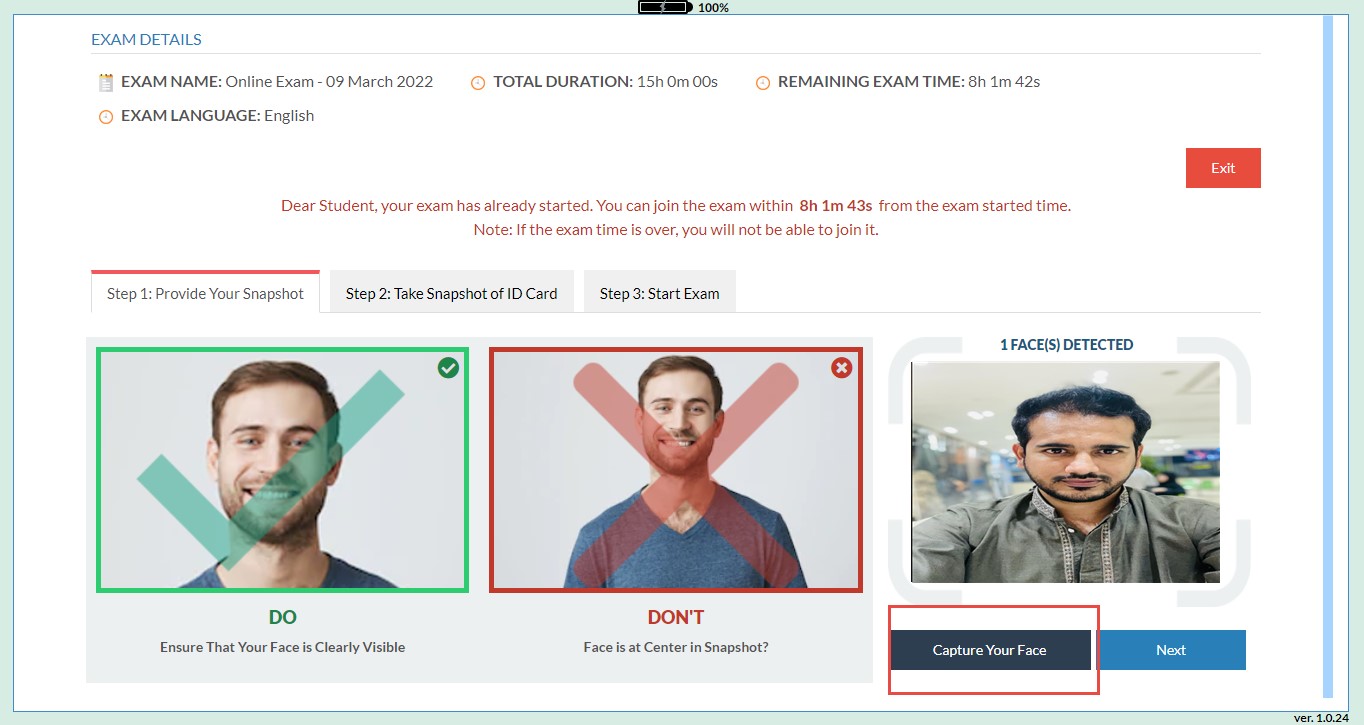
In this tab, you need to provide your face image.
By clicking capture your face, you will be able to capture and upload a picture of yourself.
Please follow the below instruction to take a picture:
- Your face must be clear while taking your picture.
- There shouldn’t be any light behind you while capturing the picture.
- Your internet connection should work properly.
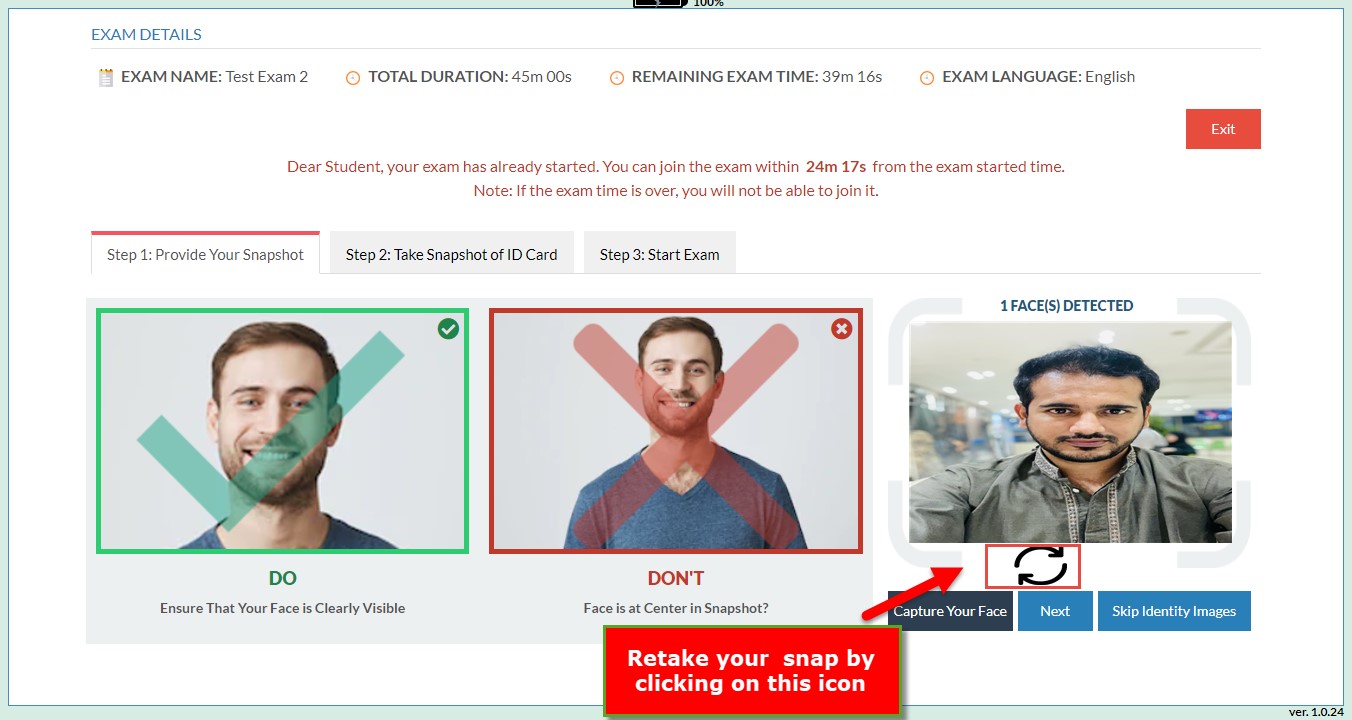
In the case of blur picture, you can retake your picture by clicking on the retake icon.
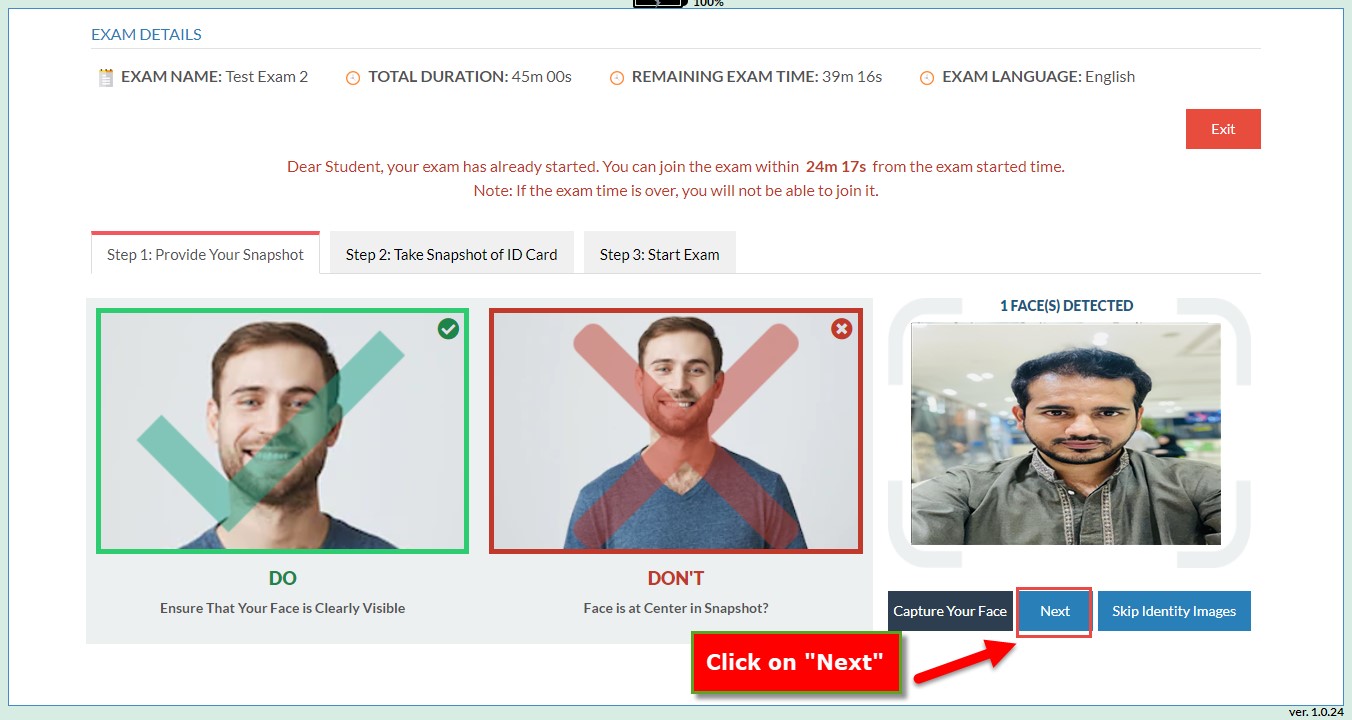
After successfully taking your picture, click on the “Next” button.
You can skip the identity picture in case of your supervisor allowed you to skip it.
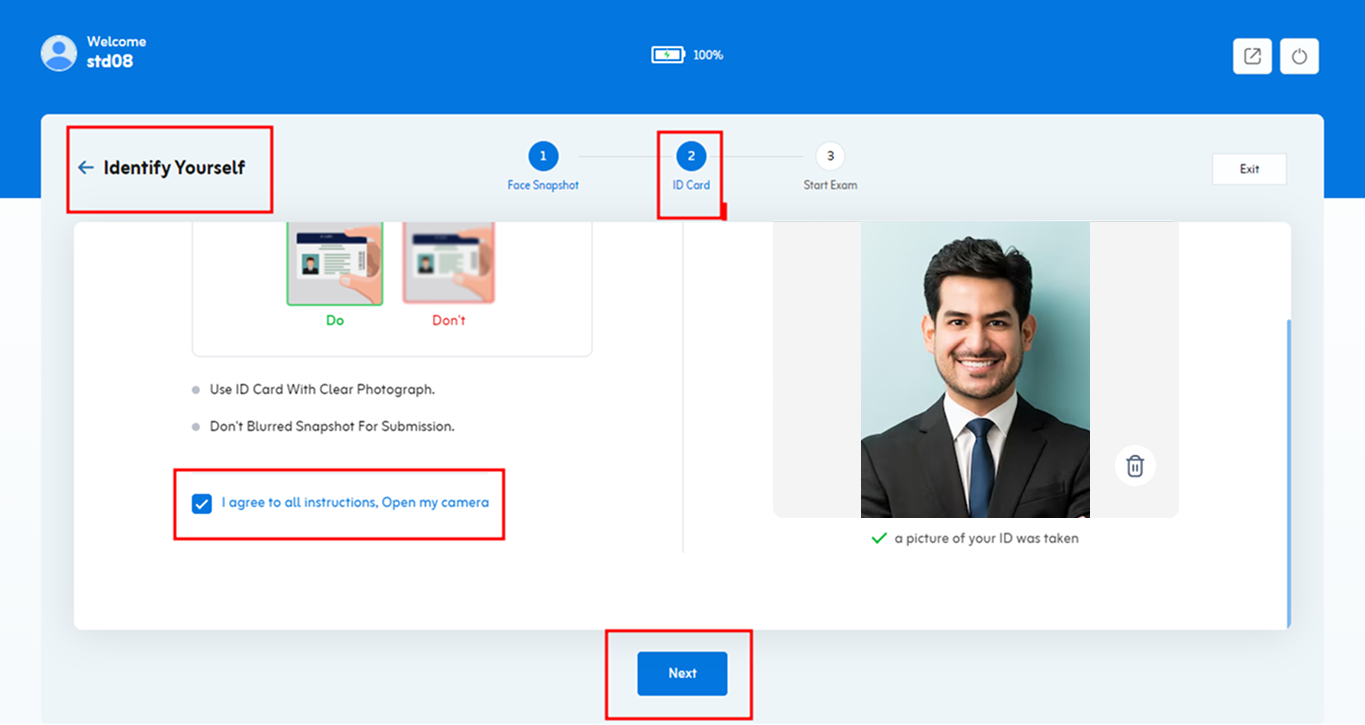
Click on the “Take Snapshot of ID Card” to add your ID card picture.
Note: Please keep in mind that your ID card picture must be clear, like shown in the screen.
After successfully adding your ID card, click on Next.
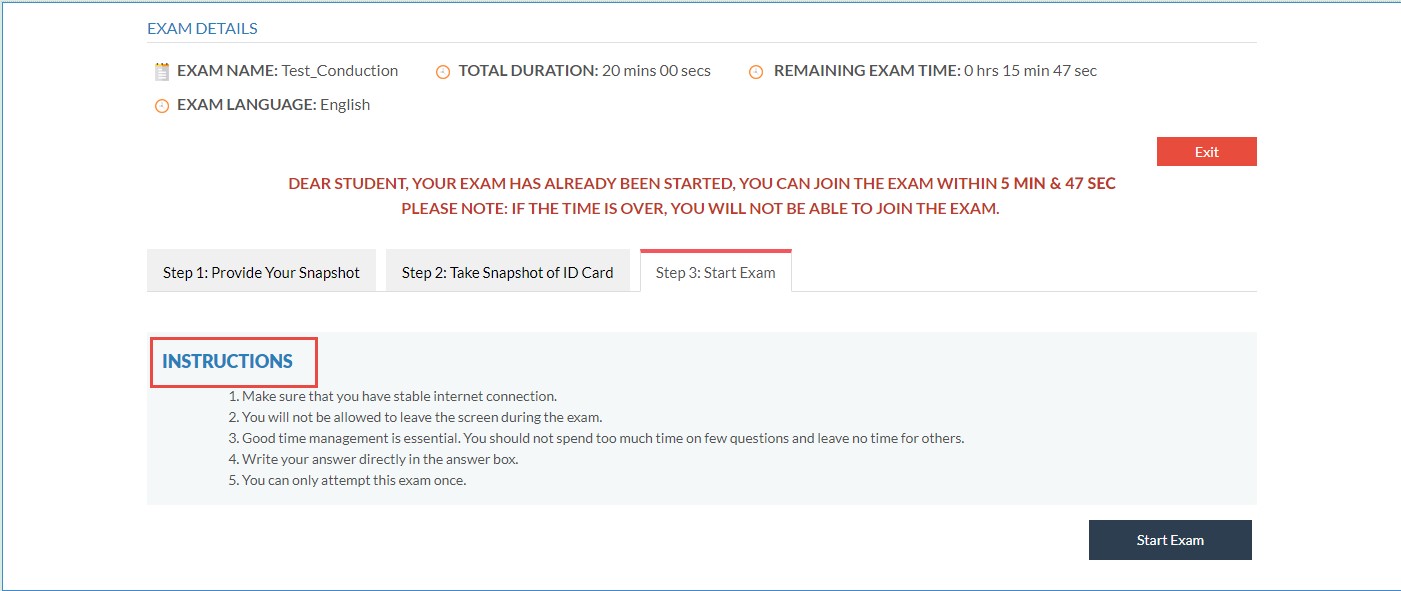
By clicking on the Next button you are now redirected to the exam instruction page.
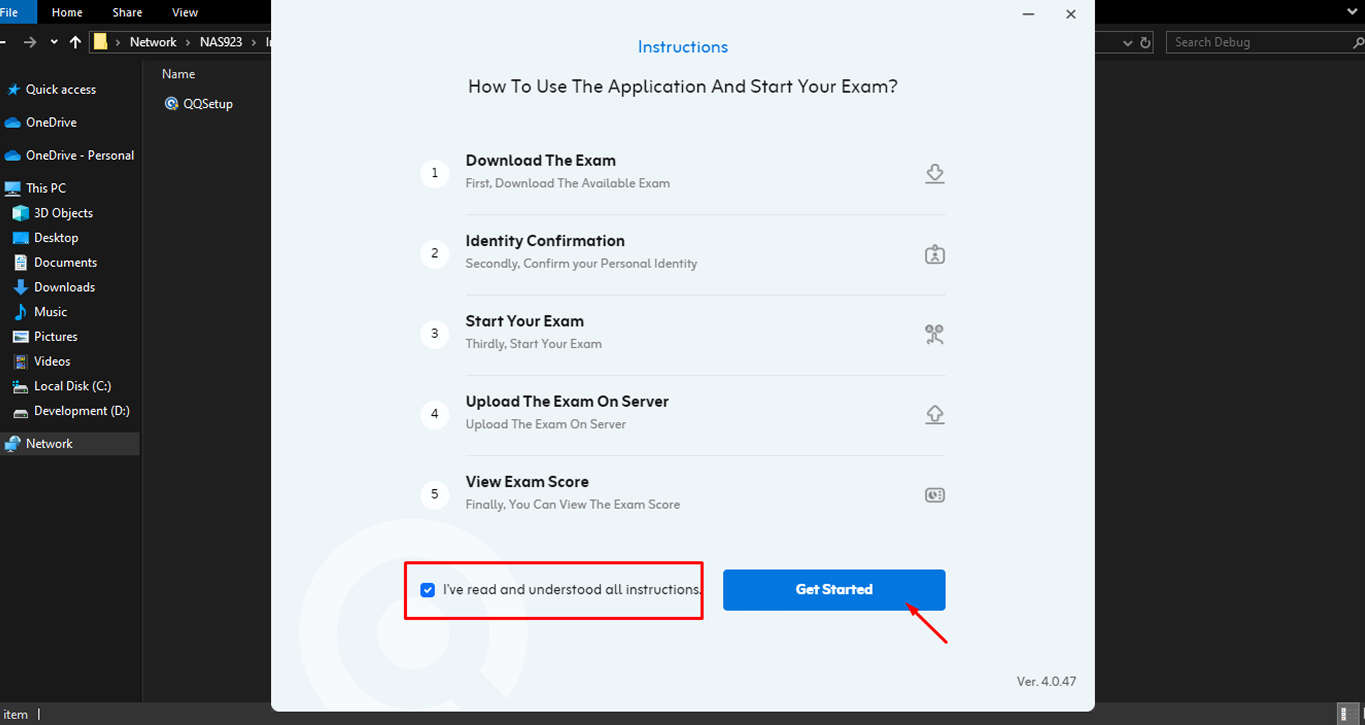
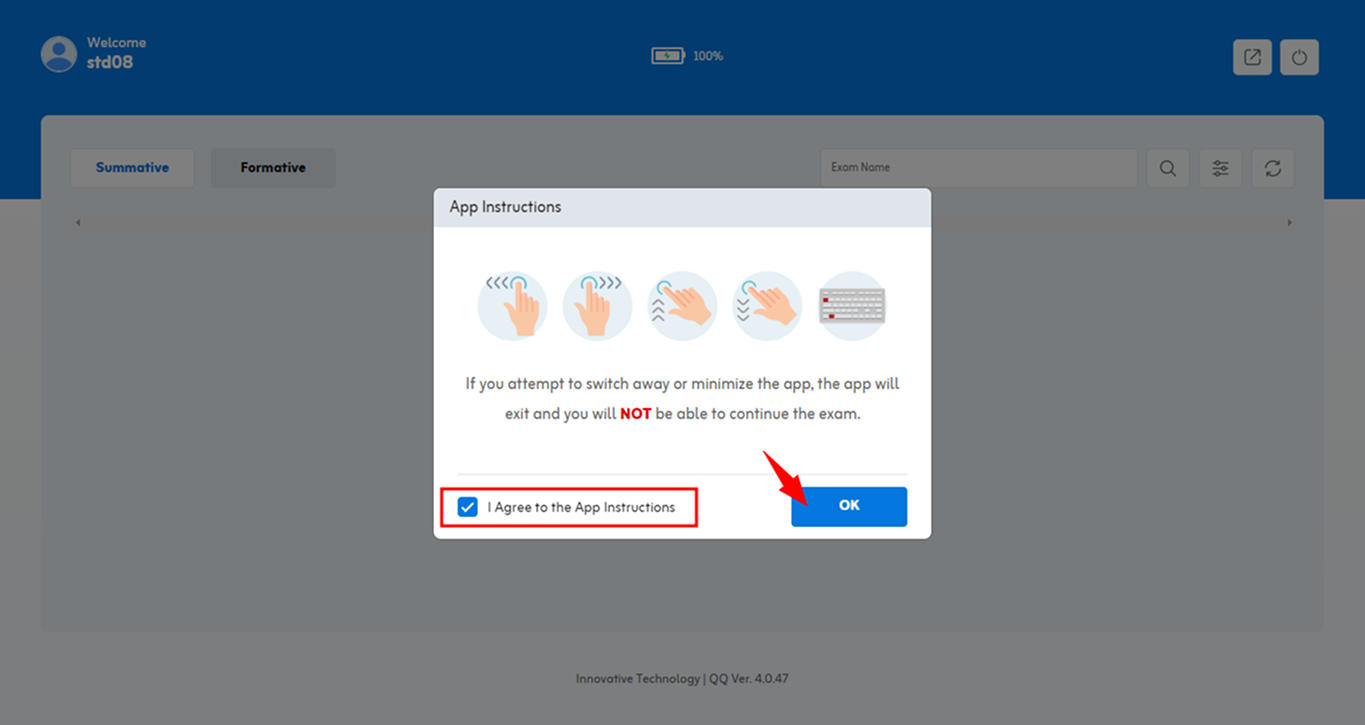
Please read all instructions carefully before starting your exam. and click on Start Exam.
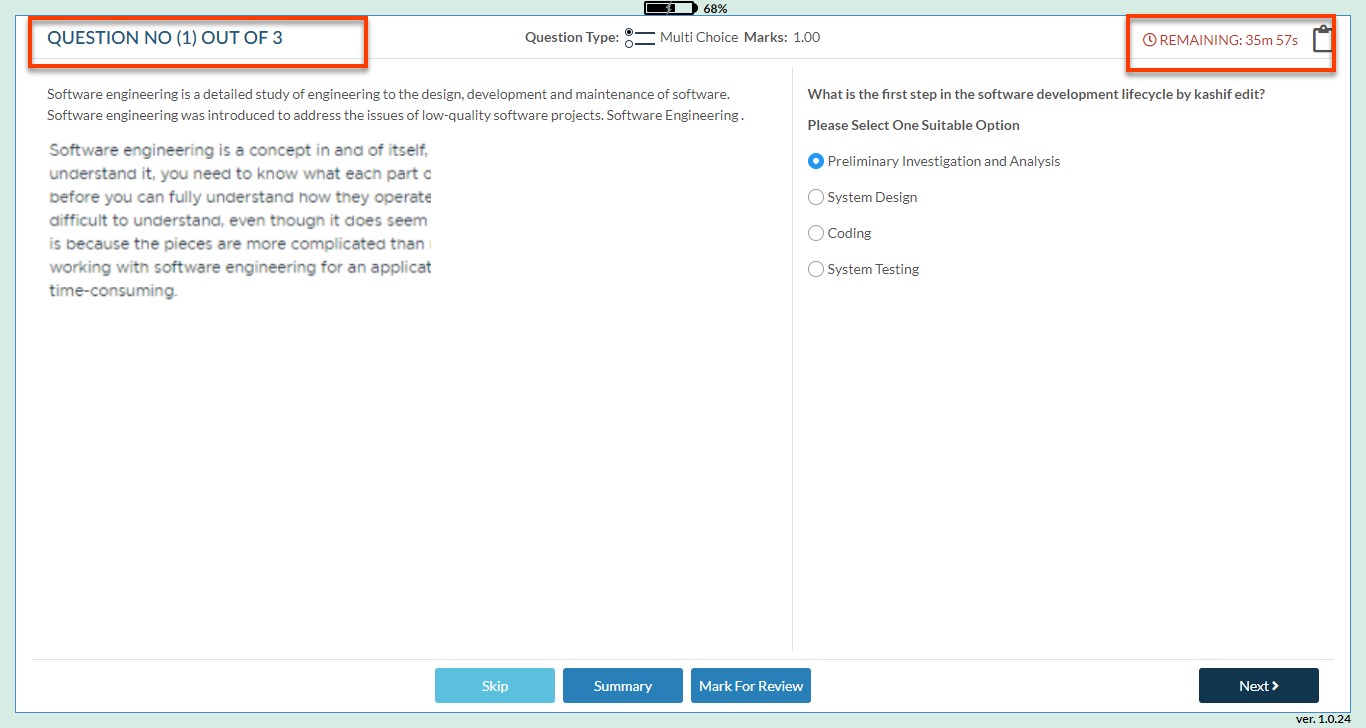
Now you are redirected to the exam screen where you can view following details.
- Questions in detail
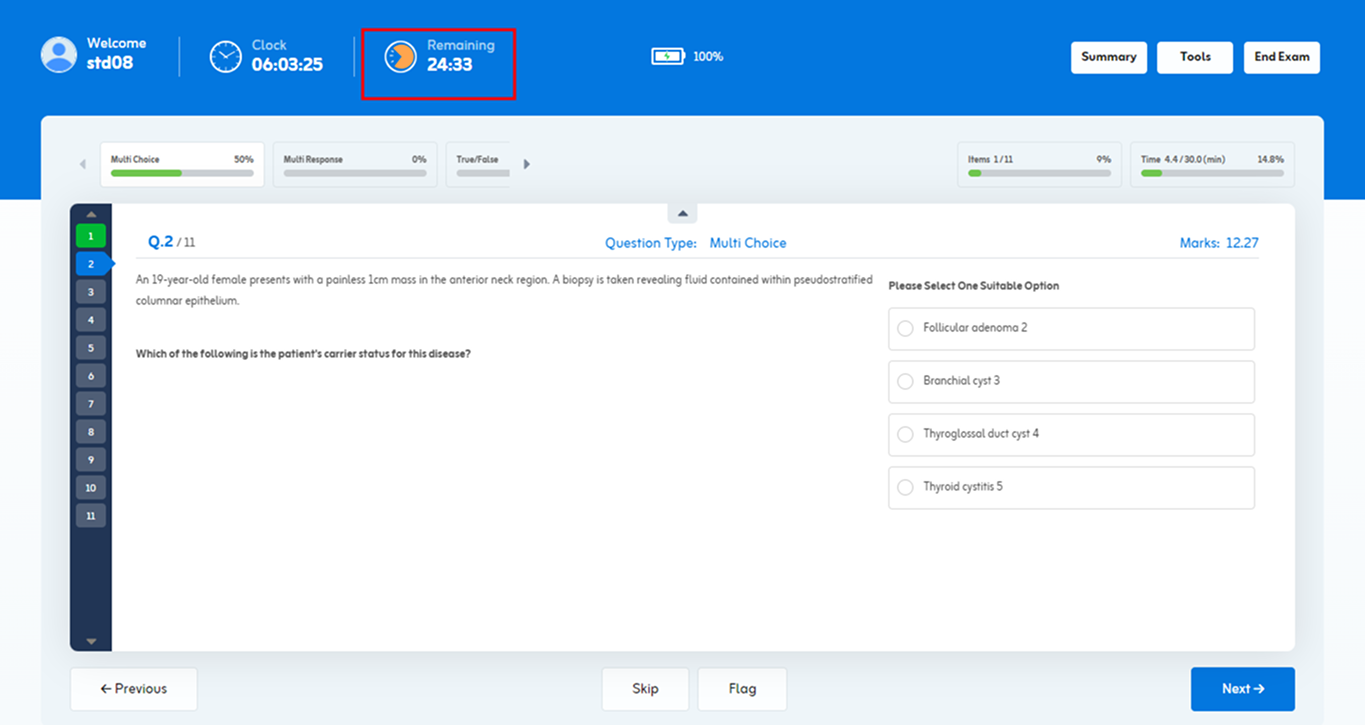
- Remaining time on exam conduction screen during attempting exam.
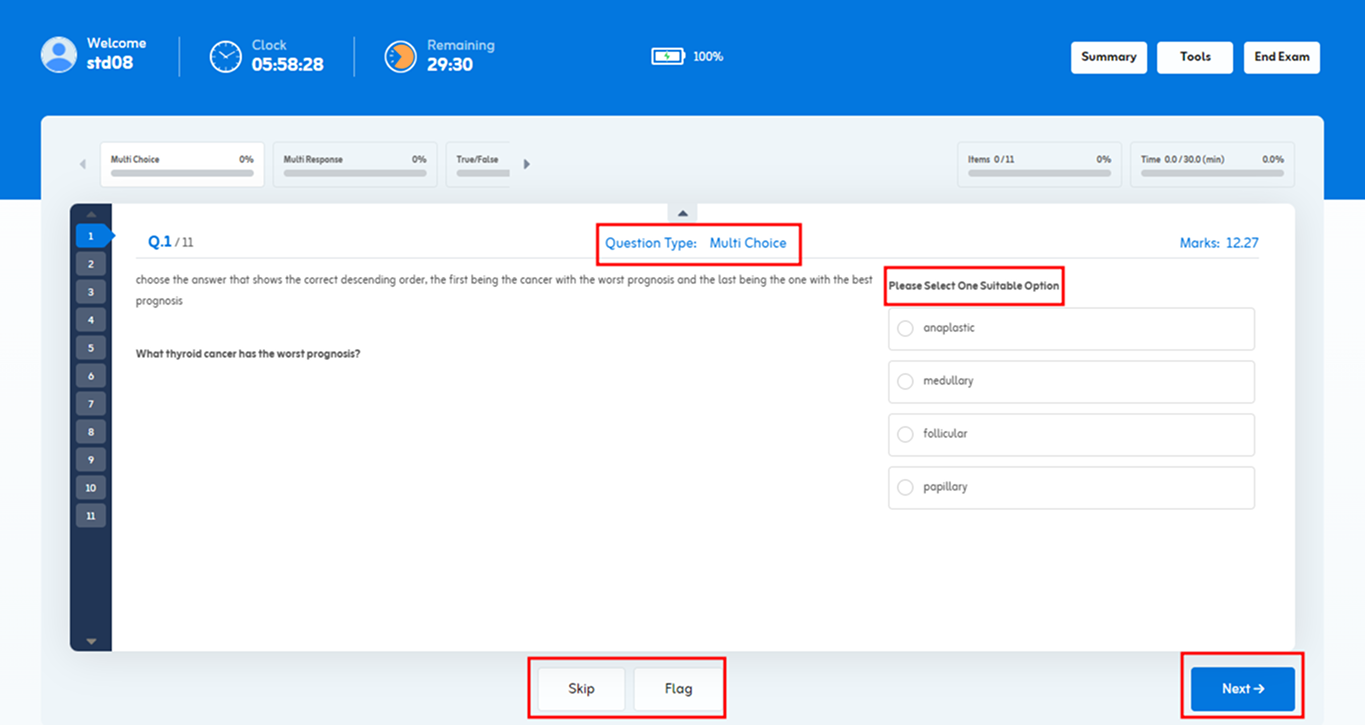
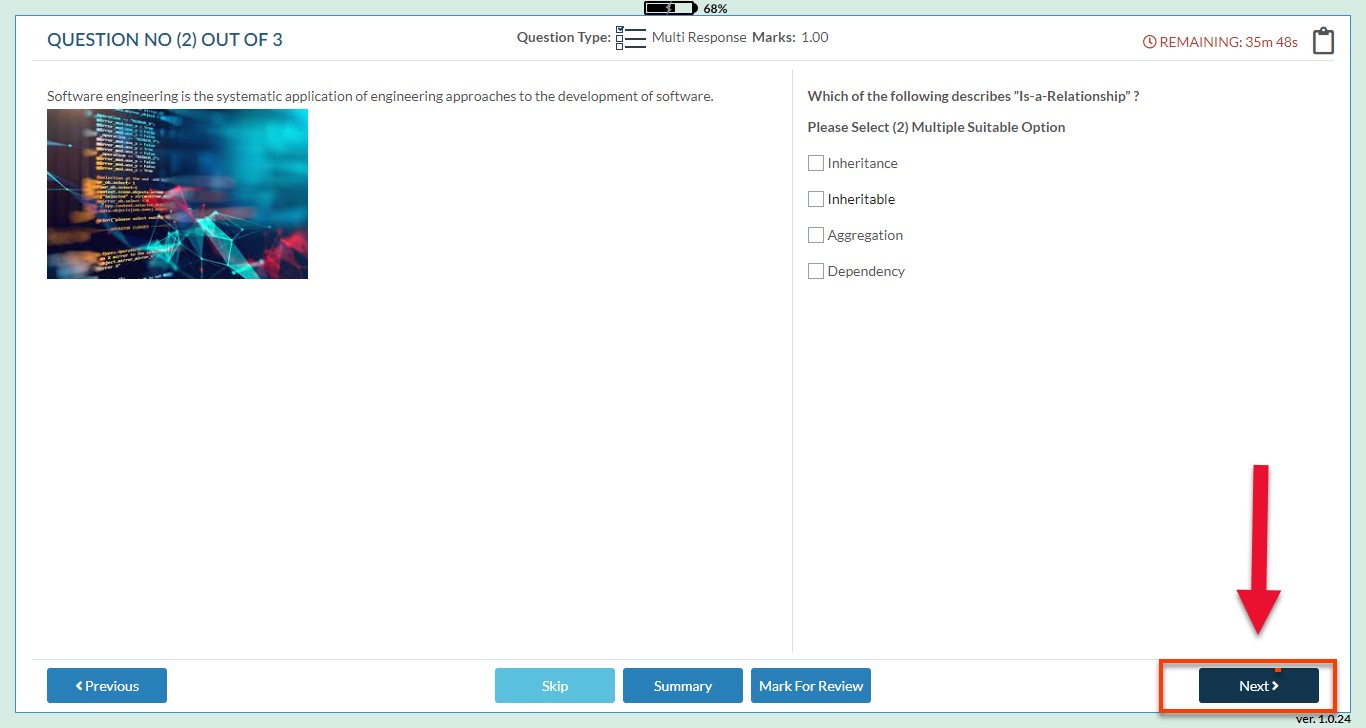
After solving your Question you can move toward the next Question by clicking on Next.
Facilities during exam conduction:
Skip: You can skip a question by clicking on it.
Summary: You can see a summary of your exam here.
Mark for review: You may mark a question for later review by clicking Mark for review and after that can check that question in Summary.
You can view your 1st question on below screen. Solve your question and click on “Next”.
Click on Next after solving your questions.
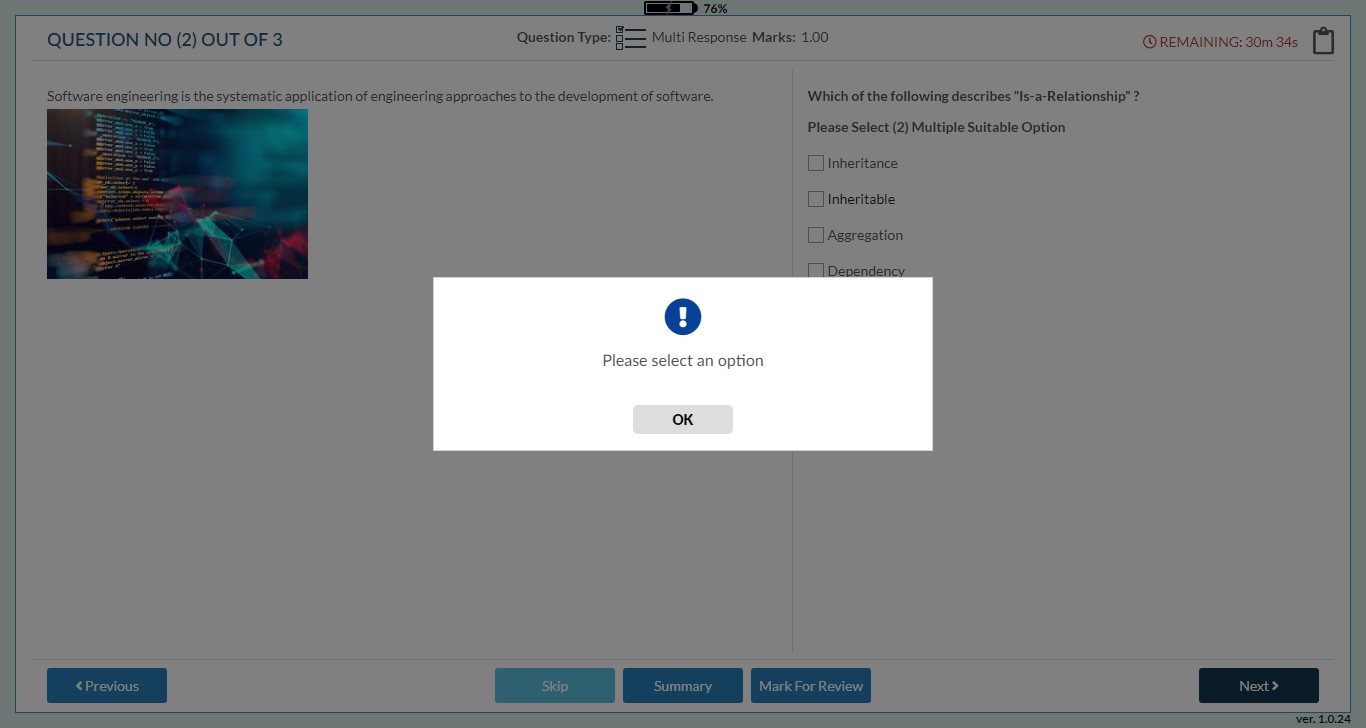
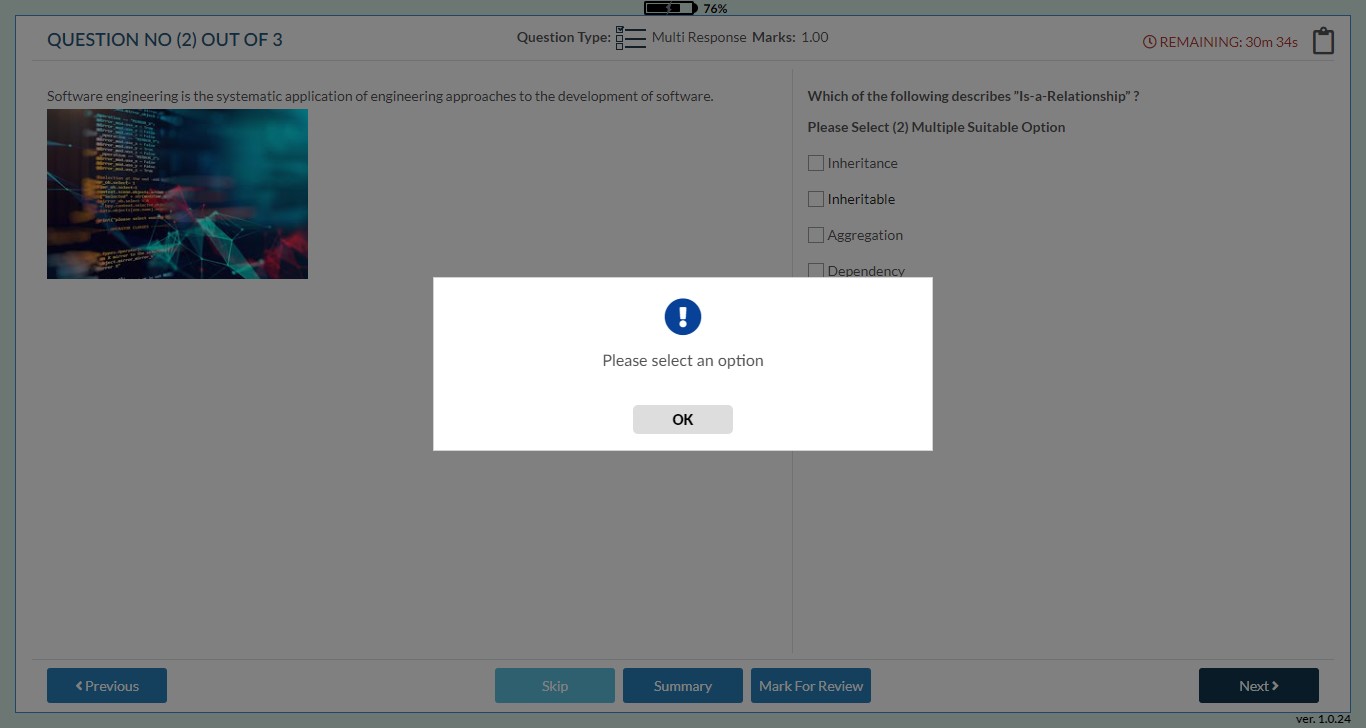
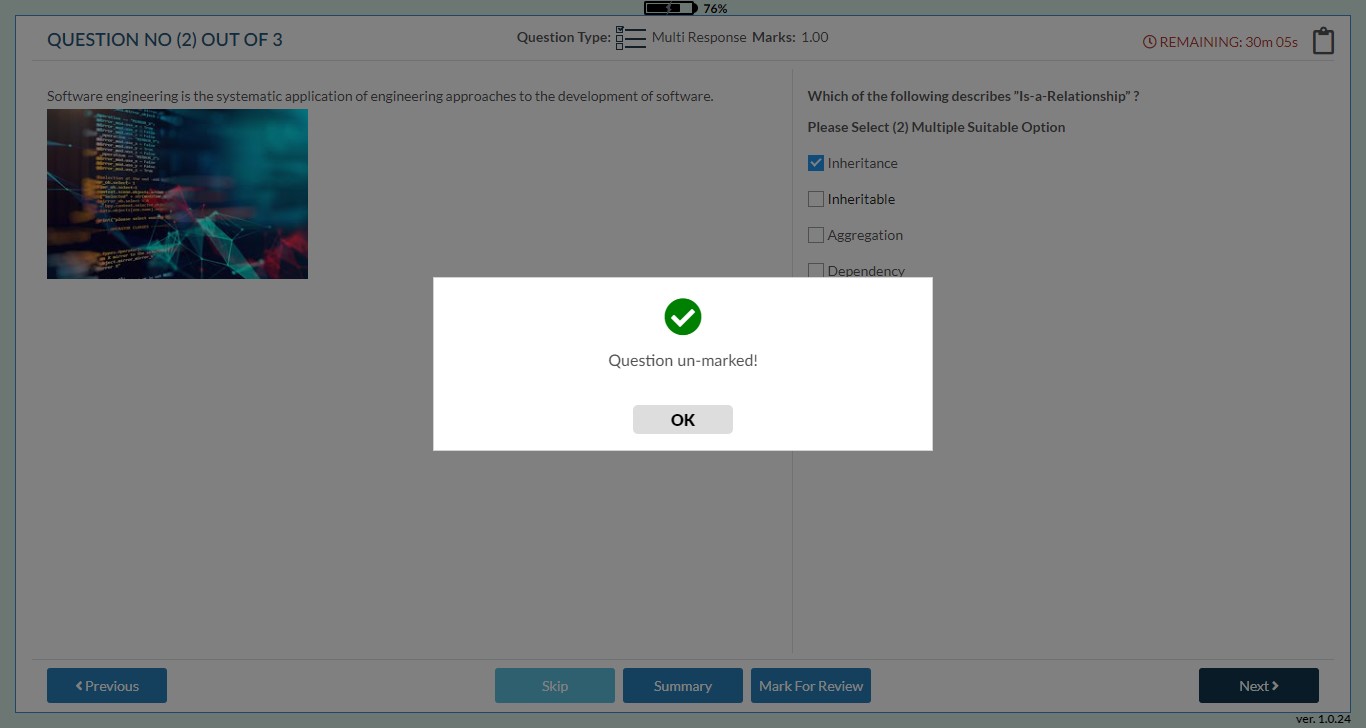
If you don’t solve the question and click on Next button, you will redirect with an error message like below that you won’t be able to proceed unless you select any options.
Skip Attempted Question:
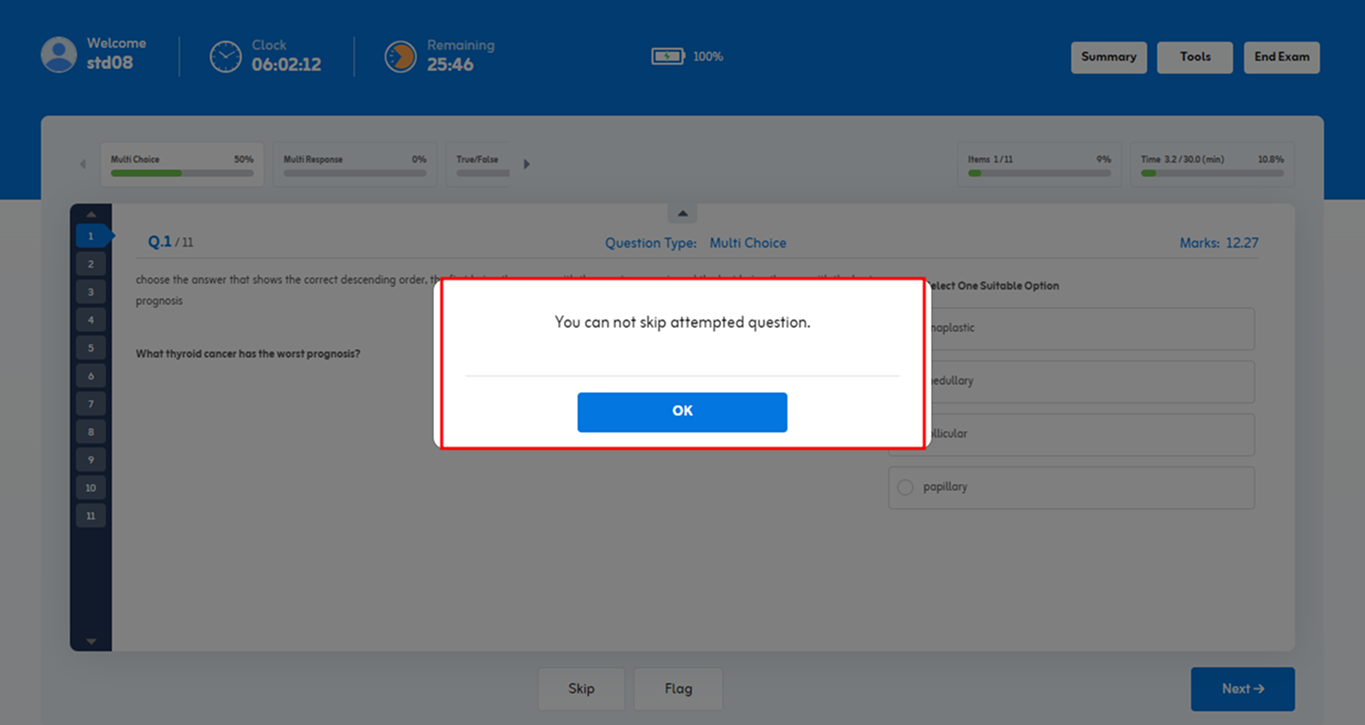
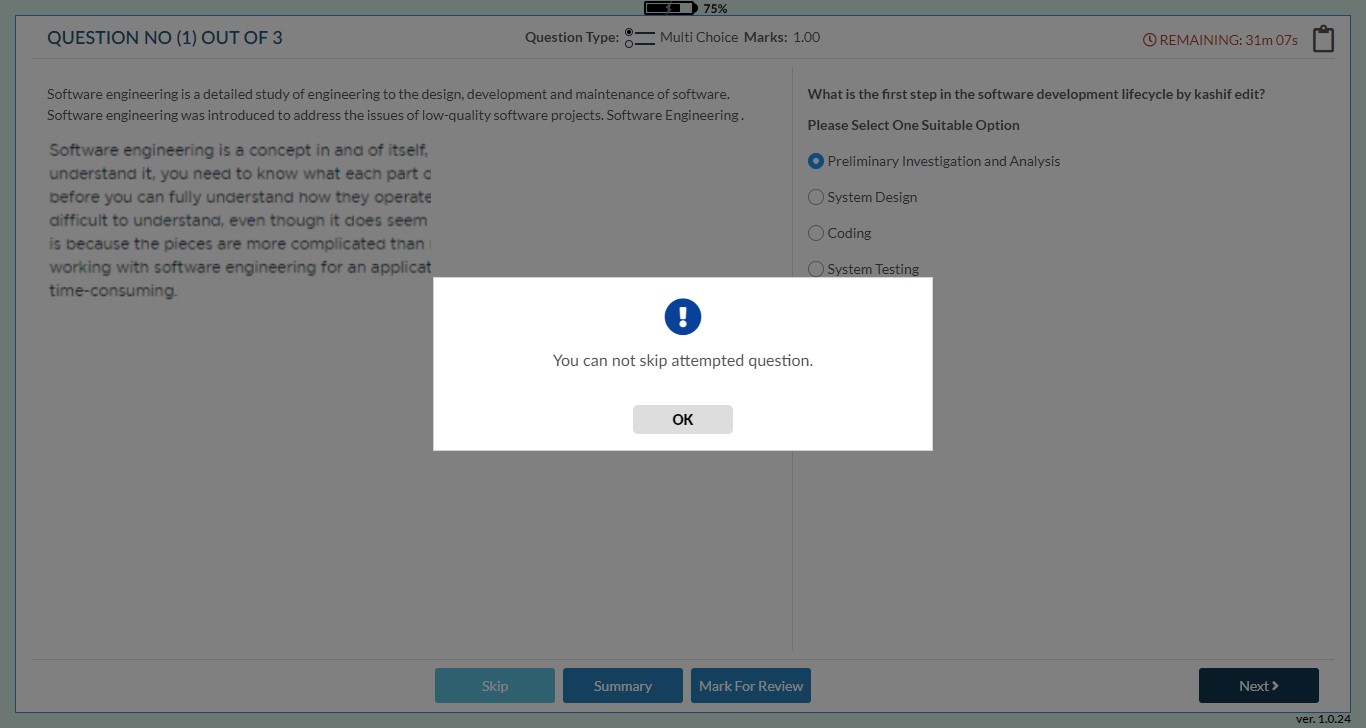
You cannot skip attempted question. Following error will appear in case user skip the attempted question.
Note: By clicking on an unsolved question, you can skip it; however, you cannot skip attempted questions.
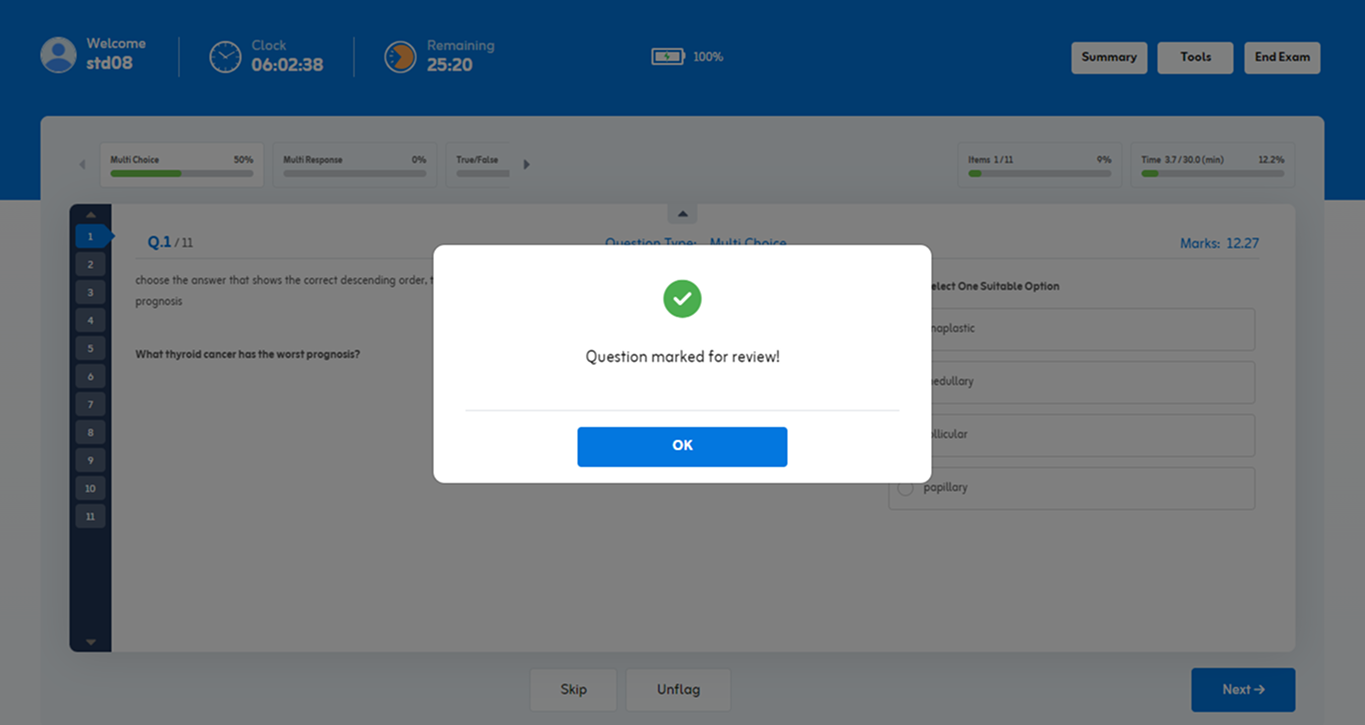
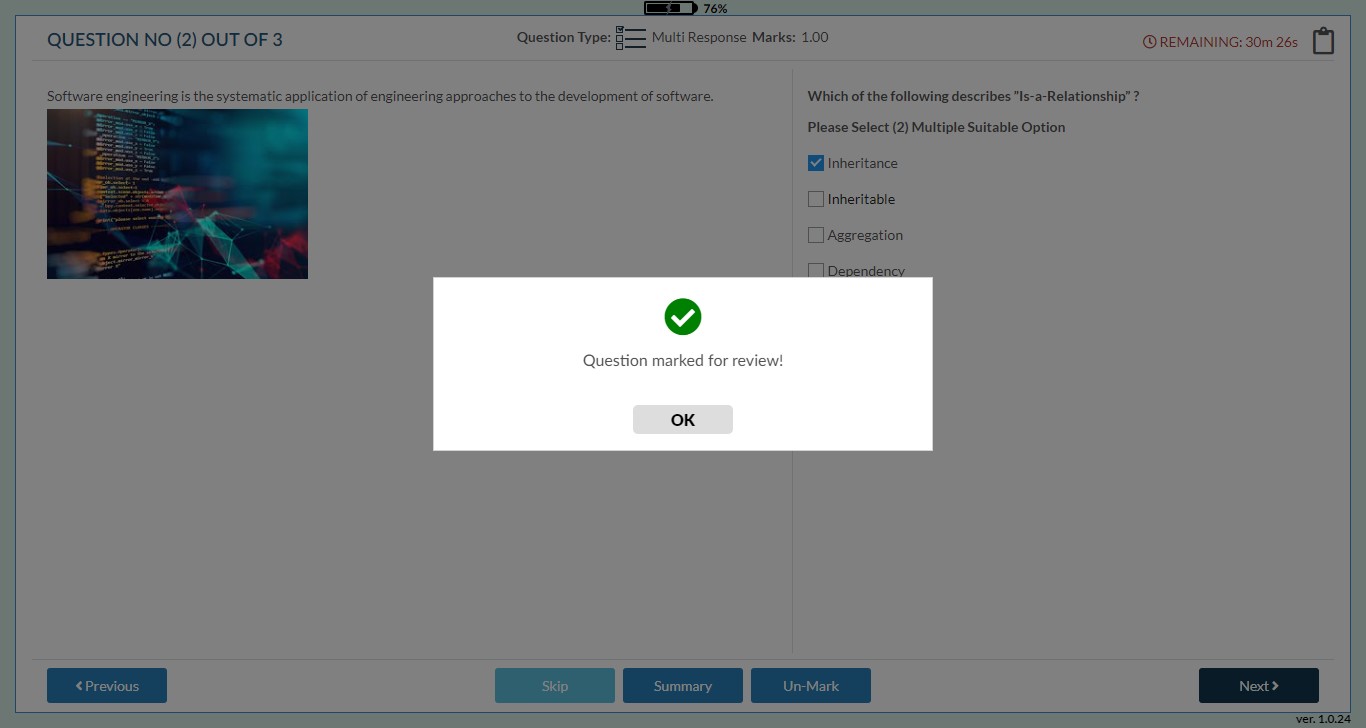
If you want to mark some question for review, You must select an option; otherwise, you can’t Mark that question for review.
By clicking on Mark for Review you can see the below message as Question marked for review.
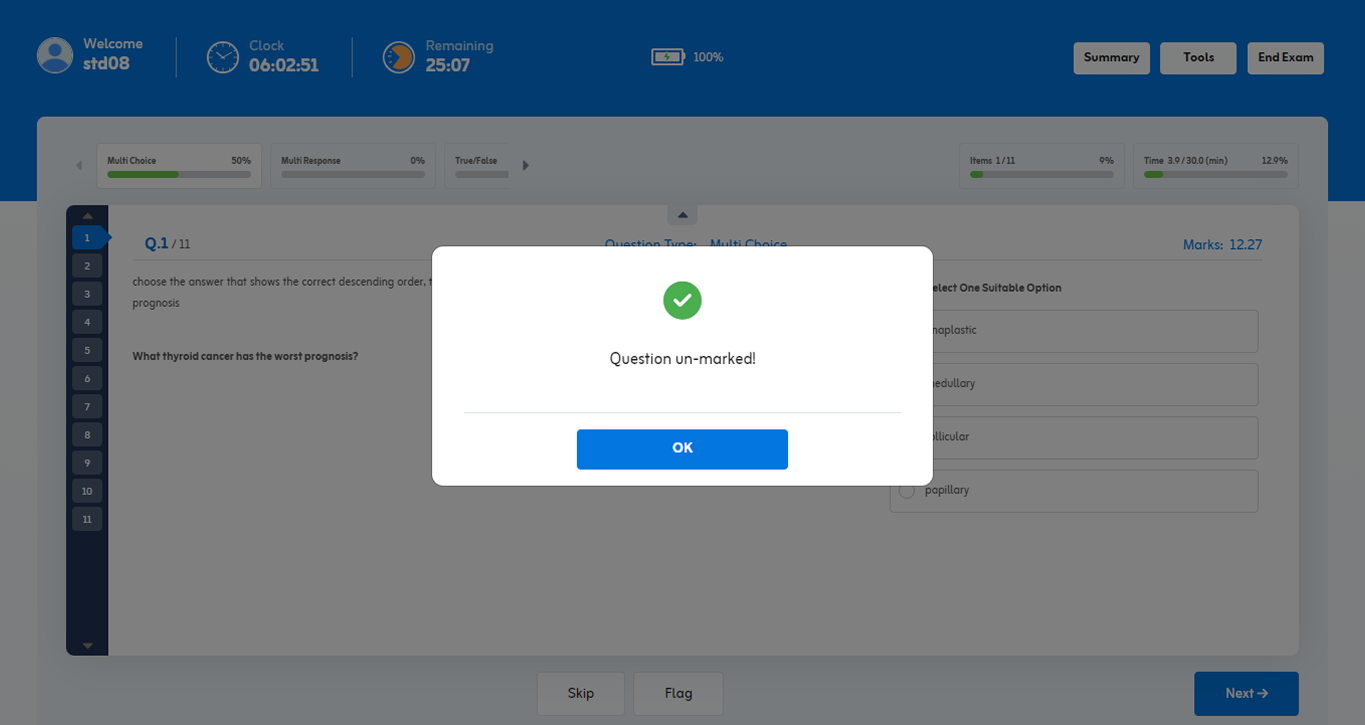
You can also unmark question for review if you don’t want to mark that question for review. By clicking on “Unmark” you will see following message.
Please click on the “Next’ button after solving question.
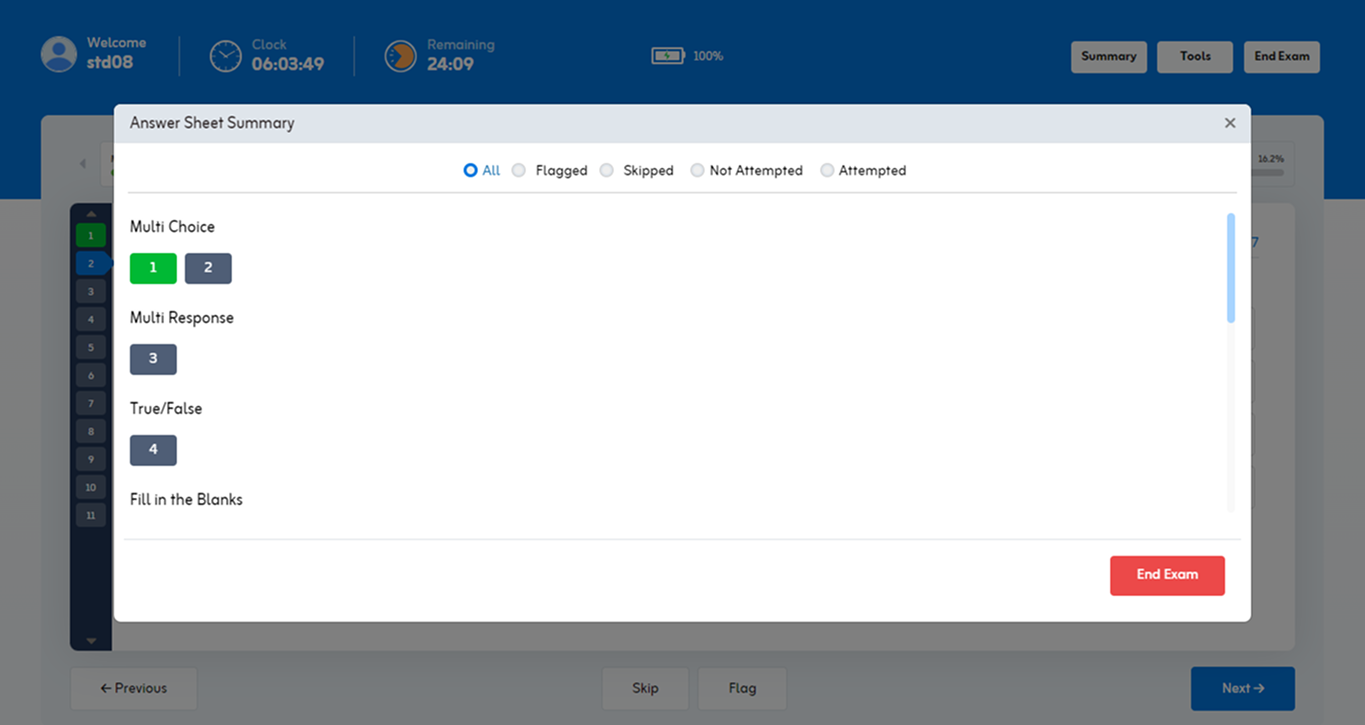
By clicking on “Next” after solving all questions, you will get a summary screen as one of the following.
The status of your exam questions is depicted by following colored boxes.
White box: All unanswered questions.
Green box: All attempted questions
Blue box: All skipped question
Red Box: All questions you mark for review.
End Exam: Click on End Exam button if you want to end your exam.
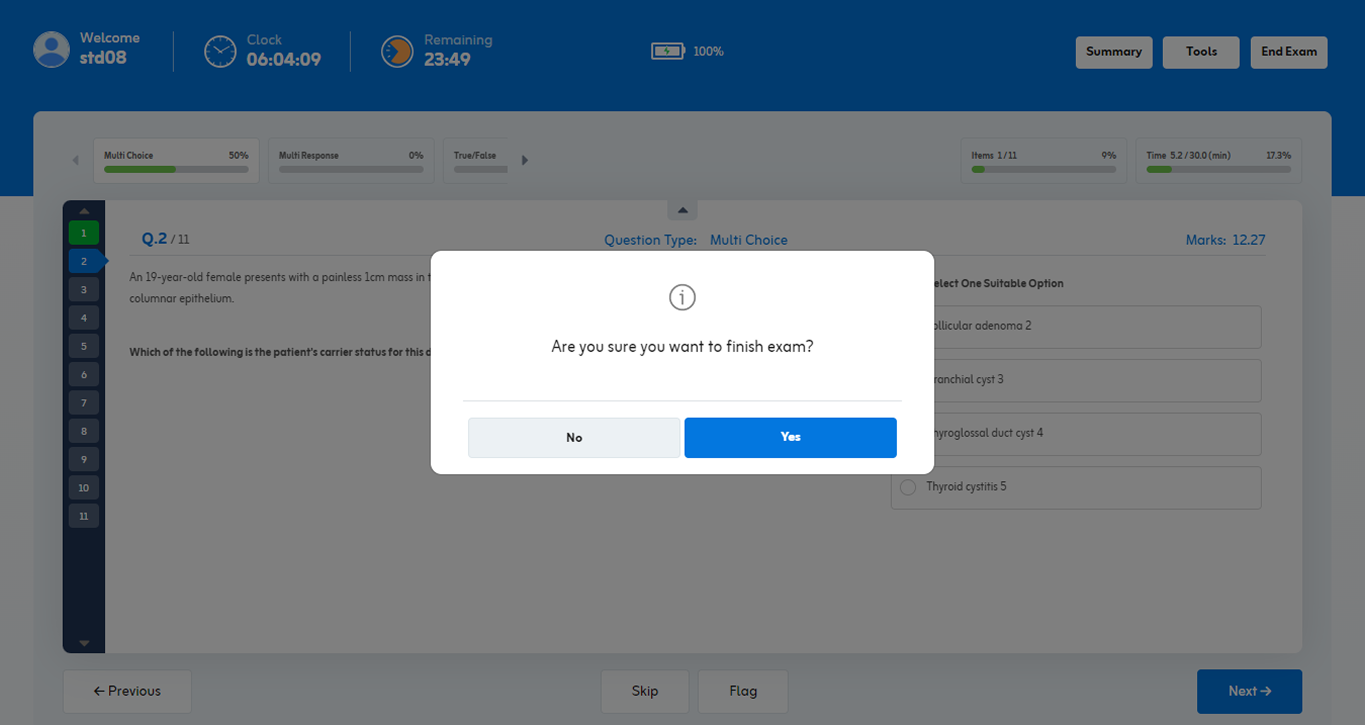
When you click the End Exam button, a confirmation popup will appear if any questions is skip or marked for review.
In case user didn’t skipped any question or marked for review, then user can view following confirmation message. Click “yes” to finish your exam.
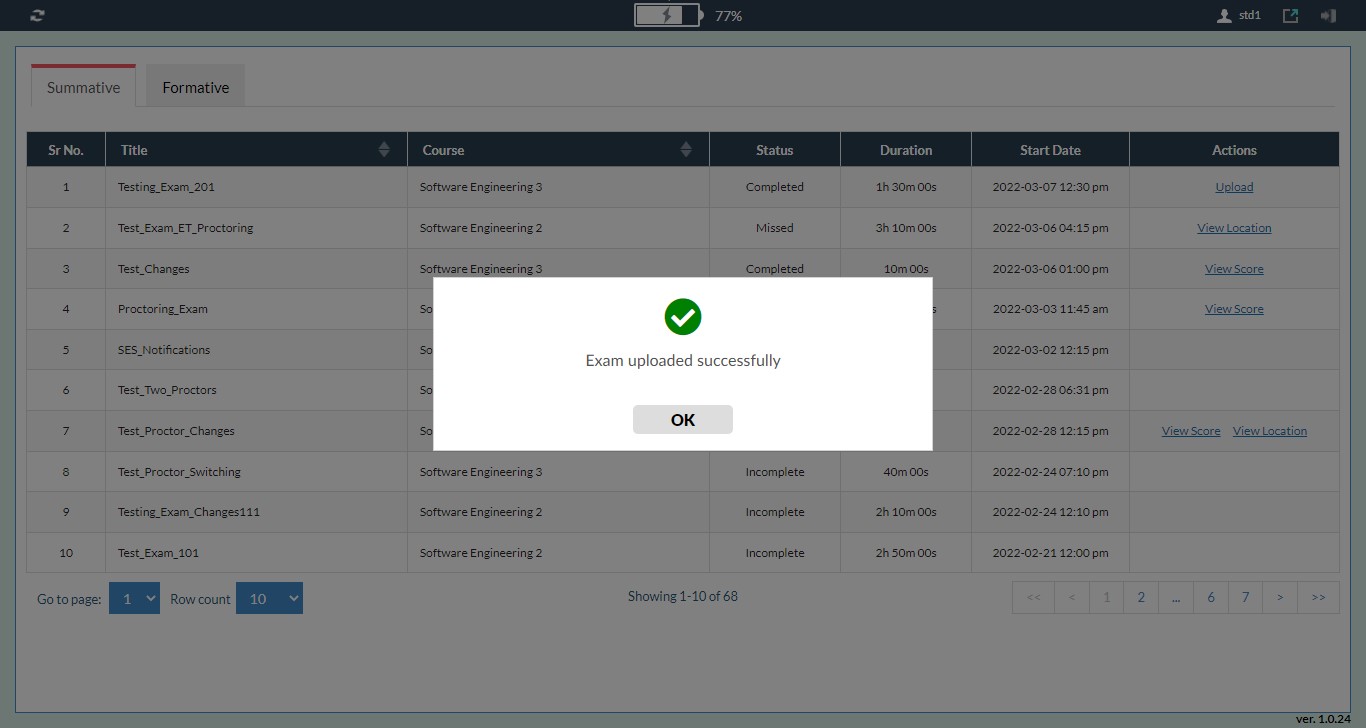
After clicking on Yes following popup will appear.
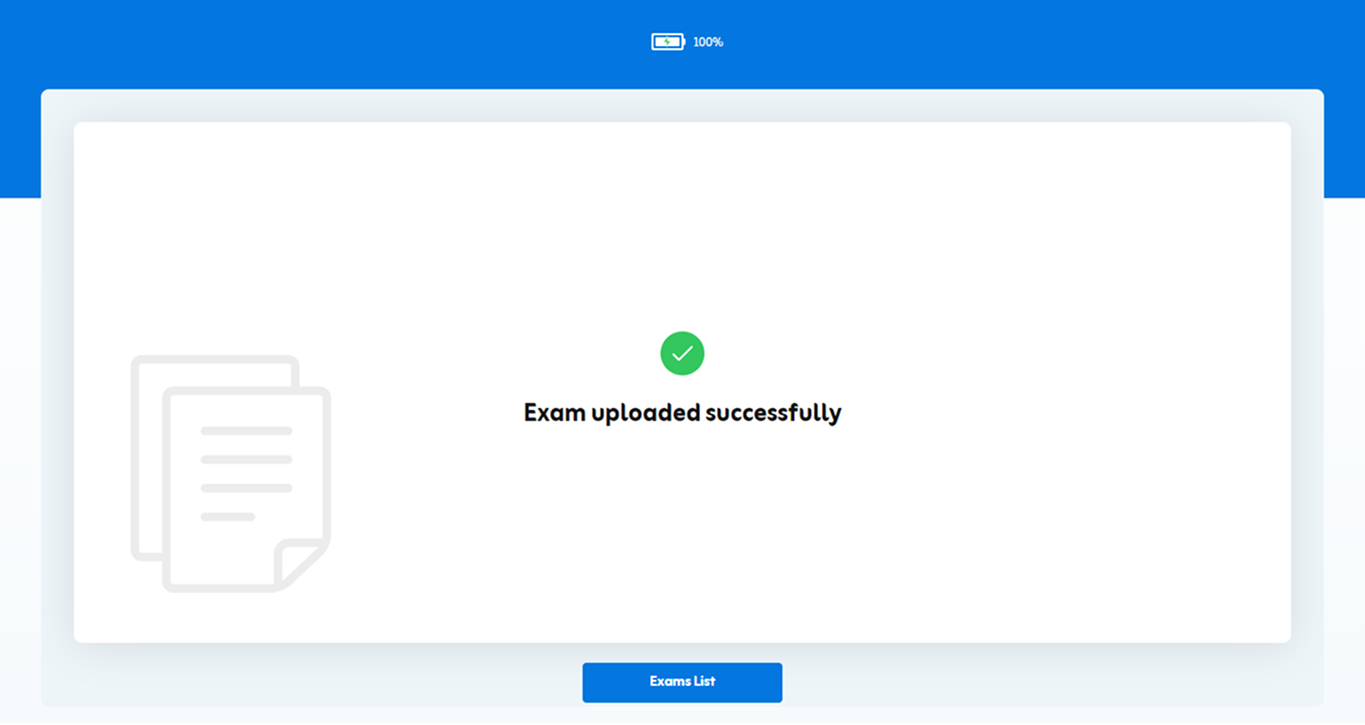
By clicking on OK your exam will be uploaded successfully.
Now you are redirected to the Exam listing page again.
You can get all the information you need about your exam right here.
To download QQ application for exam conduction, go to the QQ web portal.
Provide your credentials to log in to the web portal.
After successful login a popup will appear that provides links to download QQ assessment app on all available handheld devices.
There are two options to download the QQ Application for desktop.
- Desktop Application for windows
- Desktop Application for Mac
Download and install QQ Application for windows
- You can download (QQ) application as an Archive.
Simply click on the Downloaded QQ Setup.zip link to download zip file.
- You can also download the direct .exe file of application setup through QQSetup.exe link.
Now select the file you want to download. When you click on the desired link, the file will start to download.
Please wait till the QQ Assessment Application is downloaded.
You’ll find the QQ Assessment Application Setup archive file or .exe file setup in your “Download” folder once you’ve downloaded it.
Steps to Unzip the File:
Right click on the downloaded file, and then click on “Extract All” from the list.
Now you are on the below screen after clicking Extract All.
Please keep in mind that your file is extracted to the location specified in the extracted folder textbox; if necessary, you can change the current location to your preferred location.
Press the Extract button.
Please wait until the extraction is complete before proceeding.
After successful extraction, A new folder will be created automatically as QQSetup.
In the QQSetup folder, you can find “QQSetup” file.
Steps to Install QQ Application:
Double-click on “QQSetup.exe” to install.
A popup will appear. You must accept the application’s terms and conditions.
If you do not accept it, you will not be able to install the application.
- Click the check box to accept the terms and condition
- click the “Install” button to proceed.
Please wait until the installation is complete before proceeding. The installation takes several minutes.
Please click “Finish” button once the installation is complete
Before using QQ Application, you must restart your system. Select “Yes” to restart your system.
If you want to restart it later, select “No.”
On your desktop window, you can see your “QQ Application.”
To run QQ application right-click on it and select Run as Administrator.
You are now redirected to a popup that notifies you that you will be unable to access any other application while using the QQ Application.
Click “Yes” to continue with the QQ Application.
Please choose your university.
After choosing the university, you are now redirected to the Sign In screen.
Please enter your valid Username and Password in the given input fields and click on the “Sign in” button.
After successful authentication, you are now redirected to the Exam listing page.
On the above screen, students are able to access tabs based on two types of exams.
- Summative
- Formative
The list of exams shows the following information related to each exam:
Title
Students can see the title of their exam in this column.
Course name
Students can see their course against that specific exam.
Status
Students can see the status of their exams. Status can be;
- Available: When your exam is available against any course, you can click the “Downloaded” option to download your exam.
- Uploaded: This status will appear when a student has conducted his/her Exam successfully and uploaded from same system.
- Completed: When you successfully attempt the exam, finish the exam, and upload the exam, you will see this status.
- Incomplete: If you download the exam and begin to attempt it, but unable to complete it due to any technical difficulties, you will encounter this status.
- Missed: When a student does not take any action against the exam.
Duration:
You can see your exam duration in hours, minutes, and seconds.
Date and time
You can see your exam start date and duration in this column.
Actions can be:
- Download: By clicking this link you can download your exam
- Attempt: You can attempt your exam by clicking on this link after downloading exam.
- View score: You can see your score by clicking on this link, once you finish your exam and exam has been uploaded successfully.
- View Location: By clicking on this link, students can see their exam location, which may include the city, university, building, and hall.
The following screen appears at the time of Exam Downloading.
Please wait while your exam is being downloaded.
Click “OK” when your exam is downloaded successfully.
Once your exam is downloaded, the Attempt link will appear against that downloaded exam.
After clicking on the Attempt link, the student will be redirected to the Identity Images screen.
On this screen, you will get the following details:
- You’re Exam Name
- Exam Duration
- Remaining Exam Time
- Exam Language
- “Exit” Button (If you click on it you will be redirected to exam listing screen.)
- Exam remaining join time information
Three tabs as:
- Step1: Provide your face snapshot
- Step2: Take a snapshot of ID card
- Step3: Start exam
Step1: Provide your face snapshot.
In this tab, you need to provide your face image.
By clicking capture your face, you will be able to capture and upload a picture of yourself.
Please follow the below instruction to take a picture:
- Your face must be clear while taking your picture.
- There shouldn’t be any light behind you while capturing the picture.
- Your internet connection should work properly.
In the case of blur picture, you can retake your picture by clicking on the retake icon.
After successfully taking your picture, click on the “Next” button.
You can skip the identity picture in case of your supervisor allowed you to skip it.
Click on the “Take Snapshot of ID Card” to add your ID card picture.
Note: Please keep in mind that your ID card picture must be clear, like shown in the screen.
After successfully adding your ID card, click on Next.
By clicking on the Next button you are now redirected to the exam instruction page.
Please read all instructions carefully before starting your exam. and click on Start Exam.
Now you are redirected to the exam screen where you can view following details.
- Questions in detail
- Remaining time on exam conduction screen during attempting exam.
After solving your Question you can move toward the next Question by clicking on Next.
Facilities during exam conduction:
Skip: You can skip a question by clicking on it.
Summary: You can see a summary of your exam here.
Mark for review: You may mark a question for later review by clicking Mark for review and after that can check that question in Summary.
You can view your 1st question on below screen. Solve your question and click on “Next”.
Click on Next after solving your questions.
If you don’t solve the question and click on Next button, you will redirect with an error message like below that you won’t be able to proceed unless you select any options.
Skip Attempted Question:
You cannot skip attempted question. Following error will appear in case user skip the attempted question.
Note: By clicking on an unsolved question, you can skip it; however, you cannot skip attempted questions.
Question Marked for Review:
If you want to mark some question for review, You must select an option; otherwise, you can’t Mark that question for review.
By clicking on Mark for Review you can see the below message as Question marked for review.
You can also unmark question for review if you don’t want to mark that question for review. By clicking on “Unmark” you will see following message.
Please click on the “Next’ button after solving question.

By clicking on “Next” after solving all questions, you will get a summary screen as one of the following.
The status of your exam questions is depicted by following colored boxes.
White box: All unanswered questions.
Green box: All attempted questions
Blue box: All skipped question
Red Box: All questions you mark for review.
End Exam: Click on End Exam button if you want to end your exam.

When you click the End Exam button, a confirmation popup will appear if any questions is skip or marked for review.

In case user didn’t skipped any question or marked for review, then user can view following confirmation message. Click “yes” to finish your exam.

After clicking on Yes following popup will appear.
By clicking on OK your exam will be uploaded successfully.
Now you are redirected to the Exam listing page again.
You can get all the information you need about your exam right here.
How can we help?
A premium WordPress theme with an integrated Knowledge Base,
providing 24/7 community-based support.


